Integrating OIDC Authentication with Microsoft Entra in AWS EKS
In modern cloud environments, secure and efficient access management is essential, especially for platforms like Amazon EKS. This blog will guide you through integrating OpenID Connect (OIDC) authentication using Microsoft Entra, making it easier to manage access to your EKS clusters and KubeRocketCI Portal. By implementing this approach, you can simplify user authentication while ensuring strong security controls. Whether you're improving compliance or streamlining access for your team, this integration is a practical solution to enhance your cloud-native workflows.
Prerequisites
Before you begin, ensure you have the following:
- Access to the Microsoft Entra Admin Center with administrative privileges.
- A running AWS EKS cluster with the necessary permissions for access and management.
- The kubelogin plugin installed for authenticating to the EKS cluster using OIDC.
- The kubectl CLI tool installed.
- The aws cli tool installed.
Understanding SSO, OIDC, and Microsoft Entra
In the context of enhancing digital security and user experience, we prioritize the integration of three key elements: Single Sign-On (SSO), OpenID Connect (OIDC), and Microsoft Entra. Here’s how they connect:
-
Single Sign-On (SSO) serves as the foundation, enabling users to access multiple applications with one set of login credentials, significantly simplifying the authentication process.
-
OpenID Connect (OIDC) builds on the SSO framework by providing an authentication layer, which uses straightforward identity verification to ensure secure and seamless access across services.
-
Microsoft Entra (formerly known as Azure Active Directory) is Microsoft's comprehensive identity and access management solution. It supports the implementation of both Single Sign-On (SSO) and OpenID Connect (OIDC), enabling organizations to securely manage user identities and enforce access controls. With its reliable set of tools, Microsoft Entra simplifies authentication, enhances security, and ensures seamless access to applications and services, making it an essential platform for modern identity management.
Together, these technologies streamline the login process, reinforce security, and enhance the user experience by allowing secure, seamless navigation across our digital ecosystem.
Microsoft Entra Overview
Microsoft Entra, formerly known as Azure Active Directory (Azure AD), is a modern identity and access management solution designed for secure access to applications and services. It provides features like Single Sign-On (SSO), identity federation, and seamless integration with on-premises directories such as LDAP and Active Directory. Microsoft Entra supports industry-standard protocols, including OpenID Connect (OIDC), OAuth 2.0, and Security Assertion Markup Language (SAML) 2.0, making it a versatile solution for managing user identities. By leveraging Microsoft Entra, organizations can enhance security, simplify user access, and avoid the complexities of building identity management features from scratch. For more details, see the Microsoft Entra official documentation.
Create a new Microsoft Entra Tenant
To get started with Microsoft Entra, you need to create a new tenant in the Microsoft Entra Admin Center. Follow these steps:
-
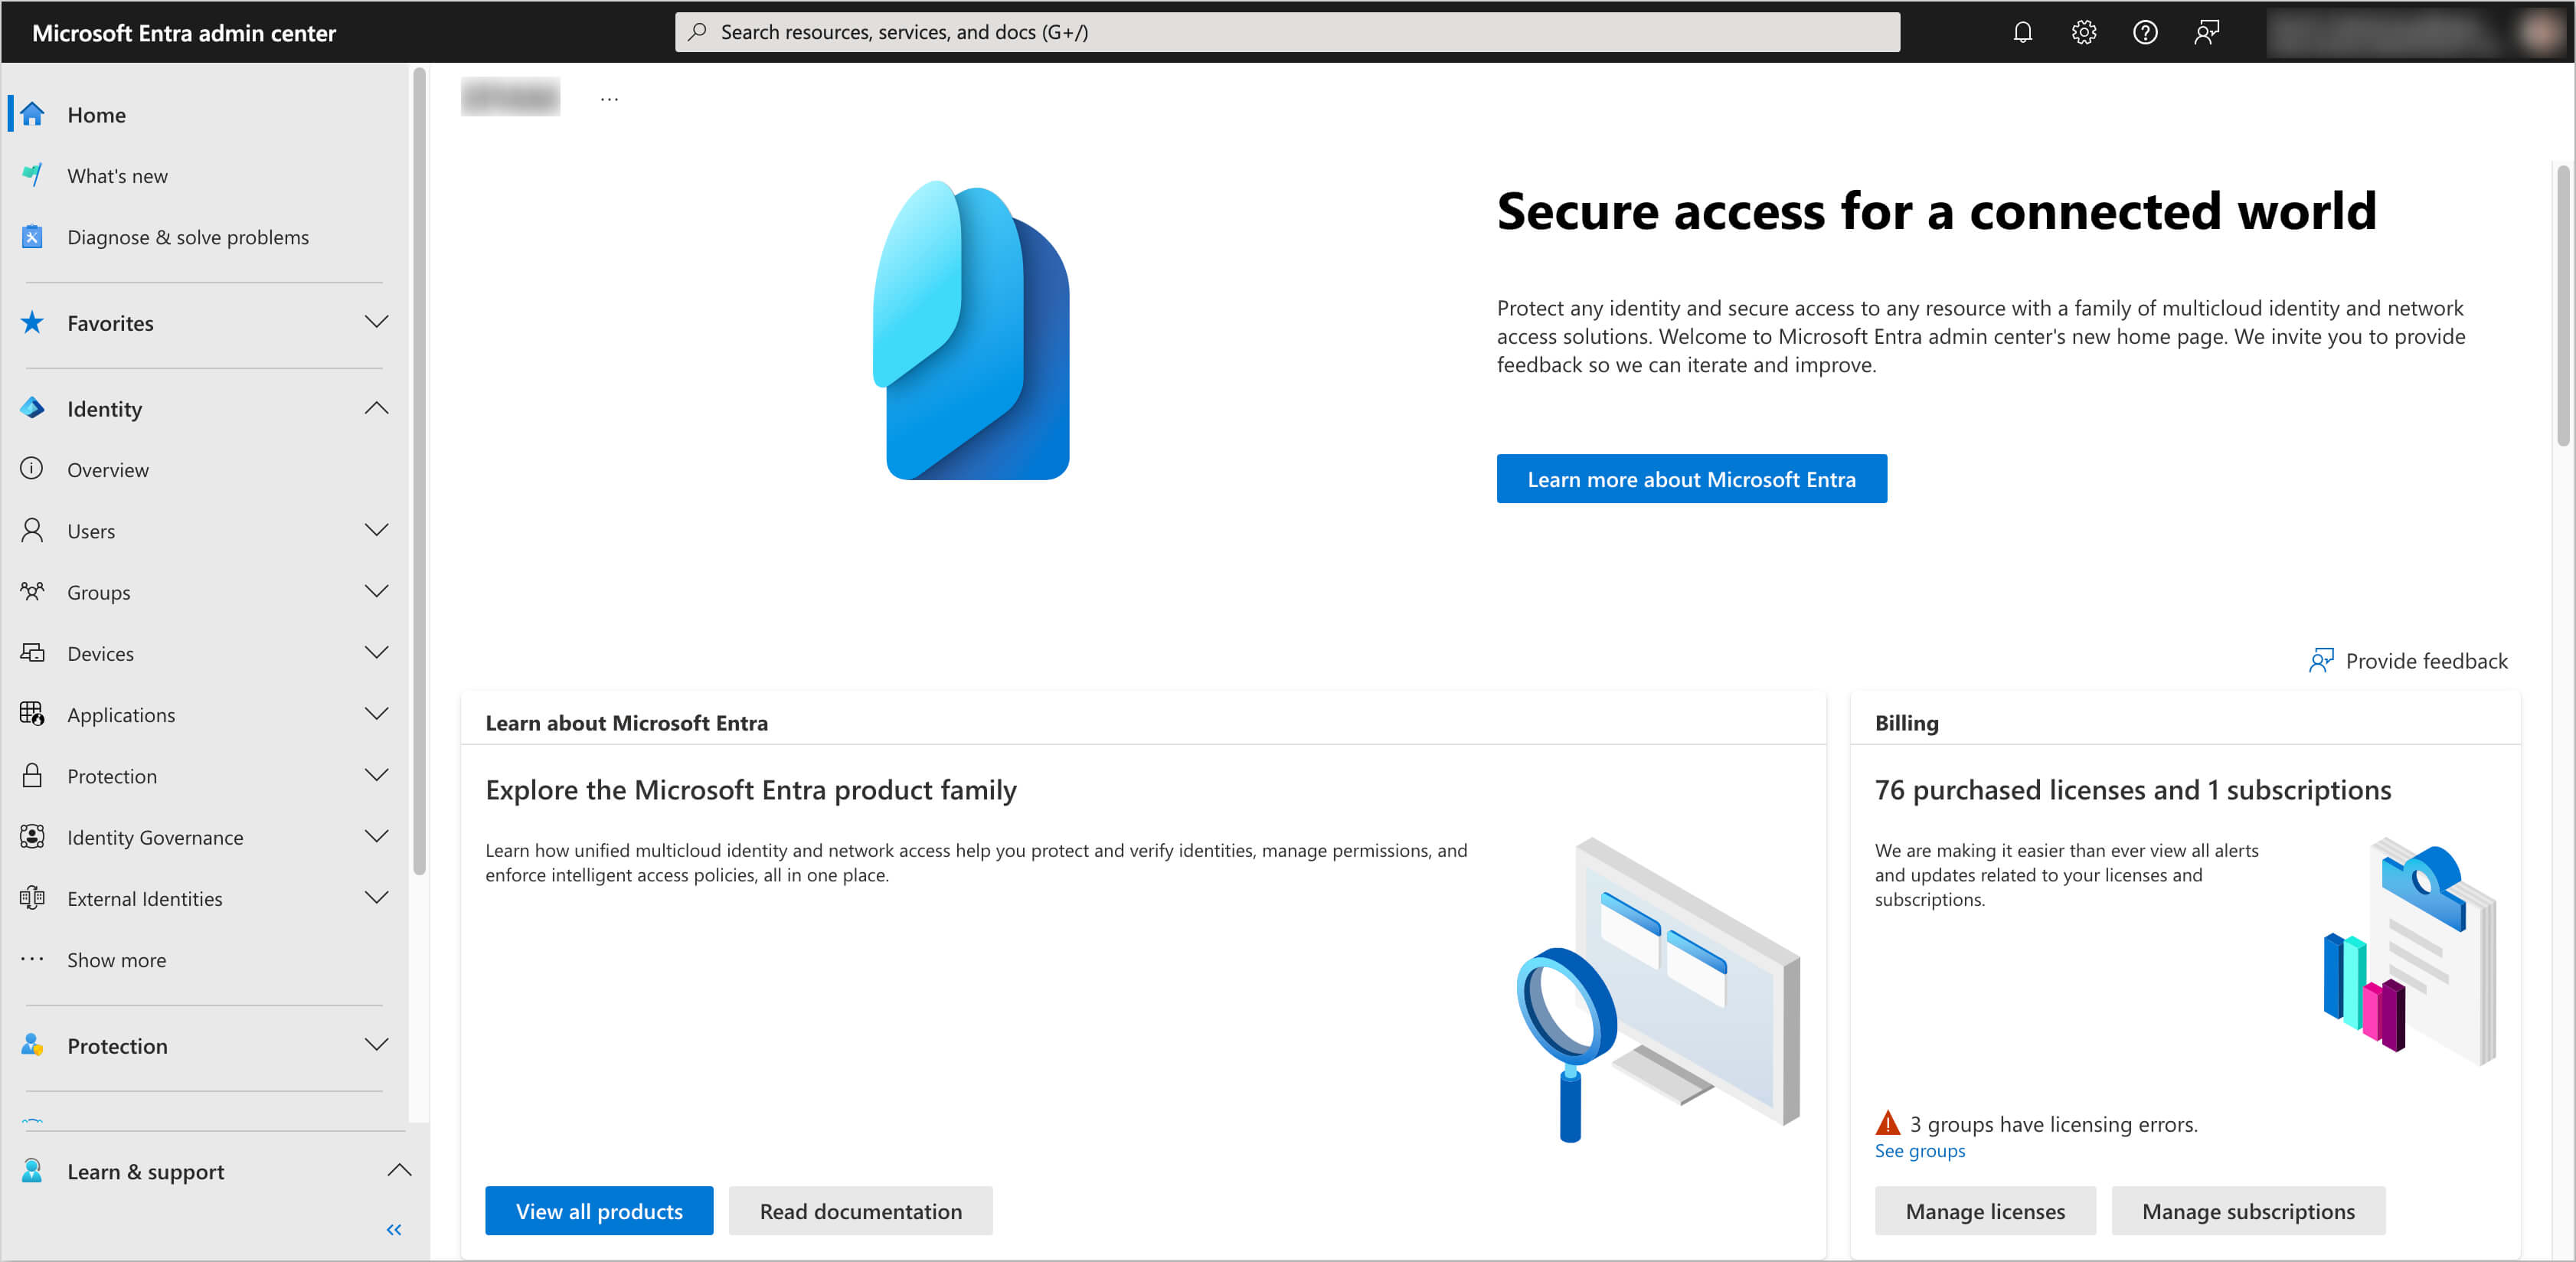
Log in to the Microsoft Entra Admin Center using your Microsoft account.
-
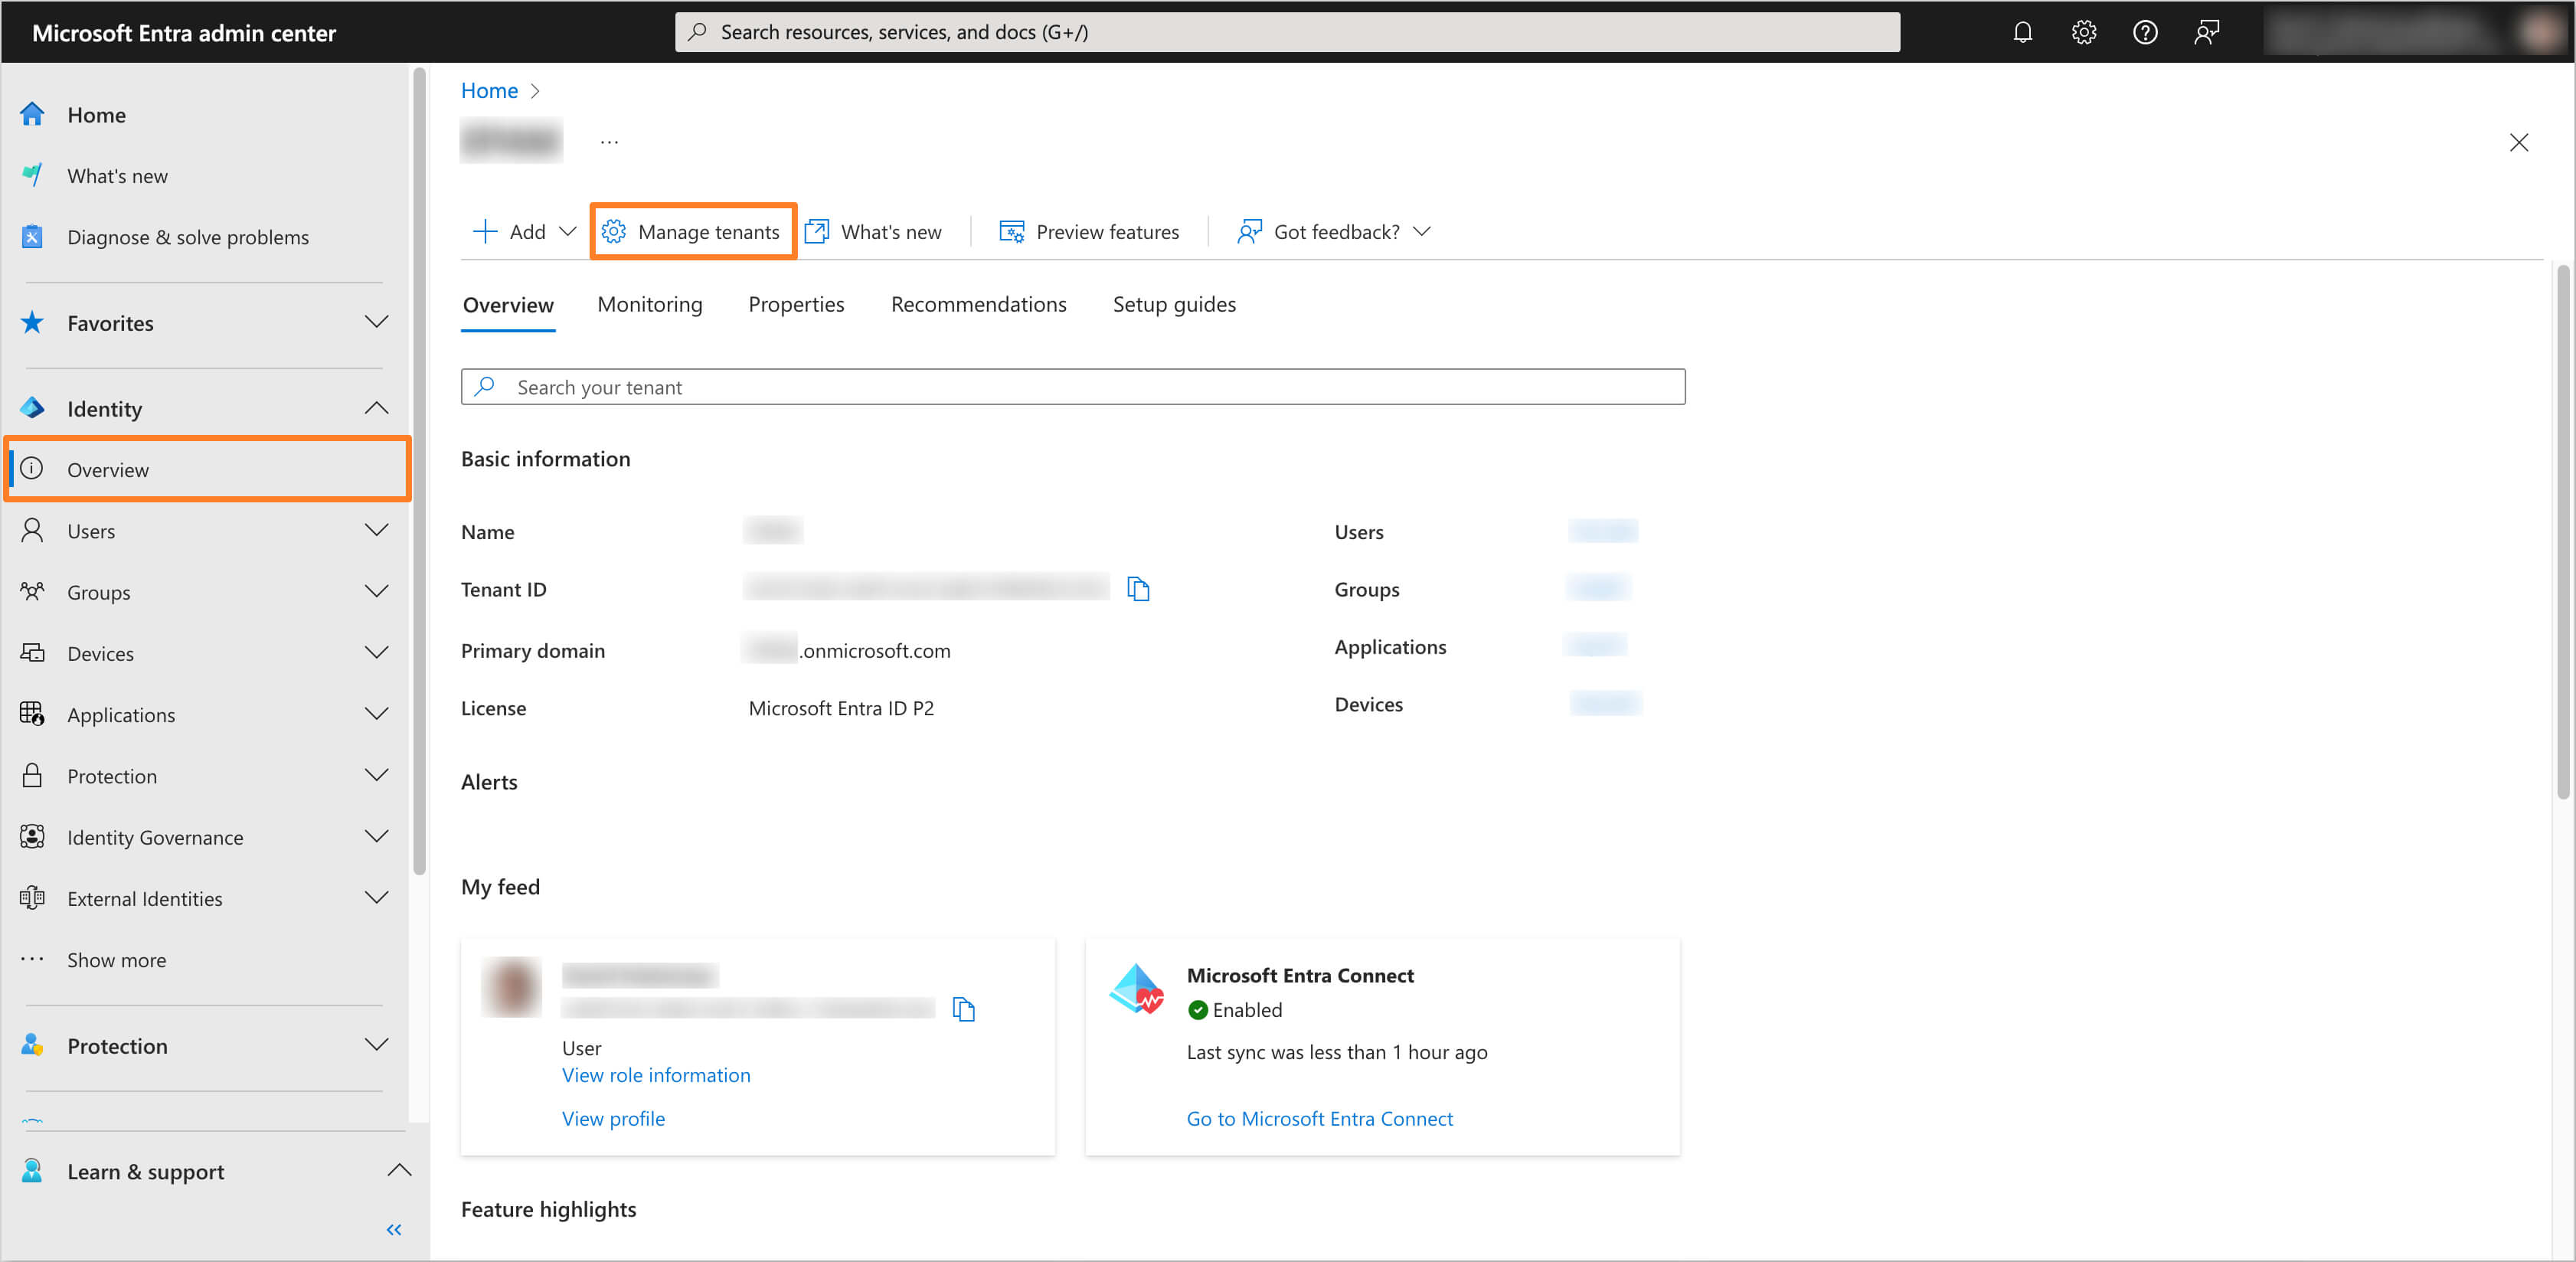
In the left sidebar menu, select Overview section and then navigate to Manage tenants tab.
-
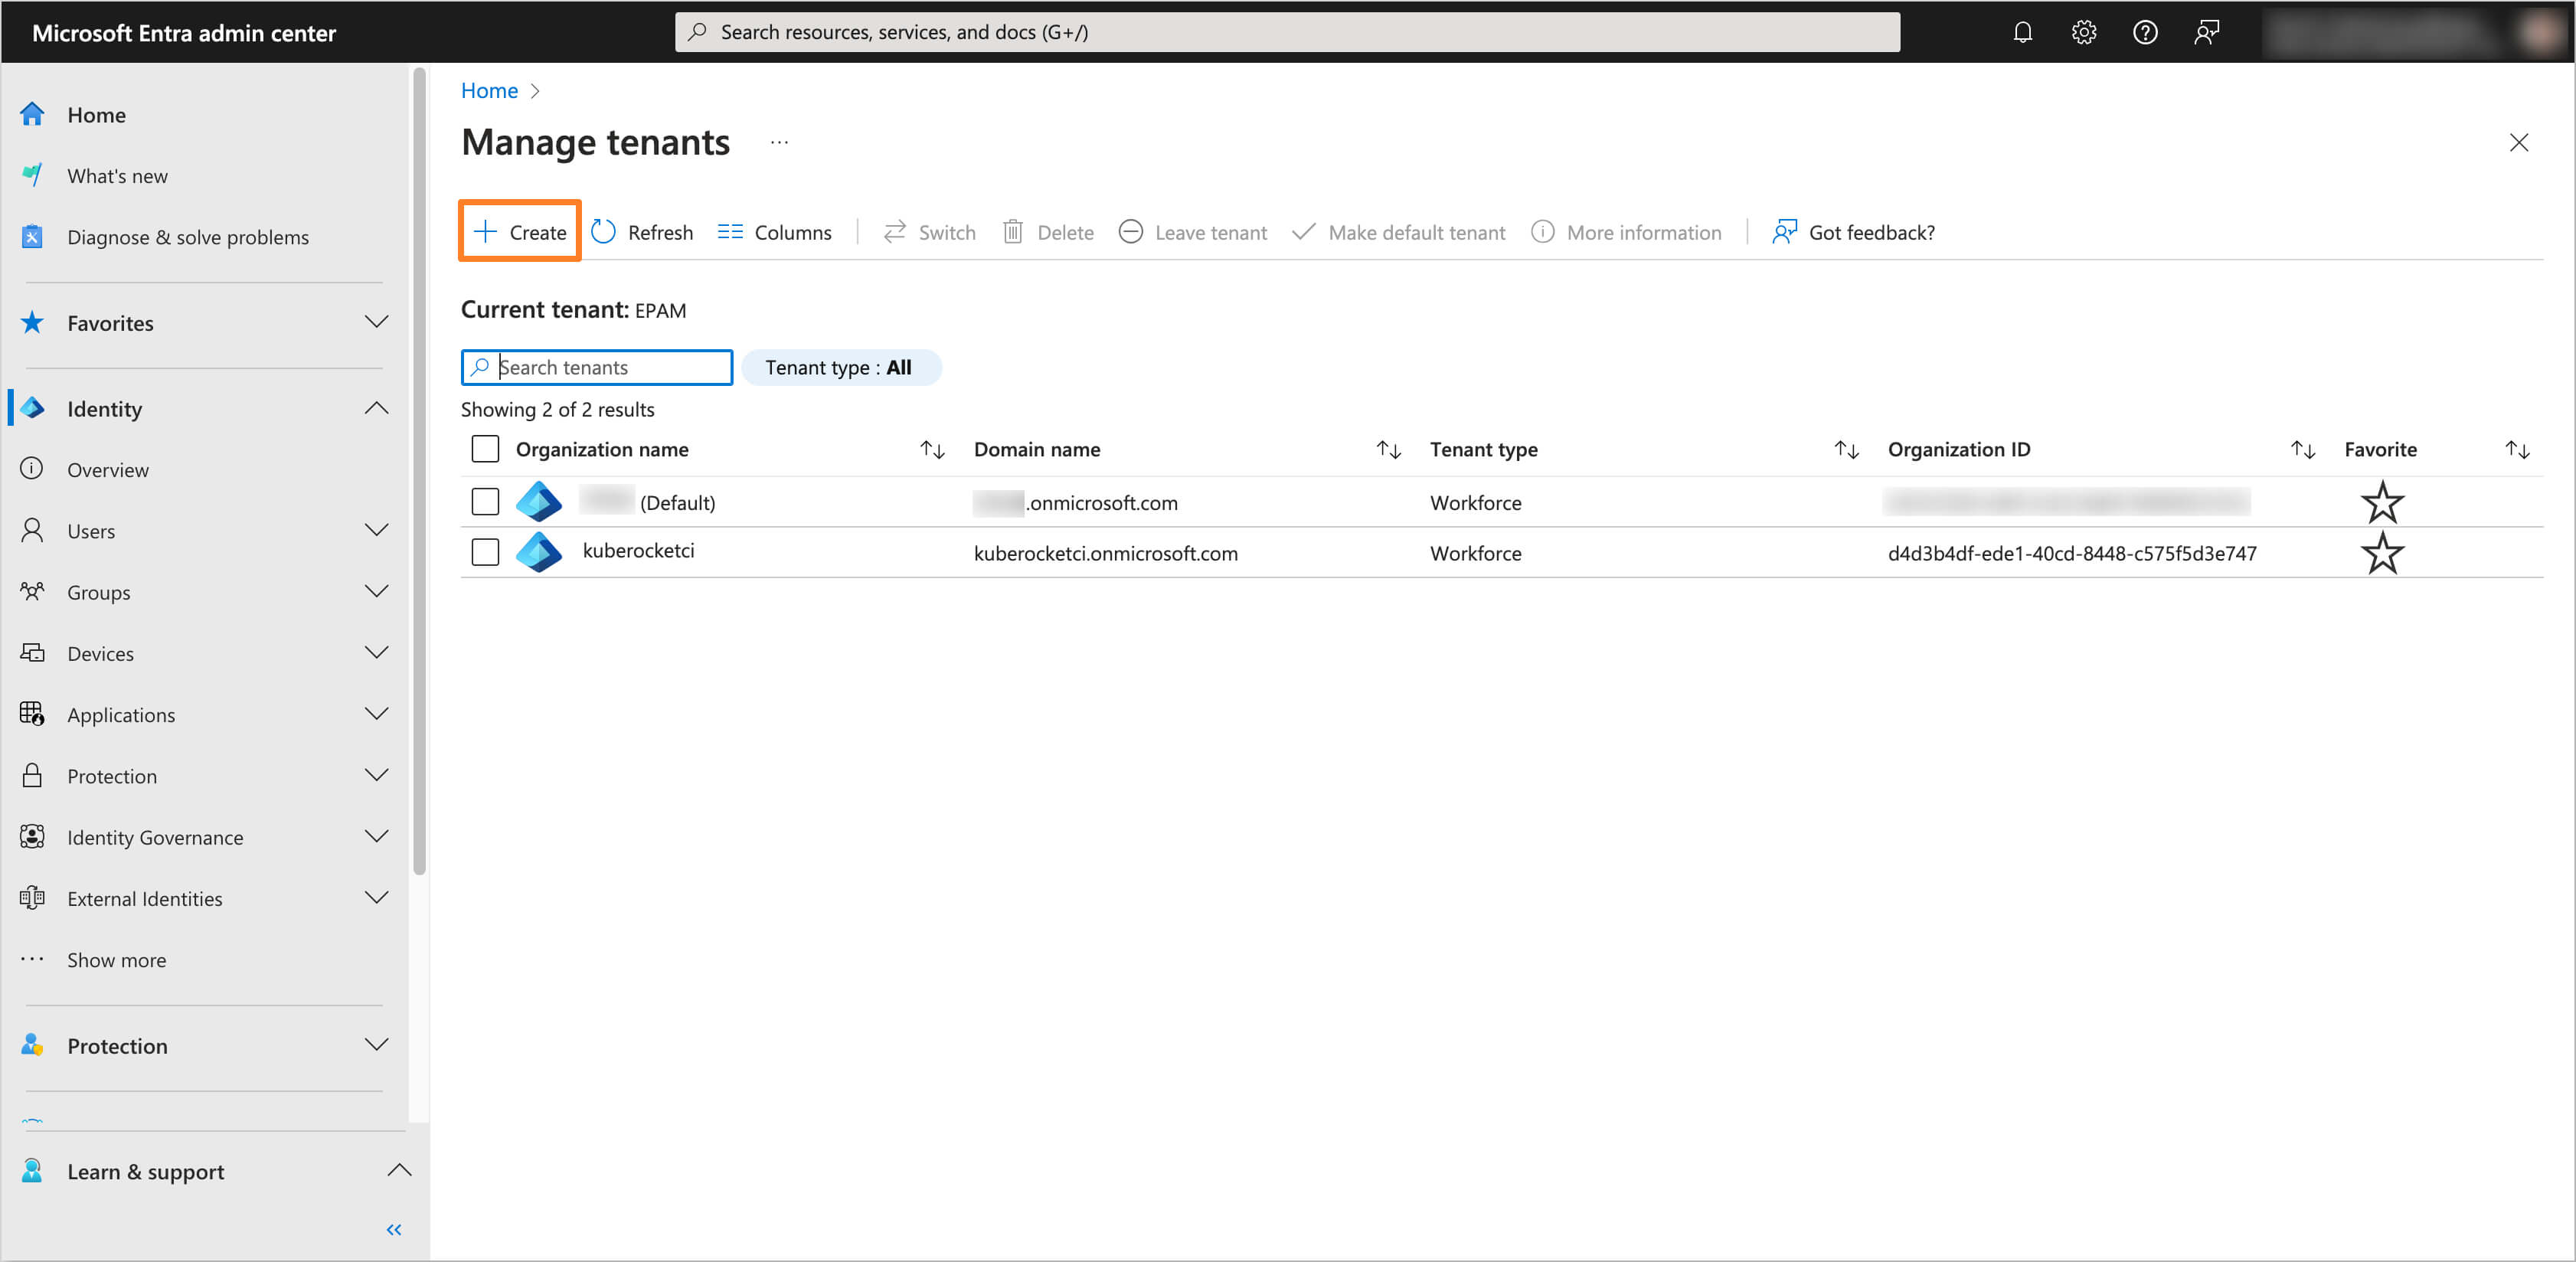
Click on Create button to create a new tenant.
-
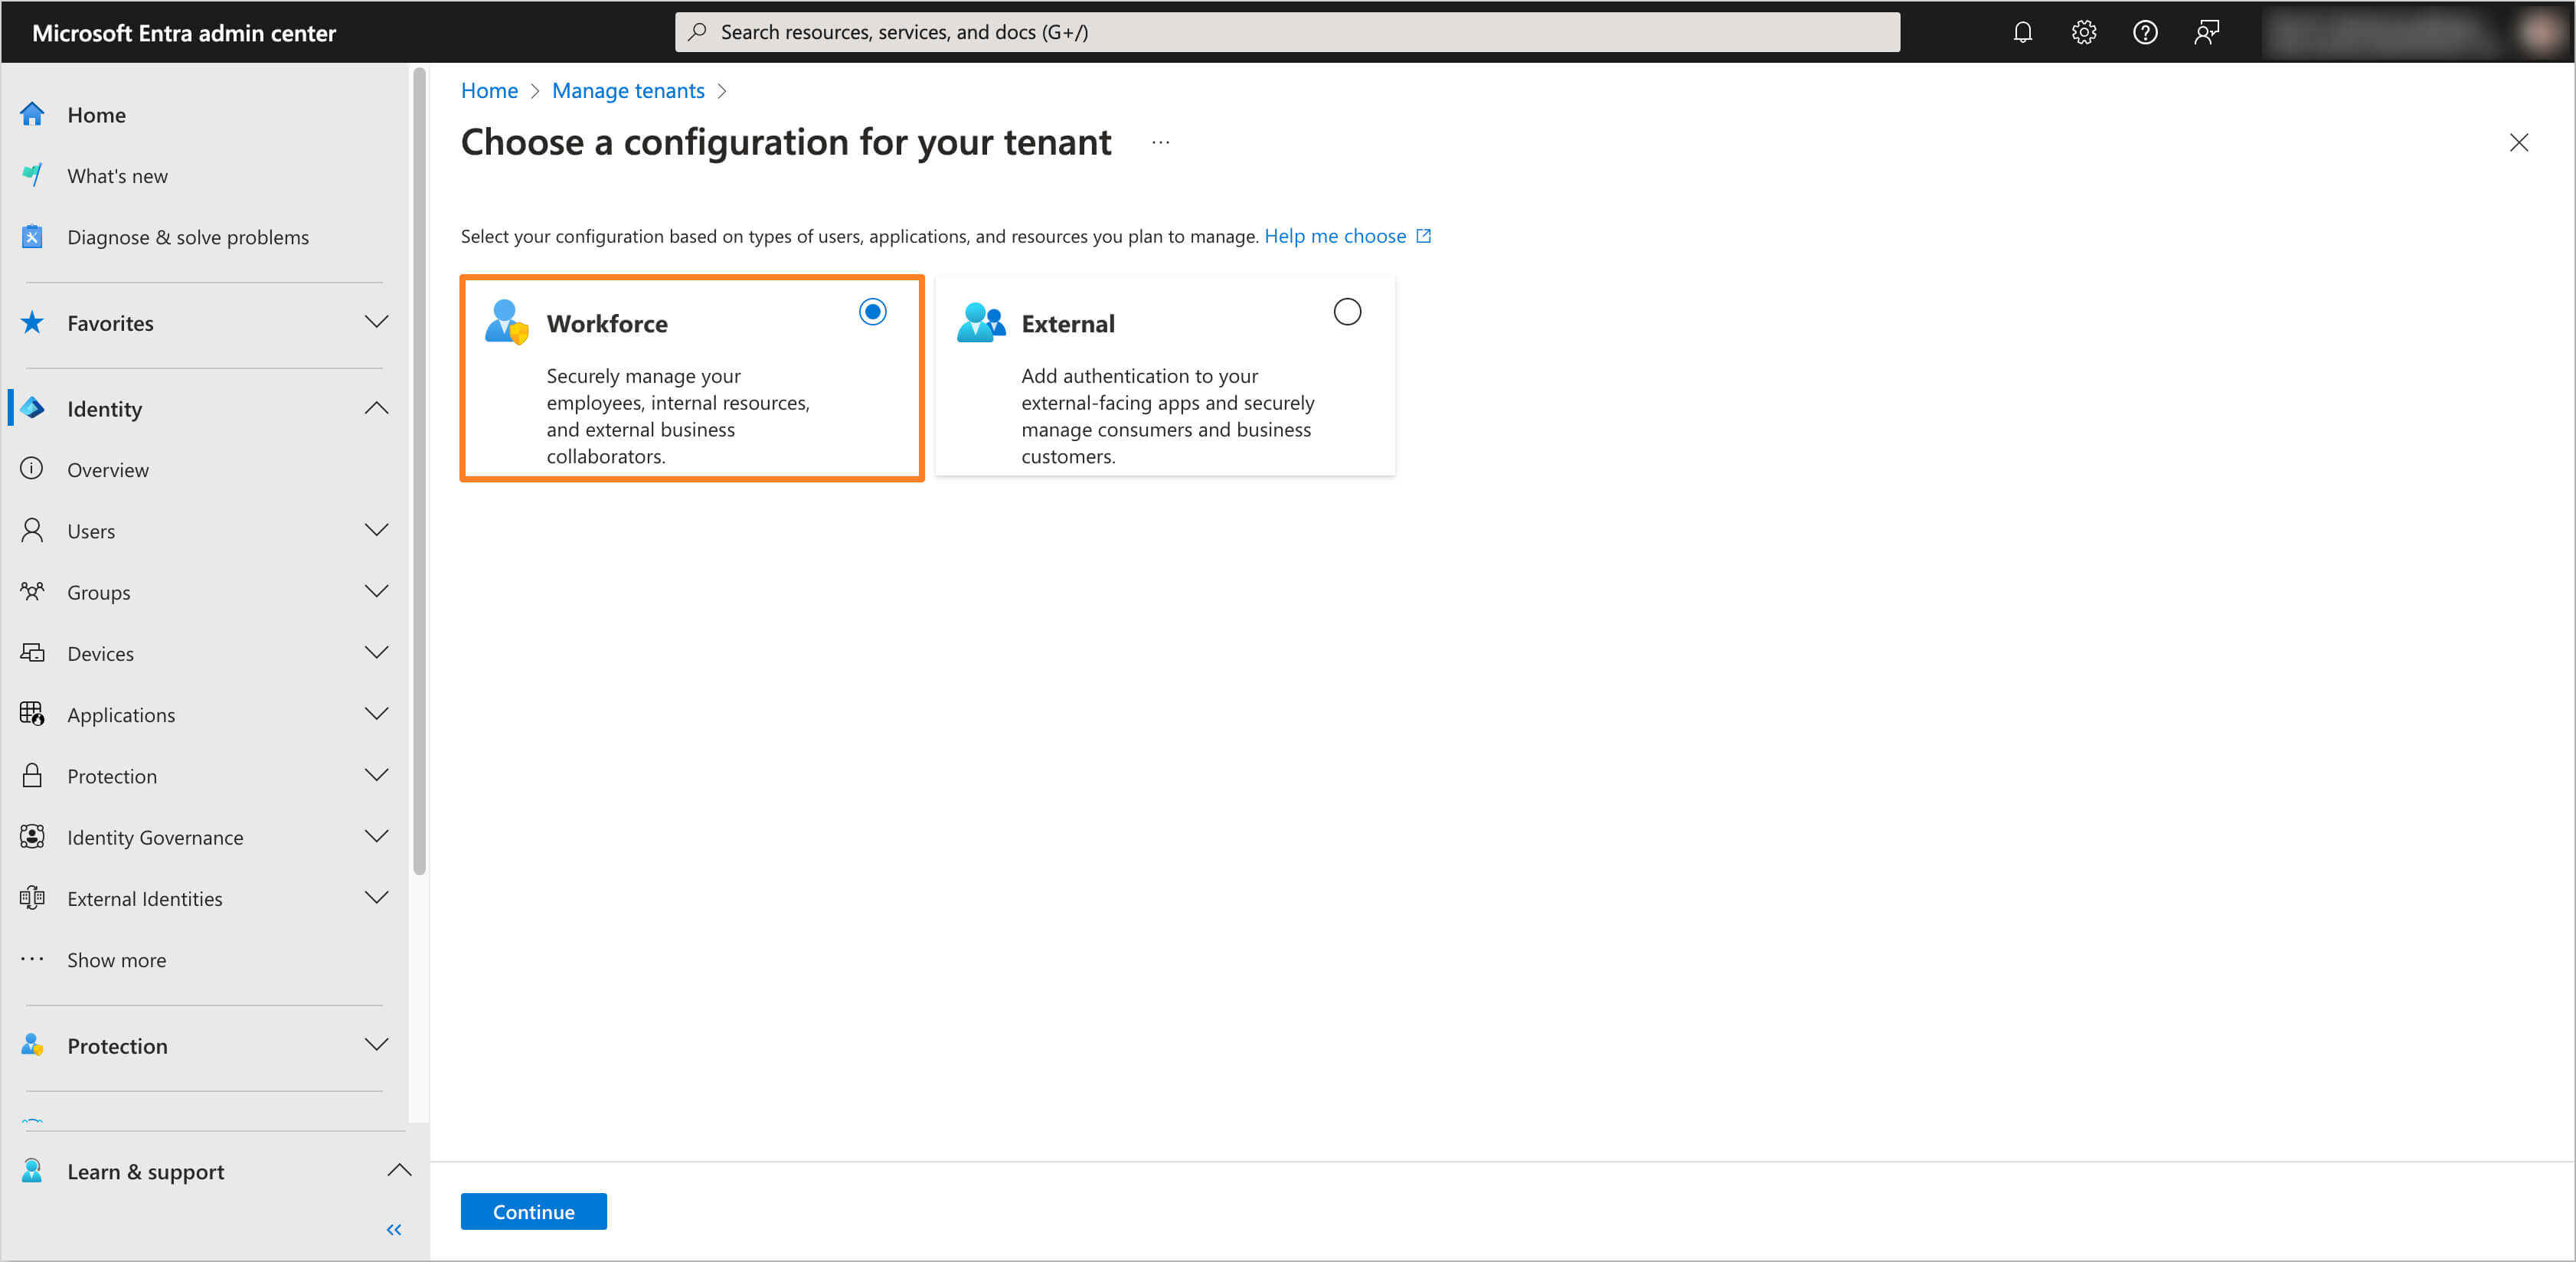
Select the configuration type Workforce.
-
Fill in the fields for Tenant Name, Domain Name, and Location.
noteThe Tenant Name and Domain Name
kuberocketciare used as a demonstration examples. In your case, it is recommended to choose names that align with your organization's specific needs and naming conventions.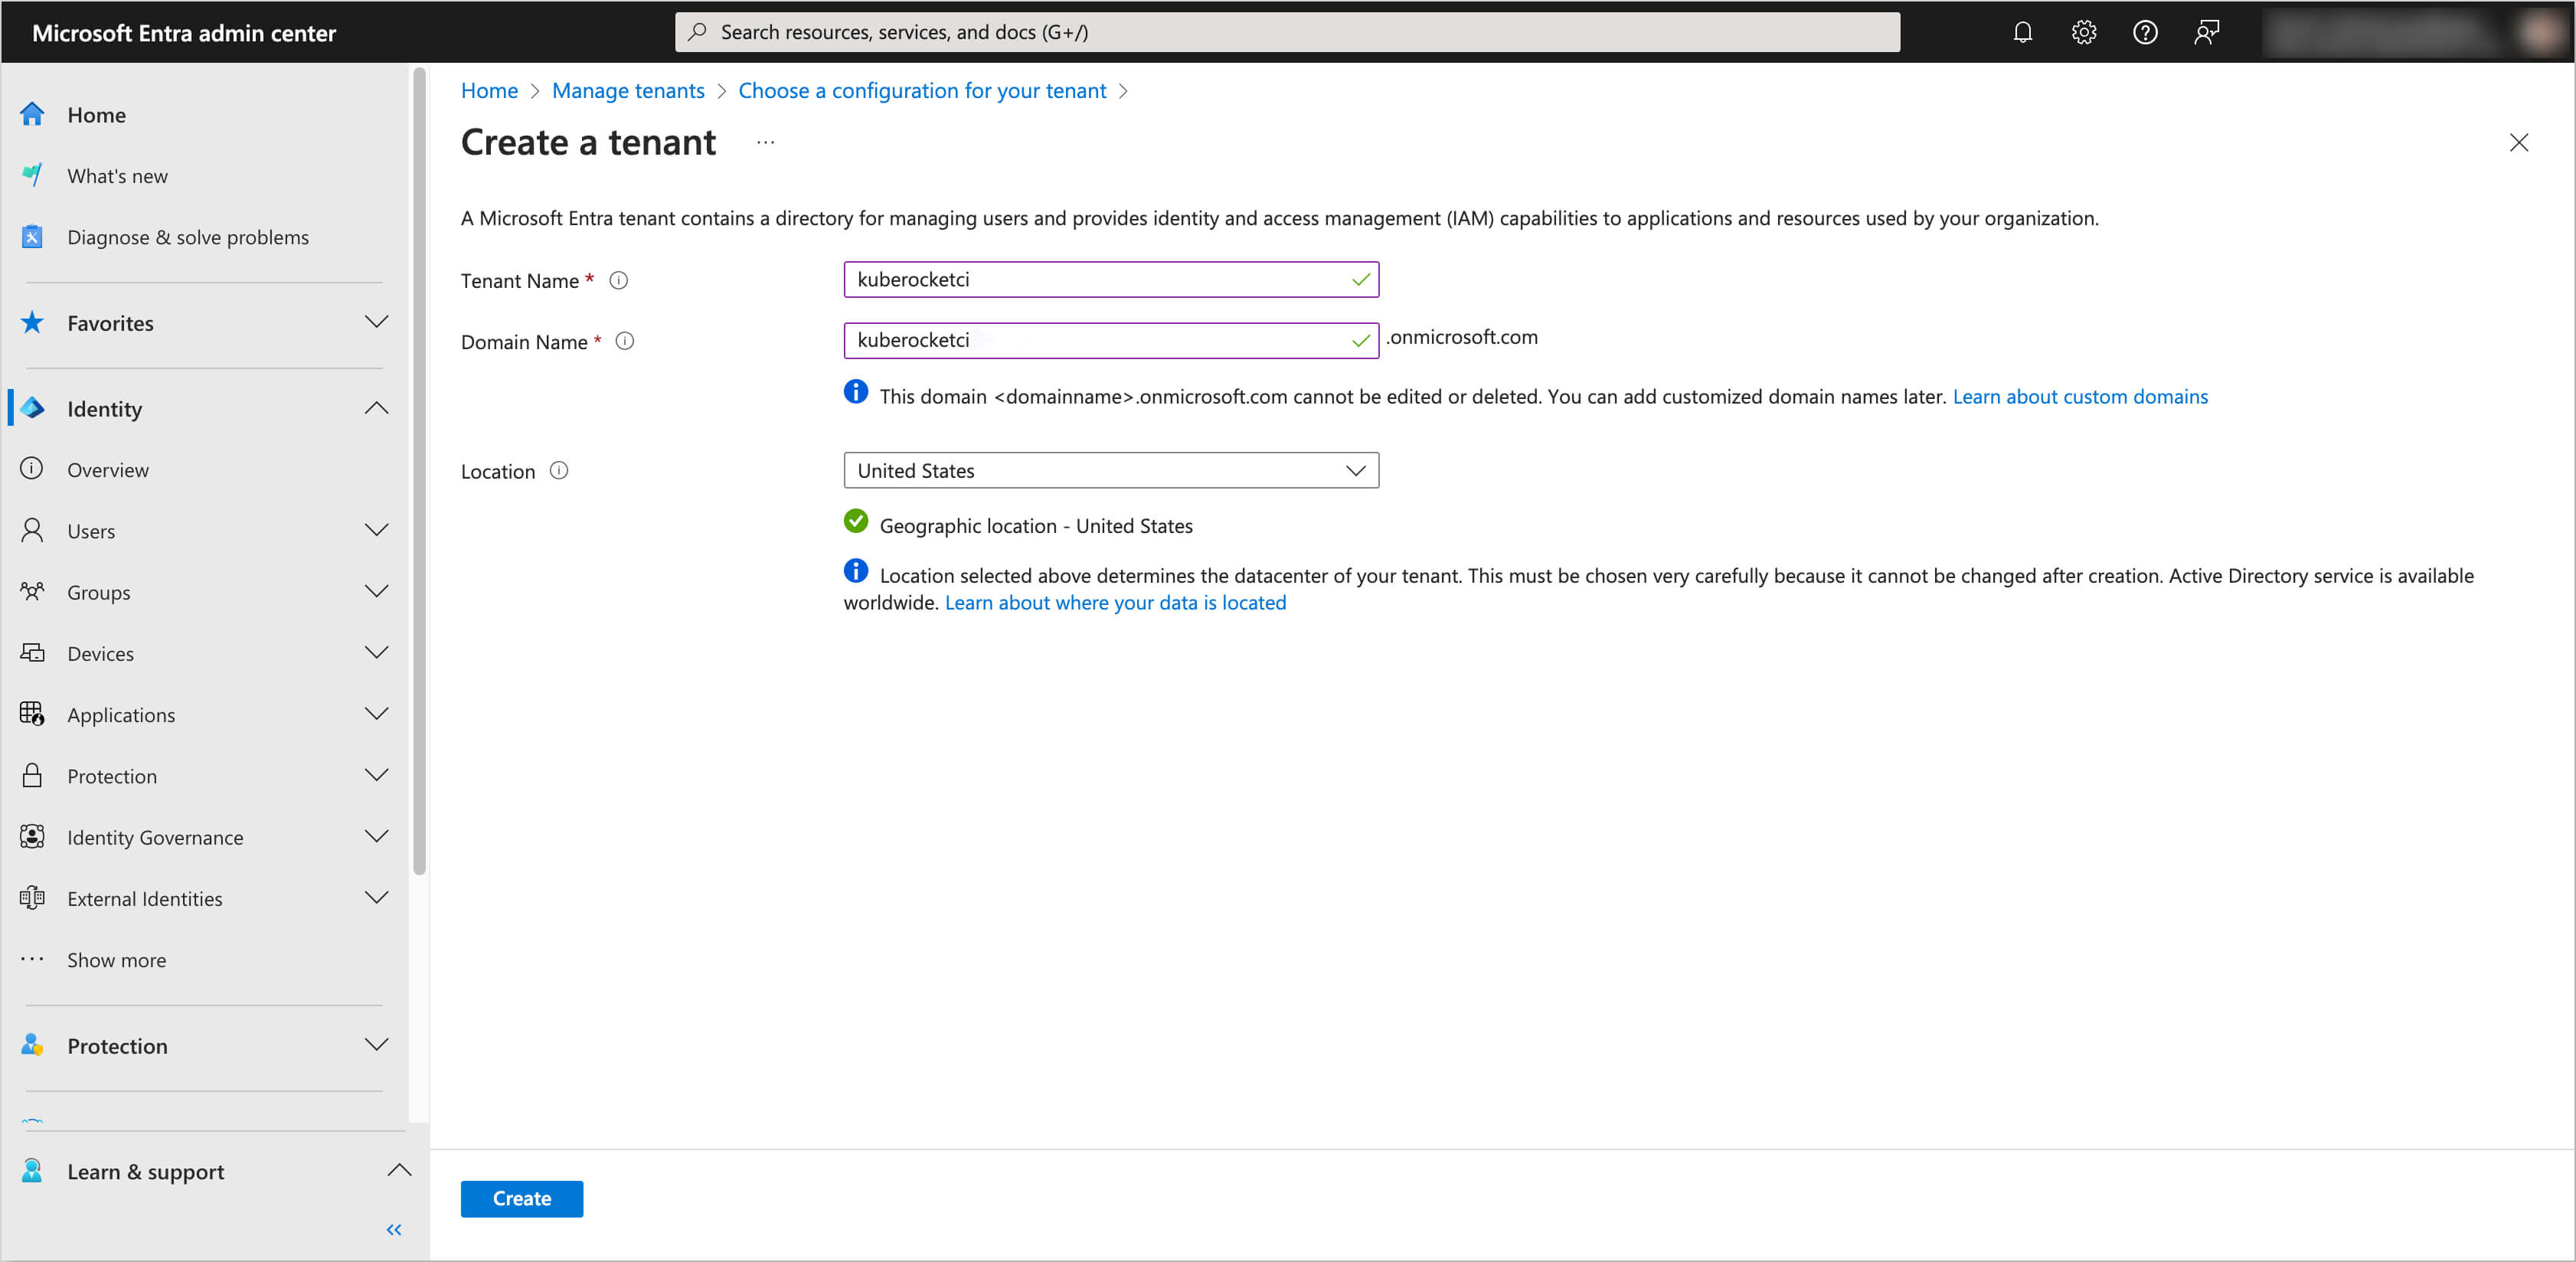
-
The new tenant will be created, and you can start configuring it for OIDC integration. Ensure you have switched to the new tenant.
Creating and Configuring OIDC Application in Microsoft Entra
After creating the tenant, you need to set up an OIDC Application in Microsoft Entra. Here's how you can do it:
-
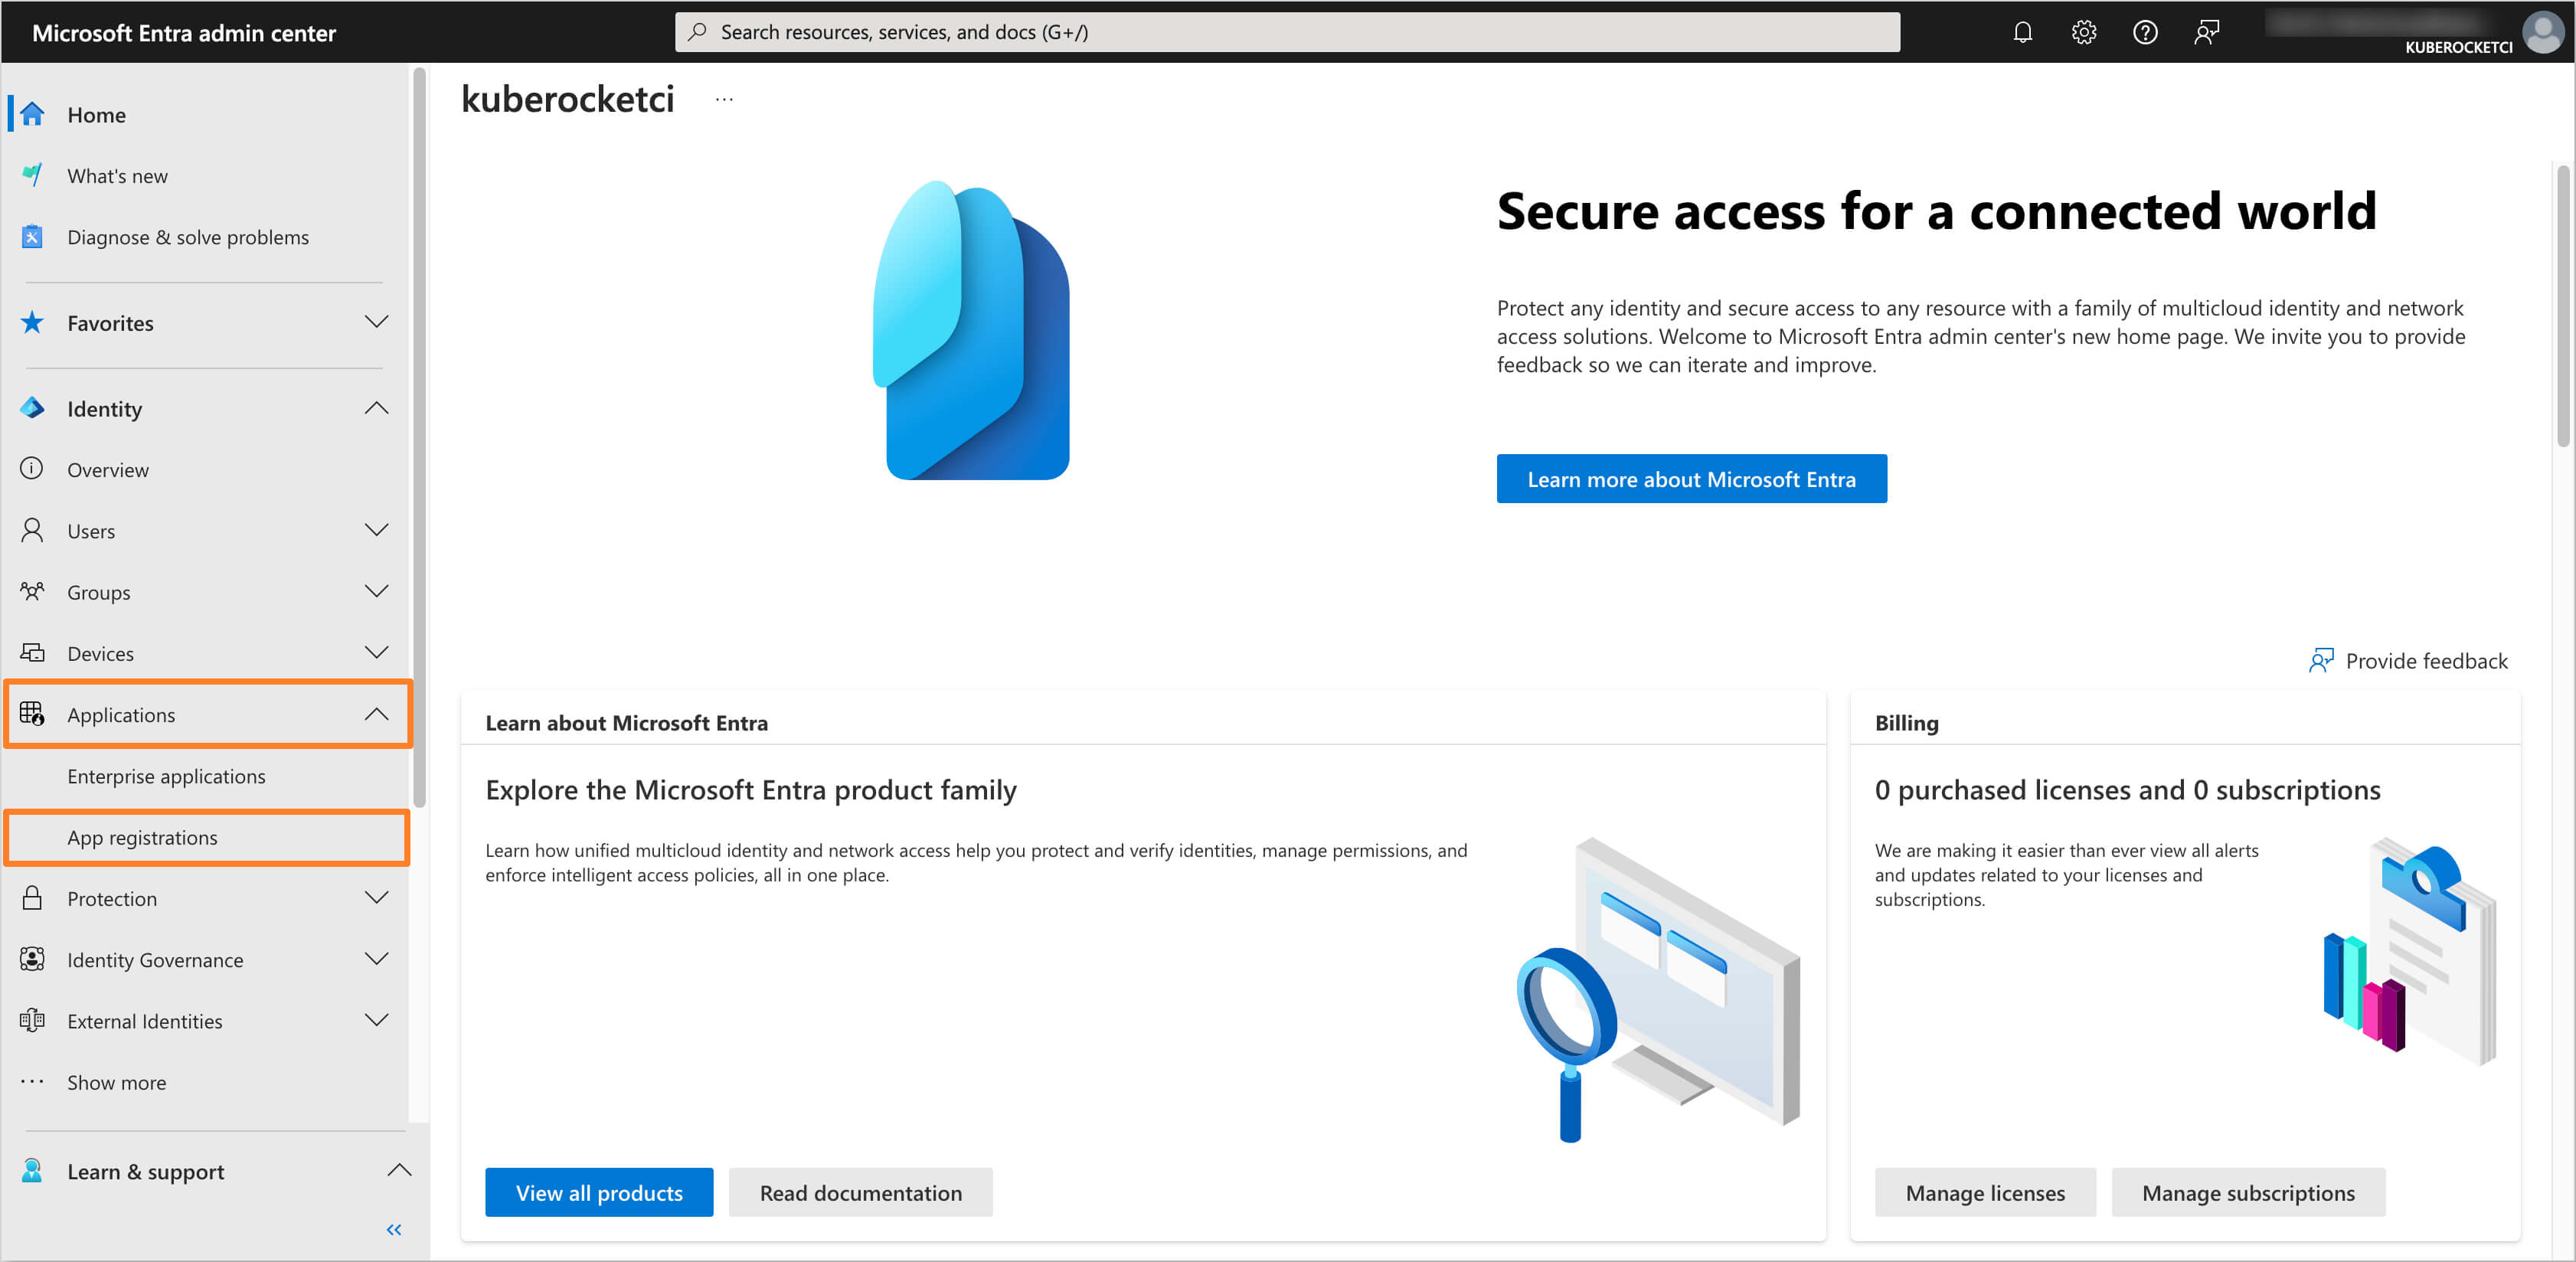
In the Microsoft Entra Admin Center, in the left sidebar menu, select Applications and then click on App registrations.
-
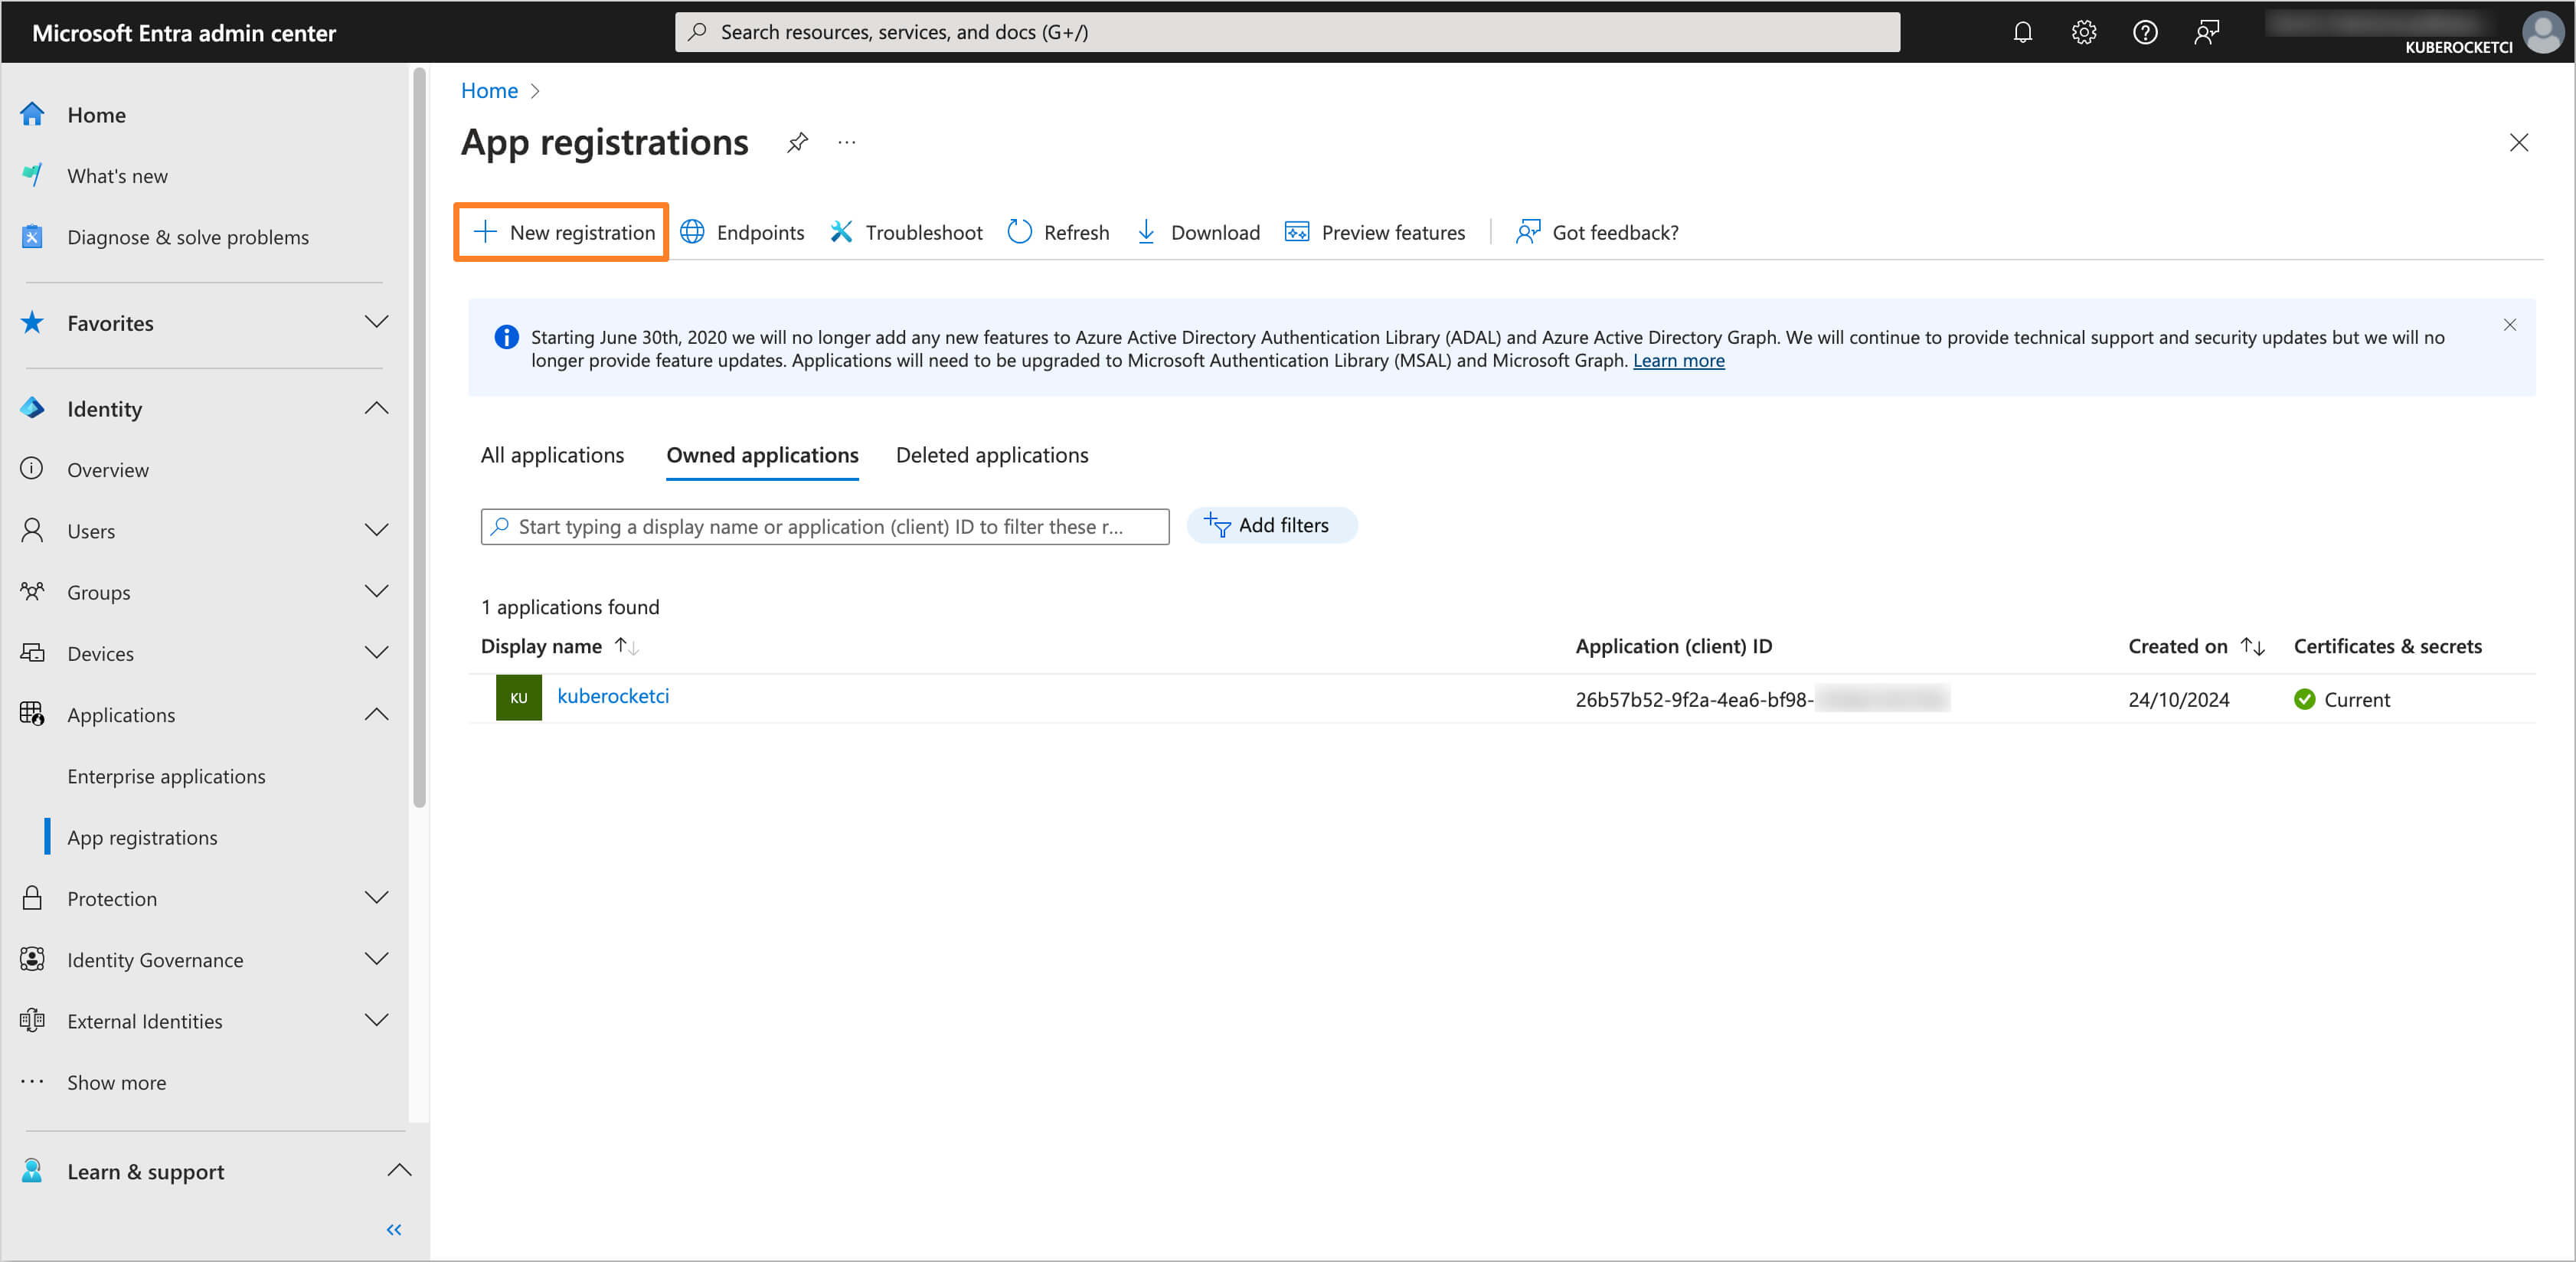
Click on the New registration button to create a new application.
-
Fill in the details for the application, such as Name, Supported account types, and Redirect URI (
http://localhost:8000/).noteThe Name
kuberocketciis used as a demonstration example. In your case, it is recommended to choose a name that aligns with your application's specific needs and naming conventions (e.g. your AWS EKS cluster name).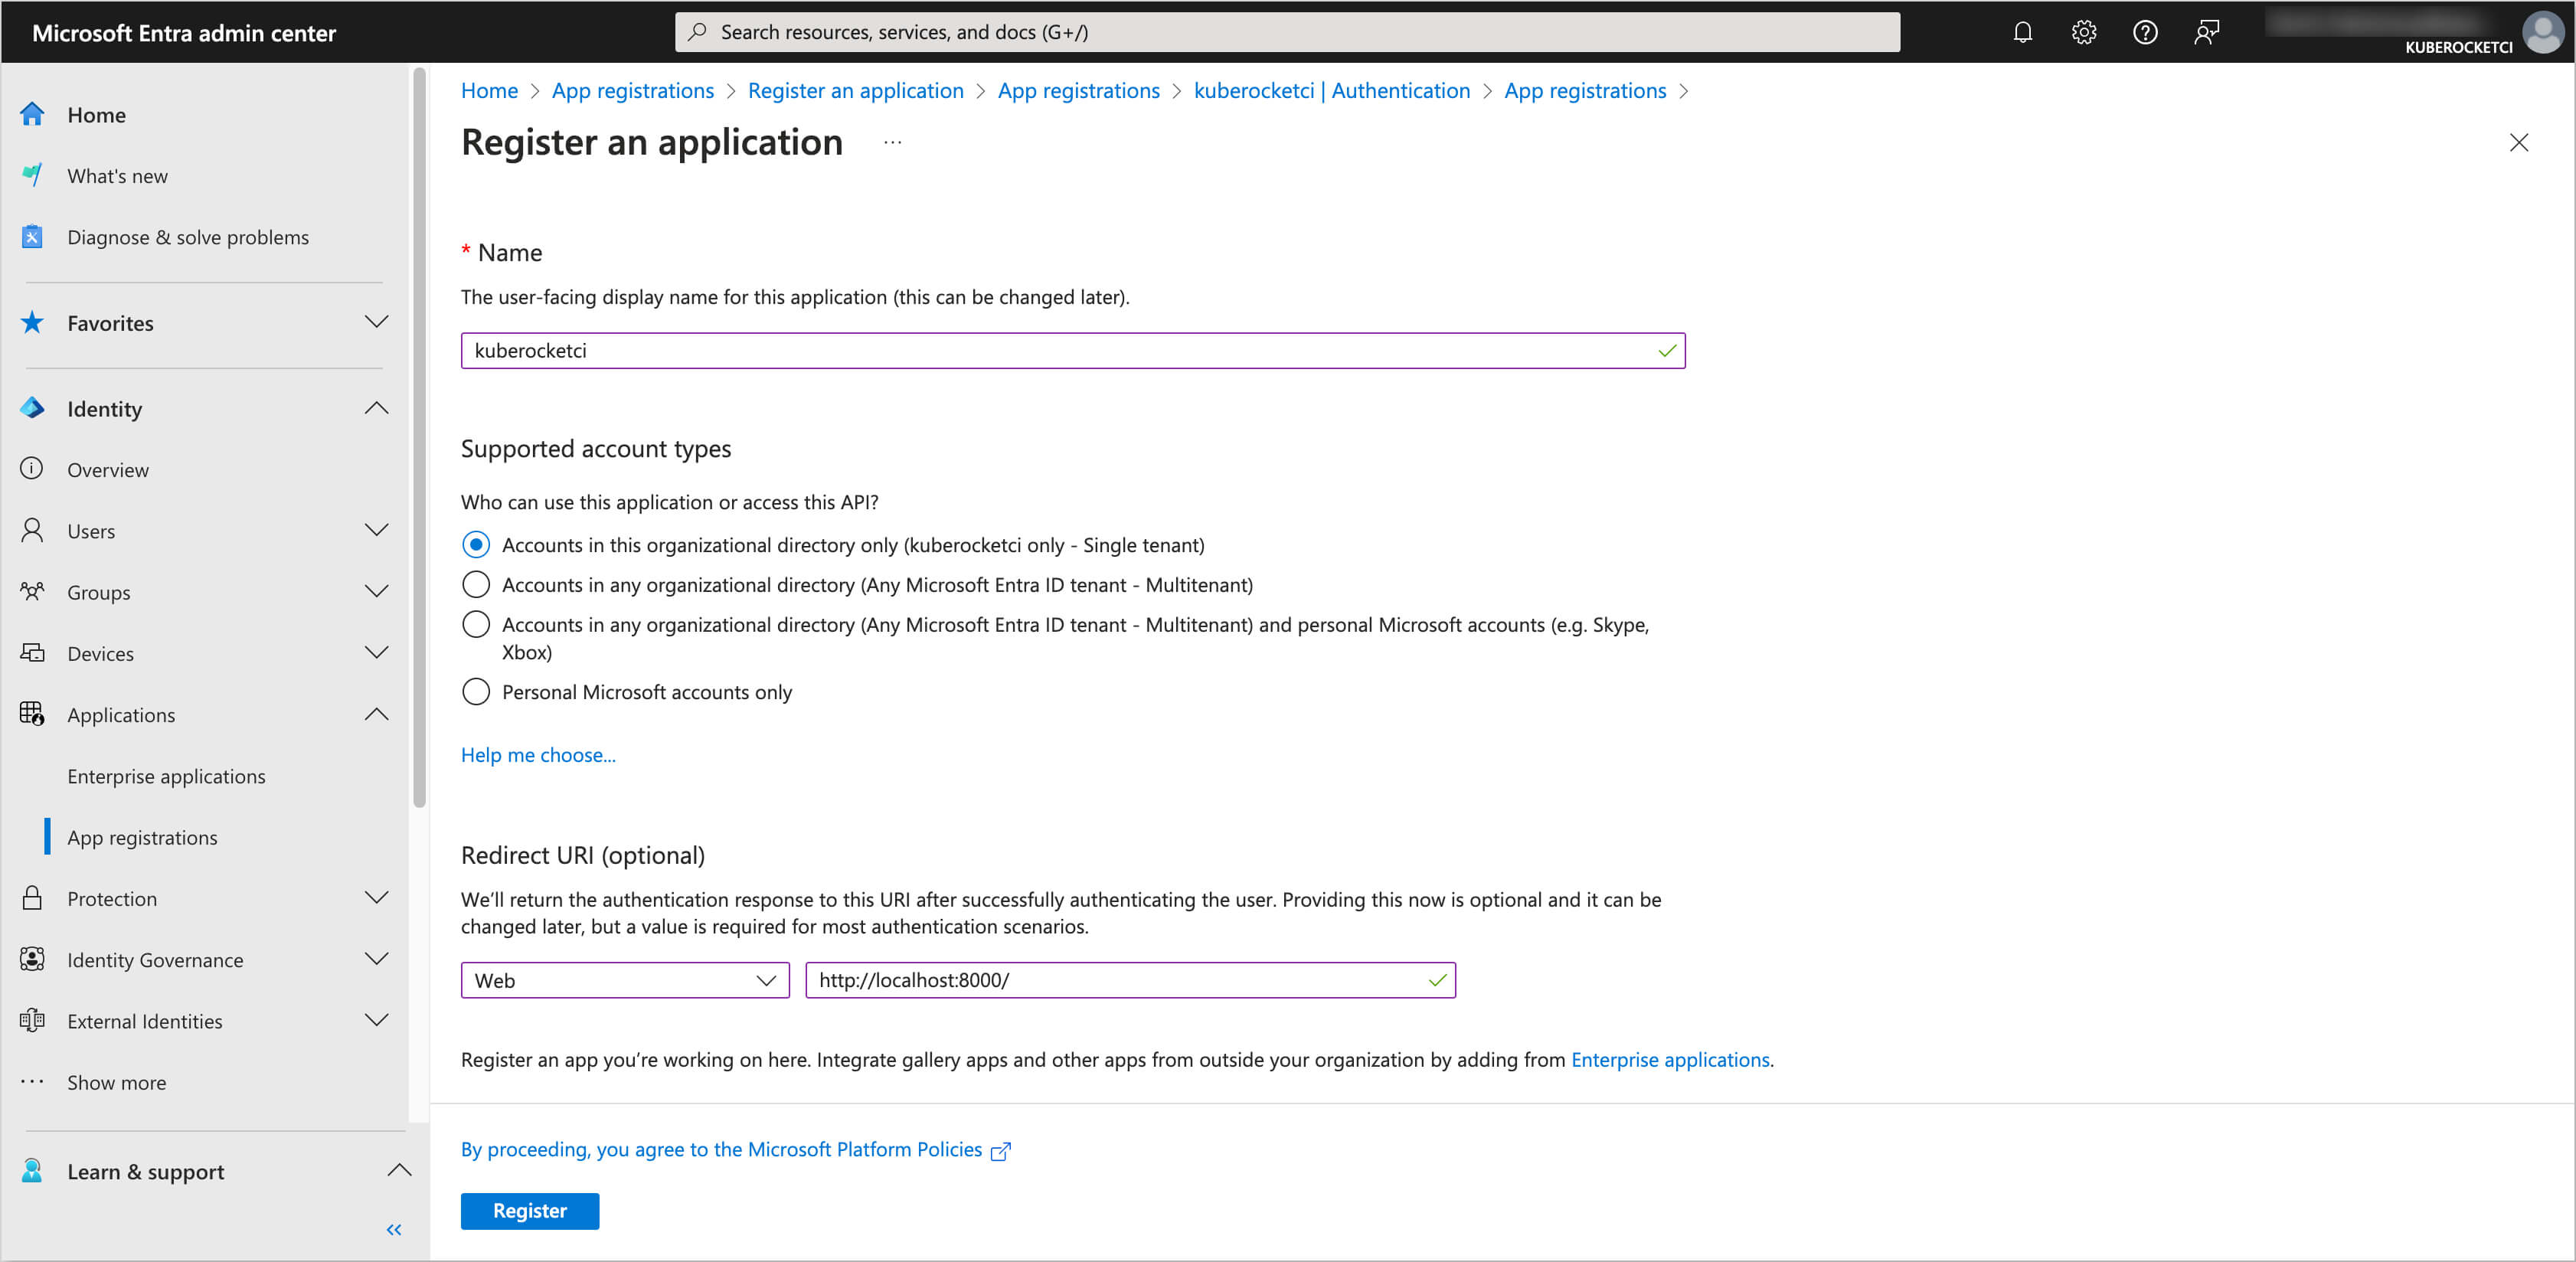
-
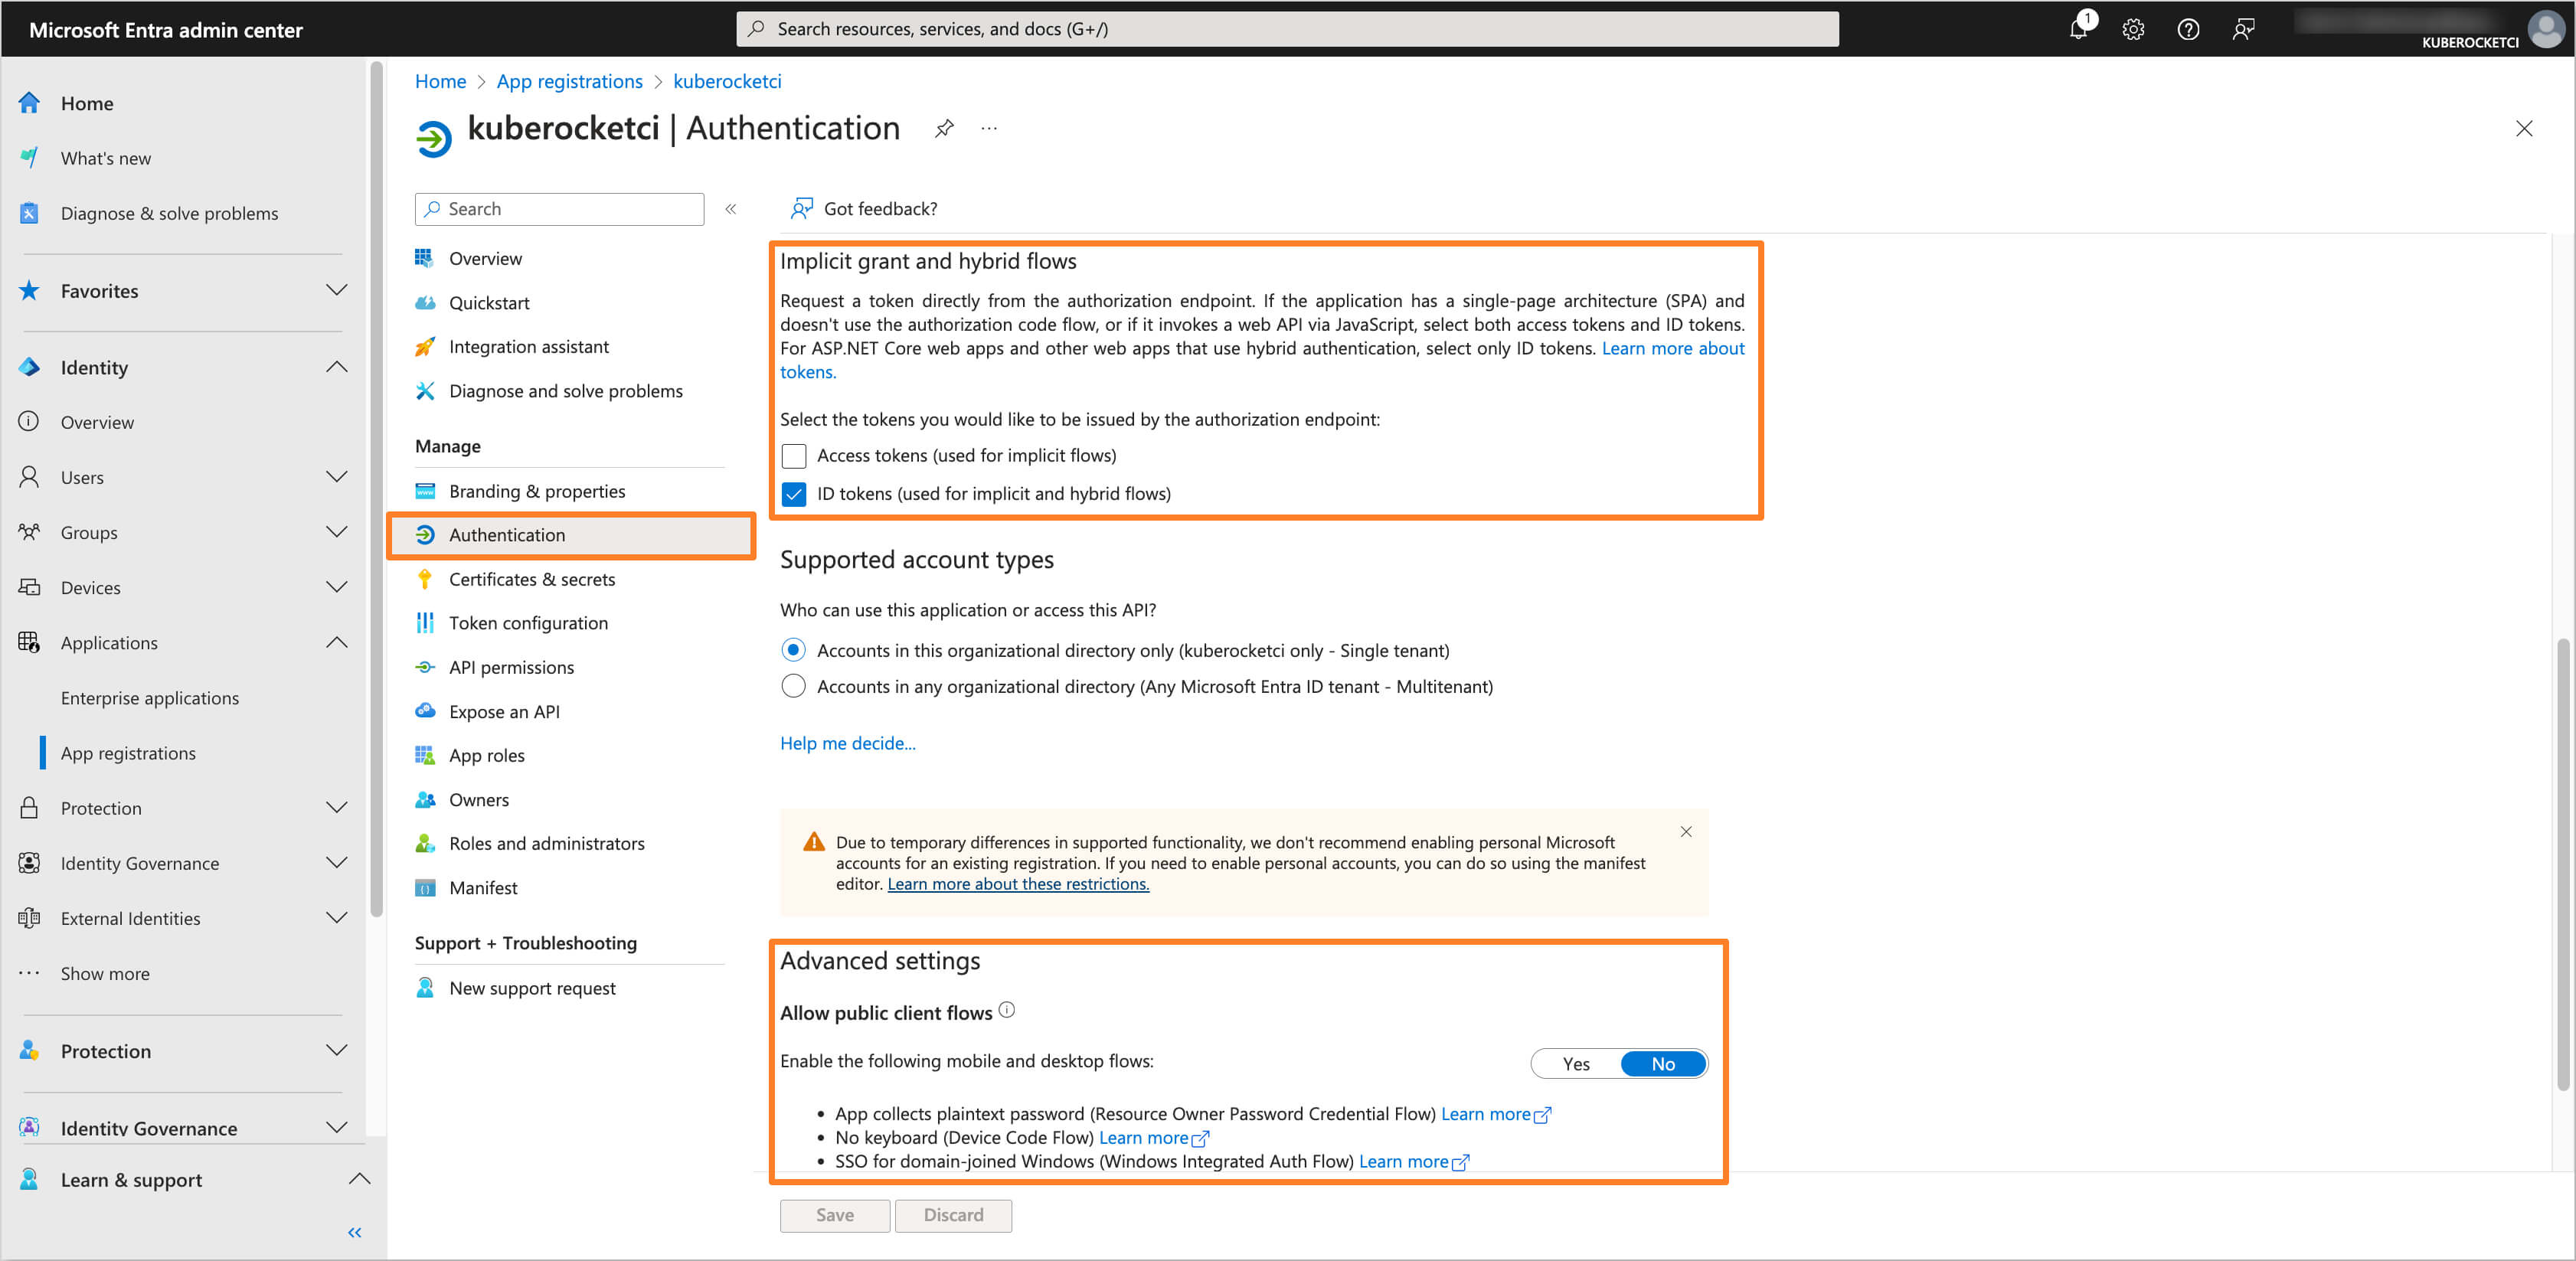
In the created application, navigate to the Authentication section from the left sidebar menu. In the Implicit grant and hybrid flows section, select ID tokens for the token type. In the Allow public client flows section, set the value to No.
-
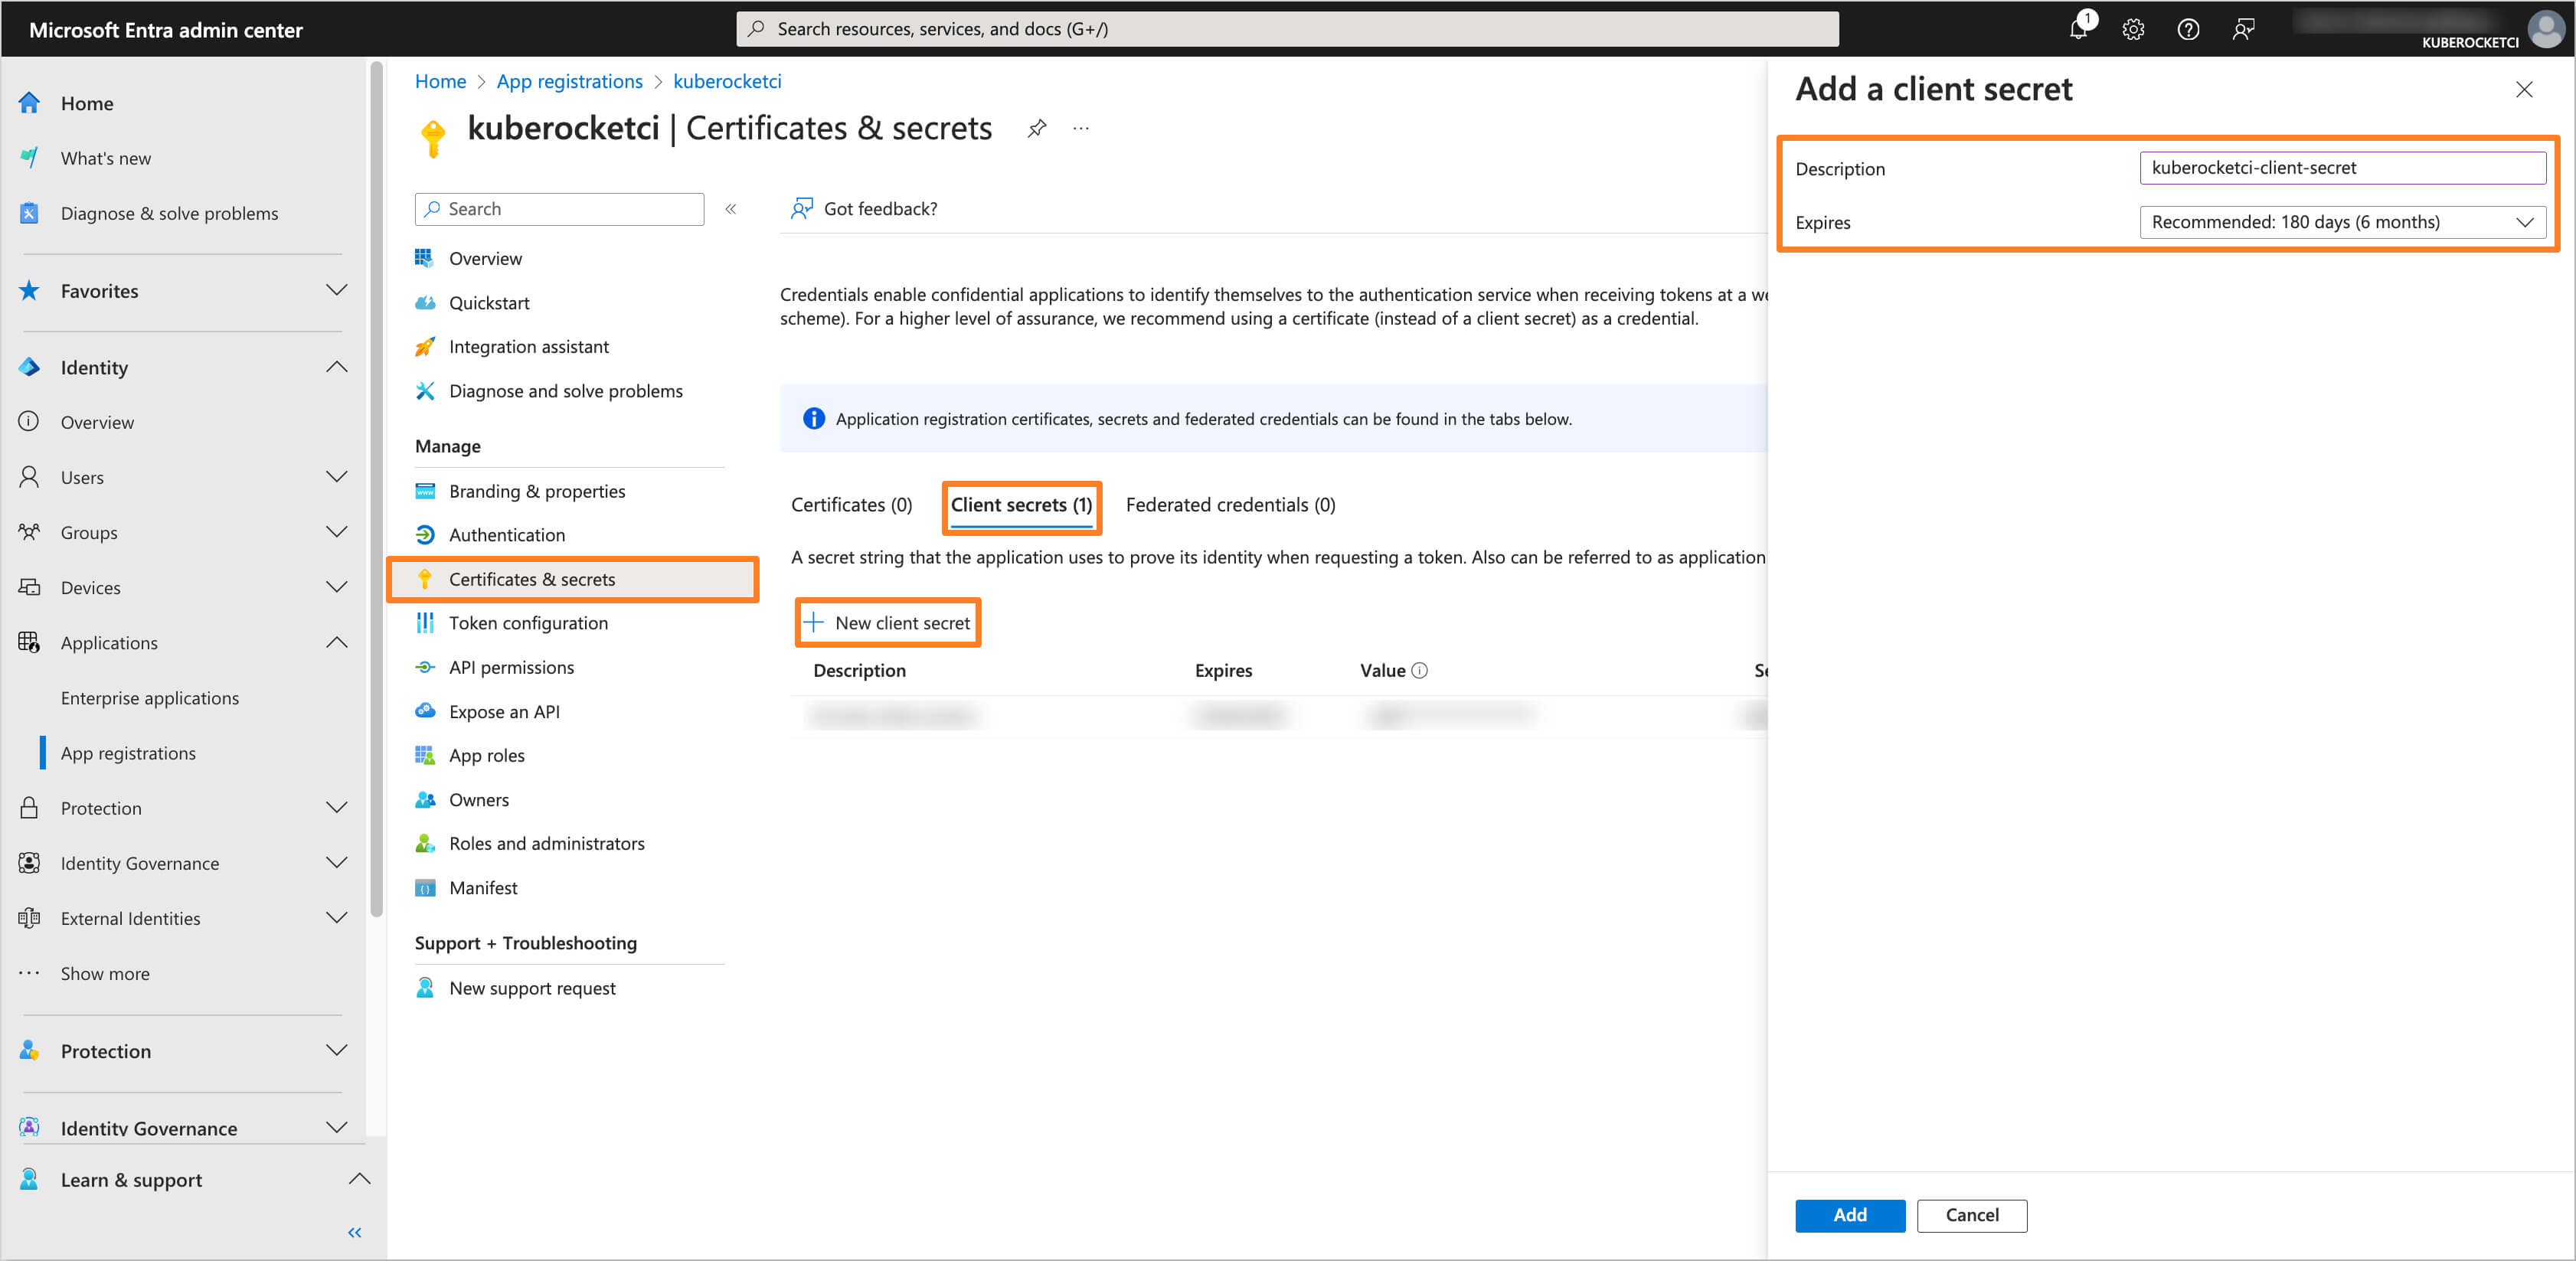
Navigate to the Certificates & secrets section from the left sidebar menu. In the Client secrets tab, click on the New client secret button to create a new secret.
-
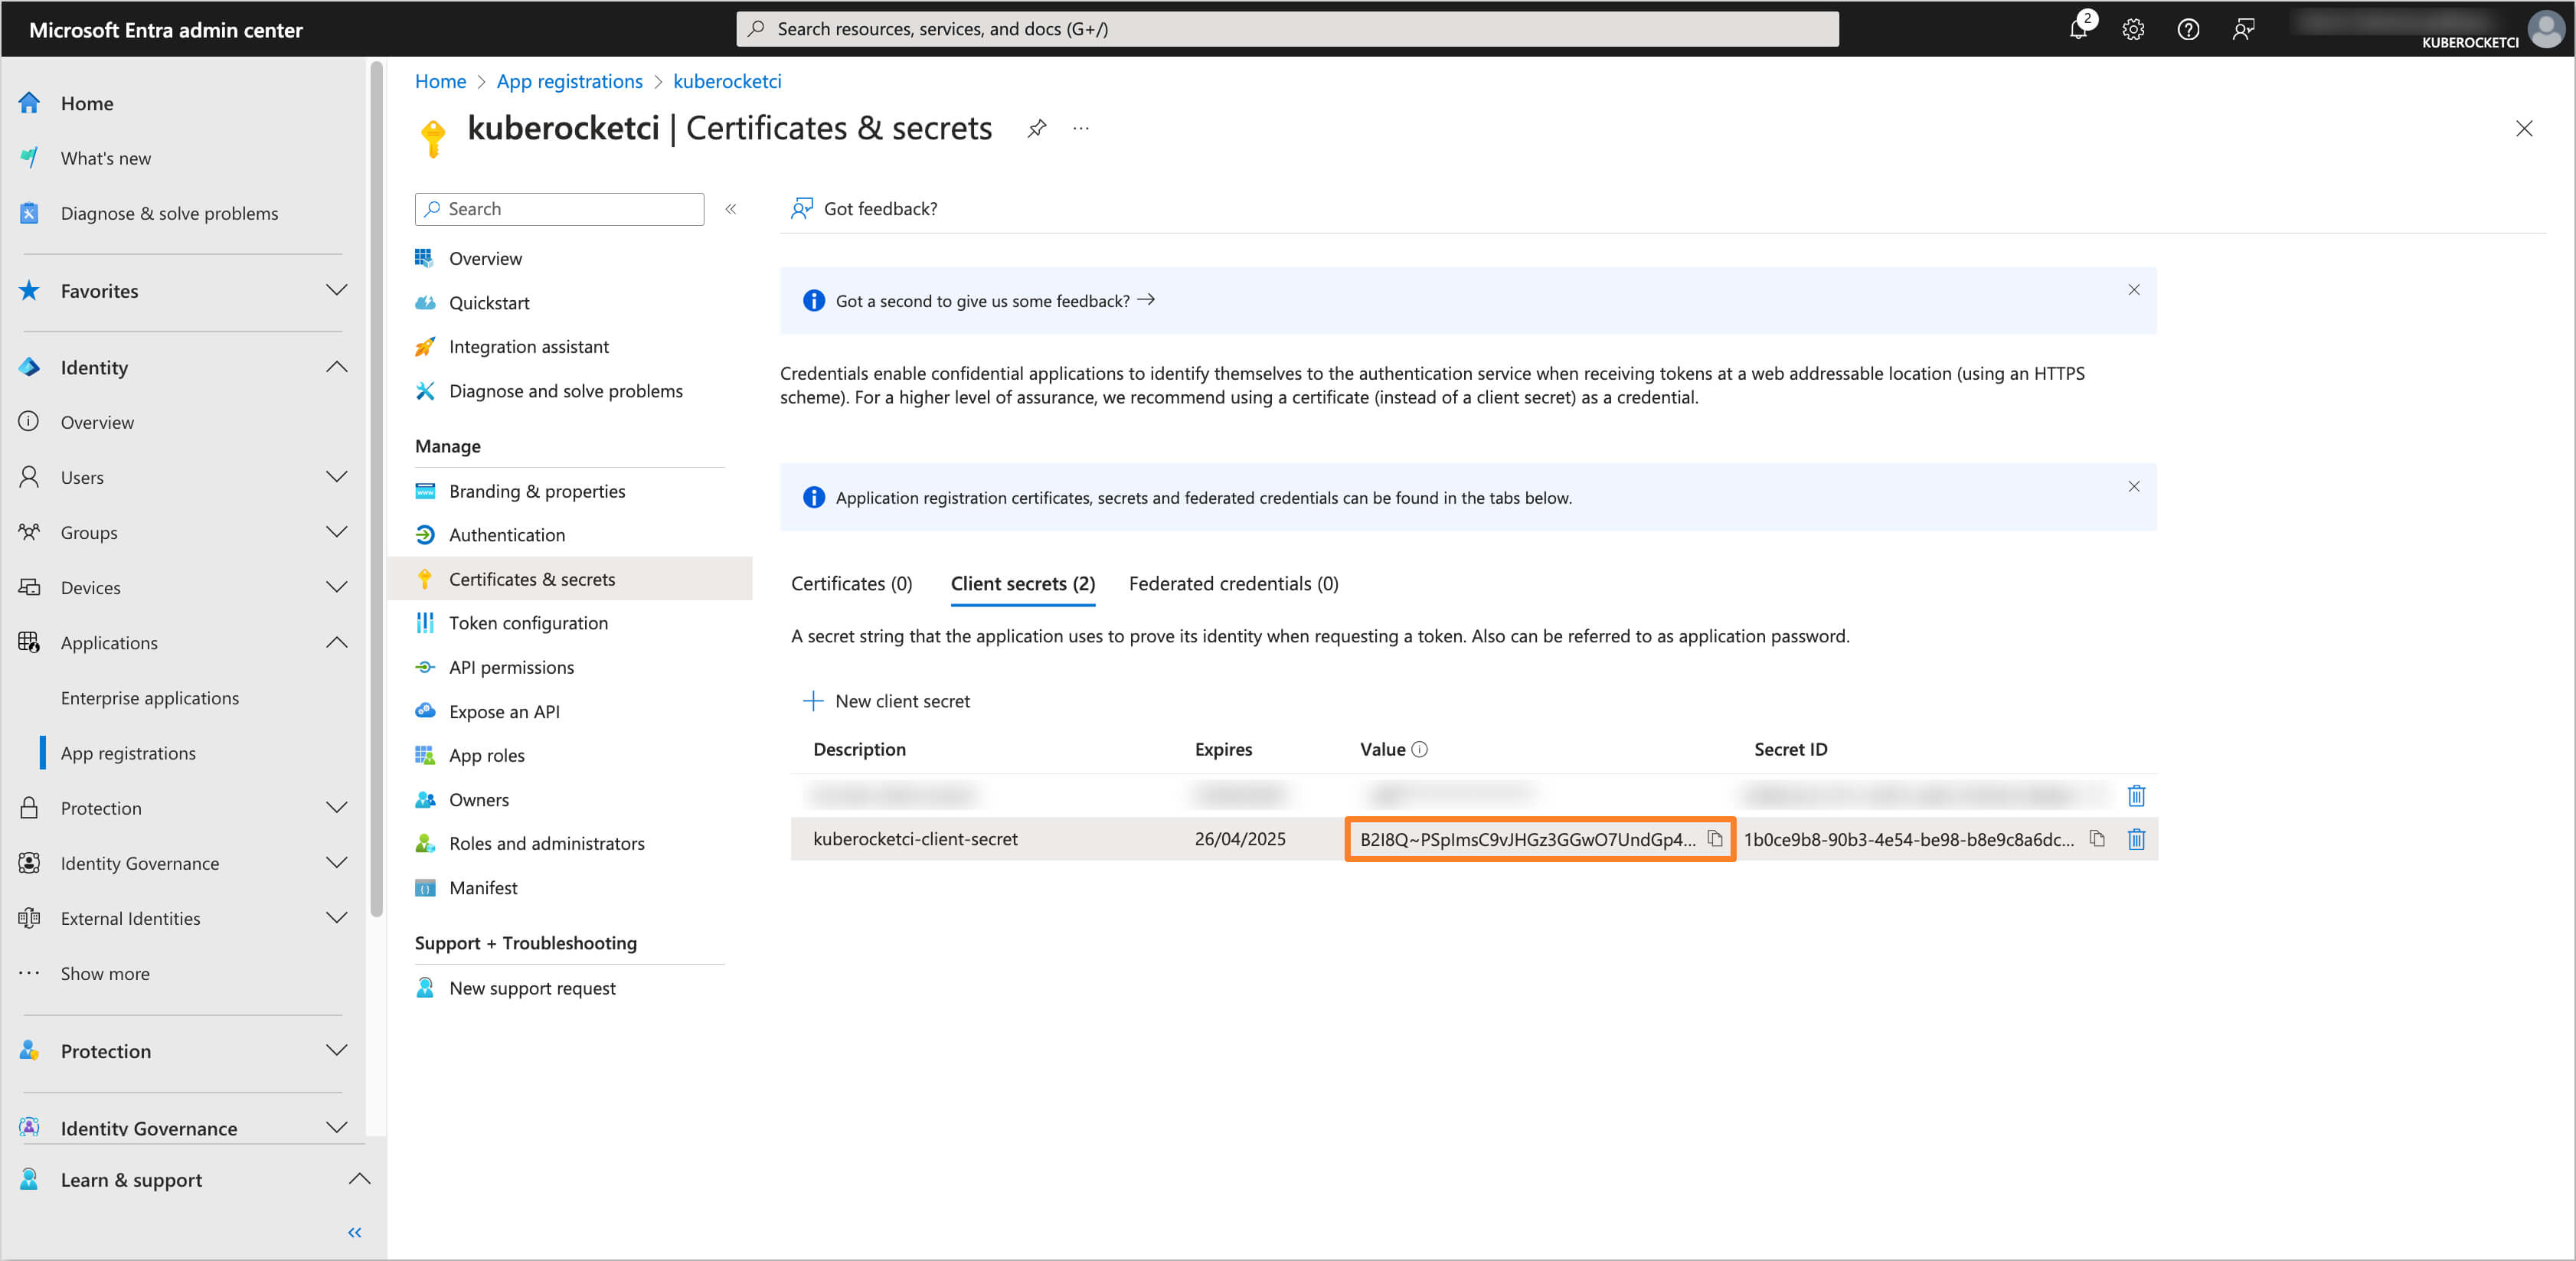
Copy the generated client secret value and store it securely.
-
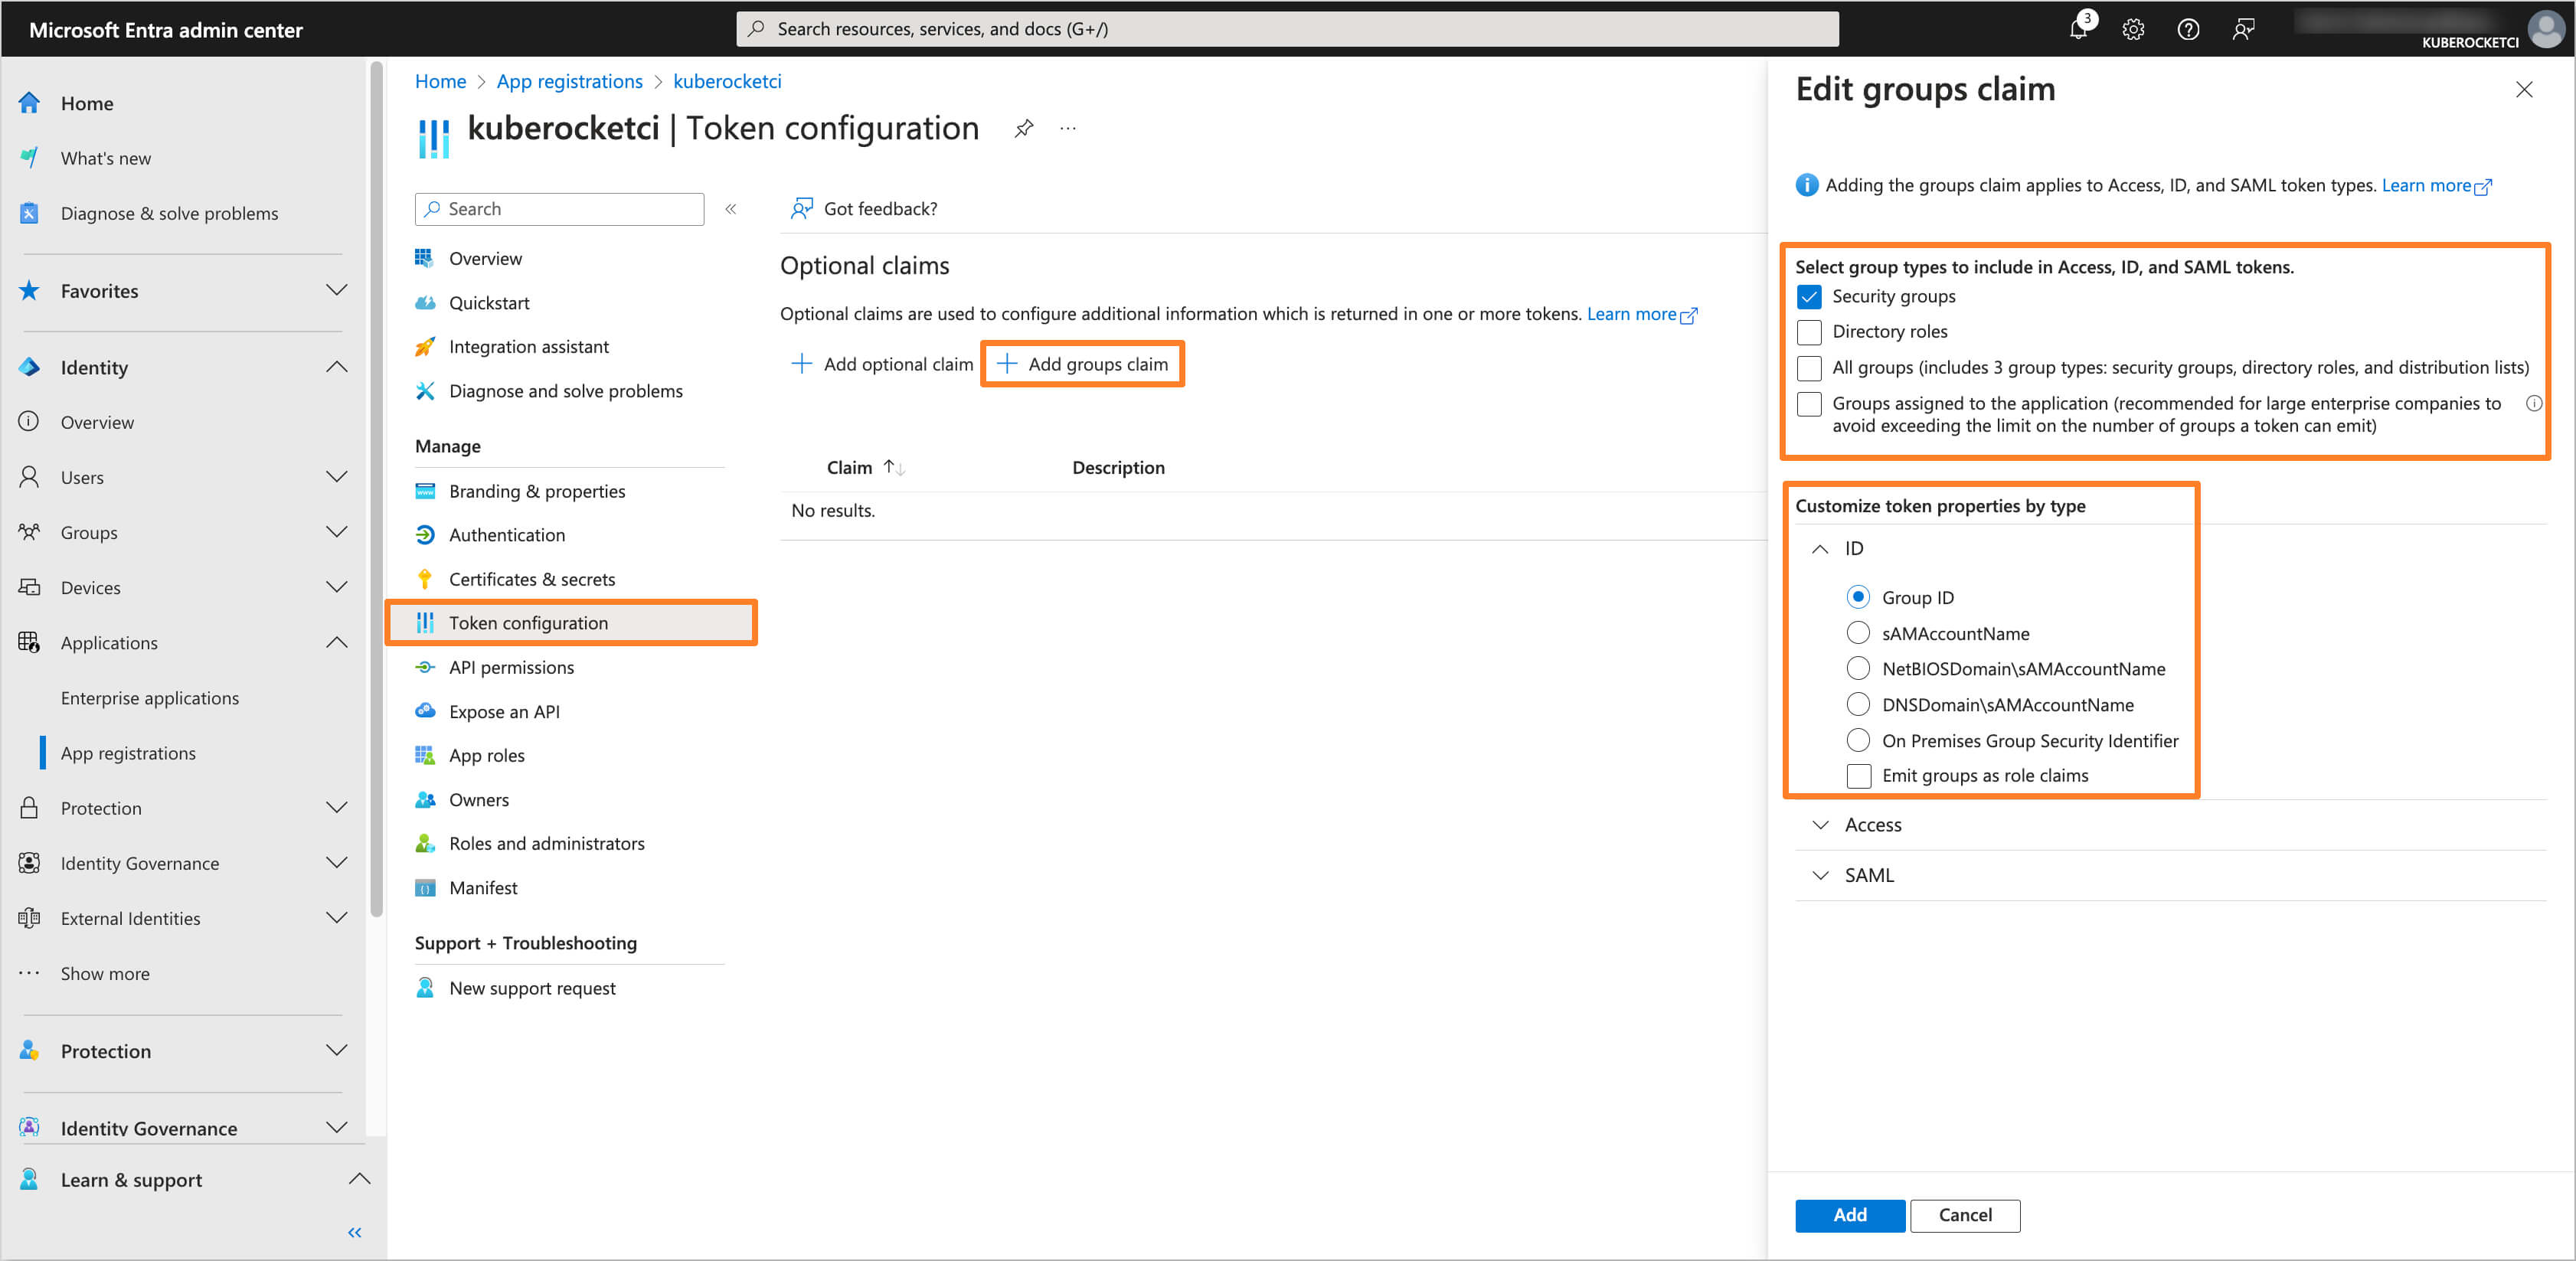
Navigate to the Token configuration section and click on Add group claim button. Choose the group type as Security Groups and for the ID token type, select Group ID.
-
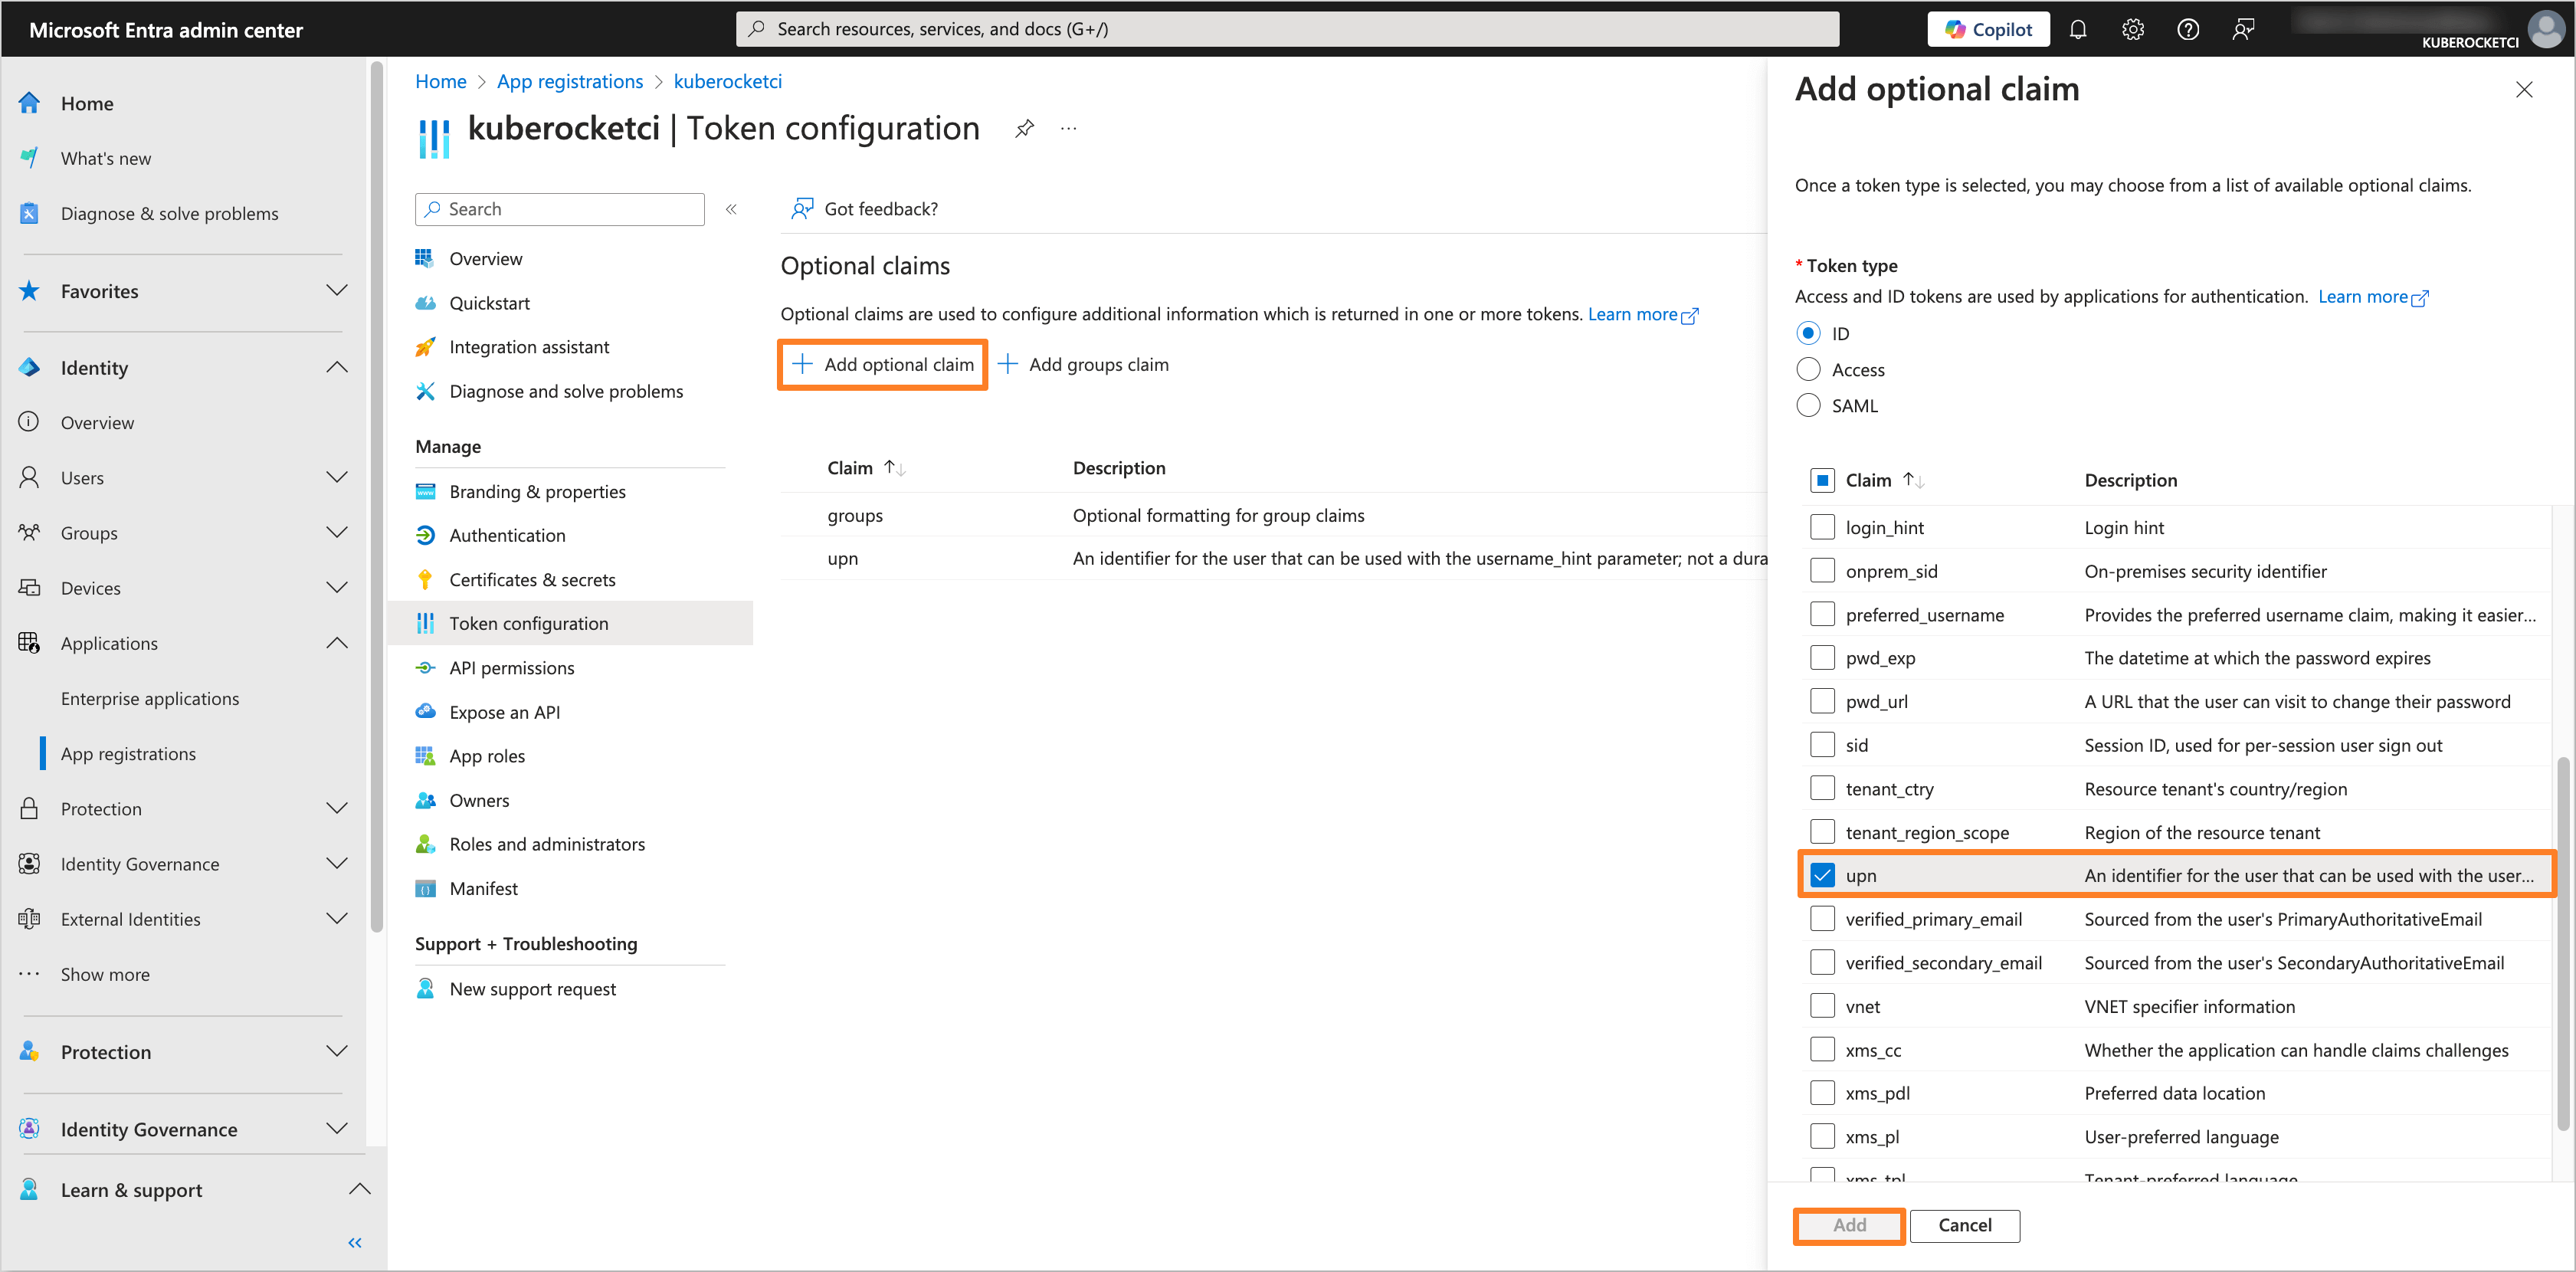
(Optional) Additionally, add an optional upn claim in the Token configuration section.
noteThis step is optional and should only be performed if external users (i.e., users with User type: Guest) will be added to the Microsoft Entra Tenant and require access to the Application.
-
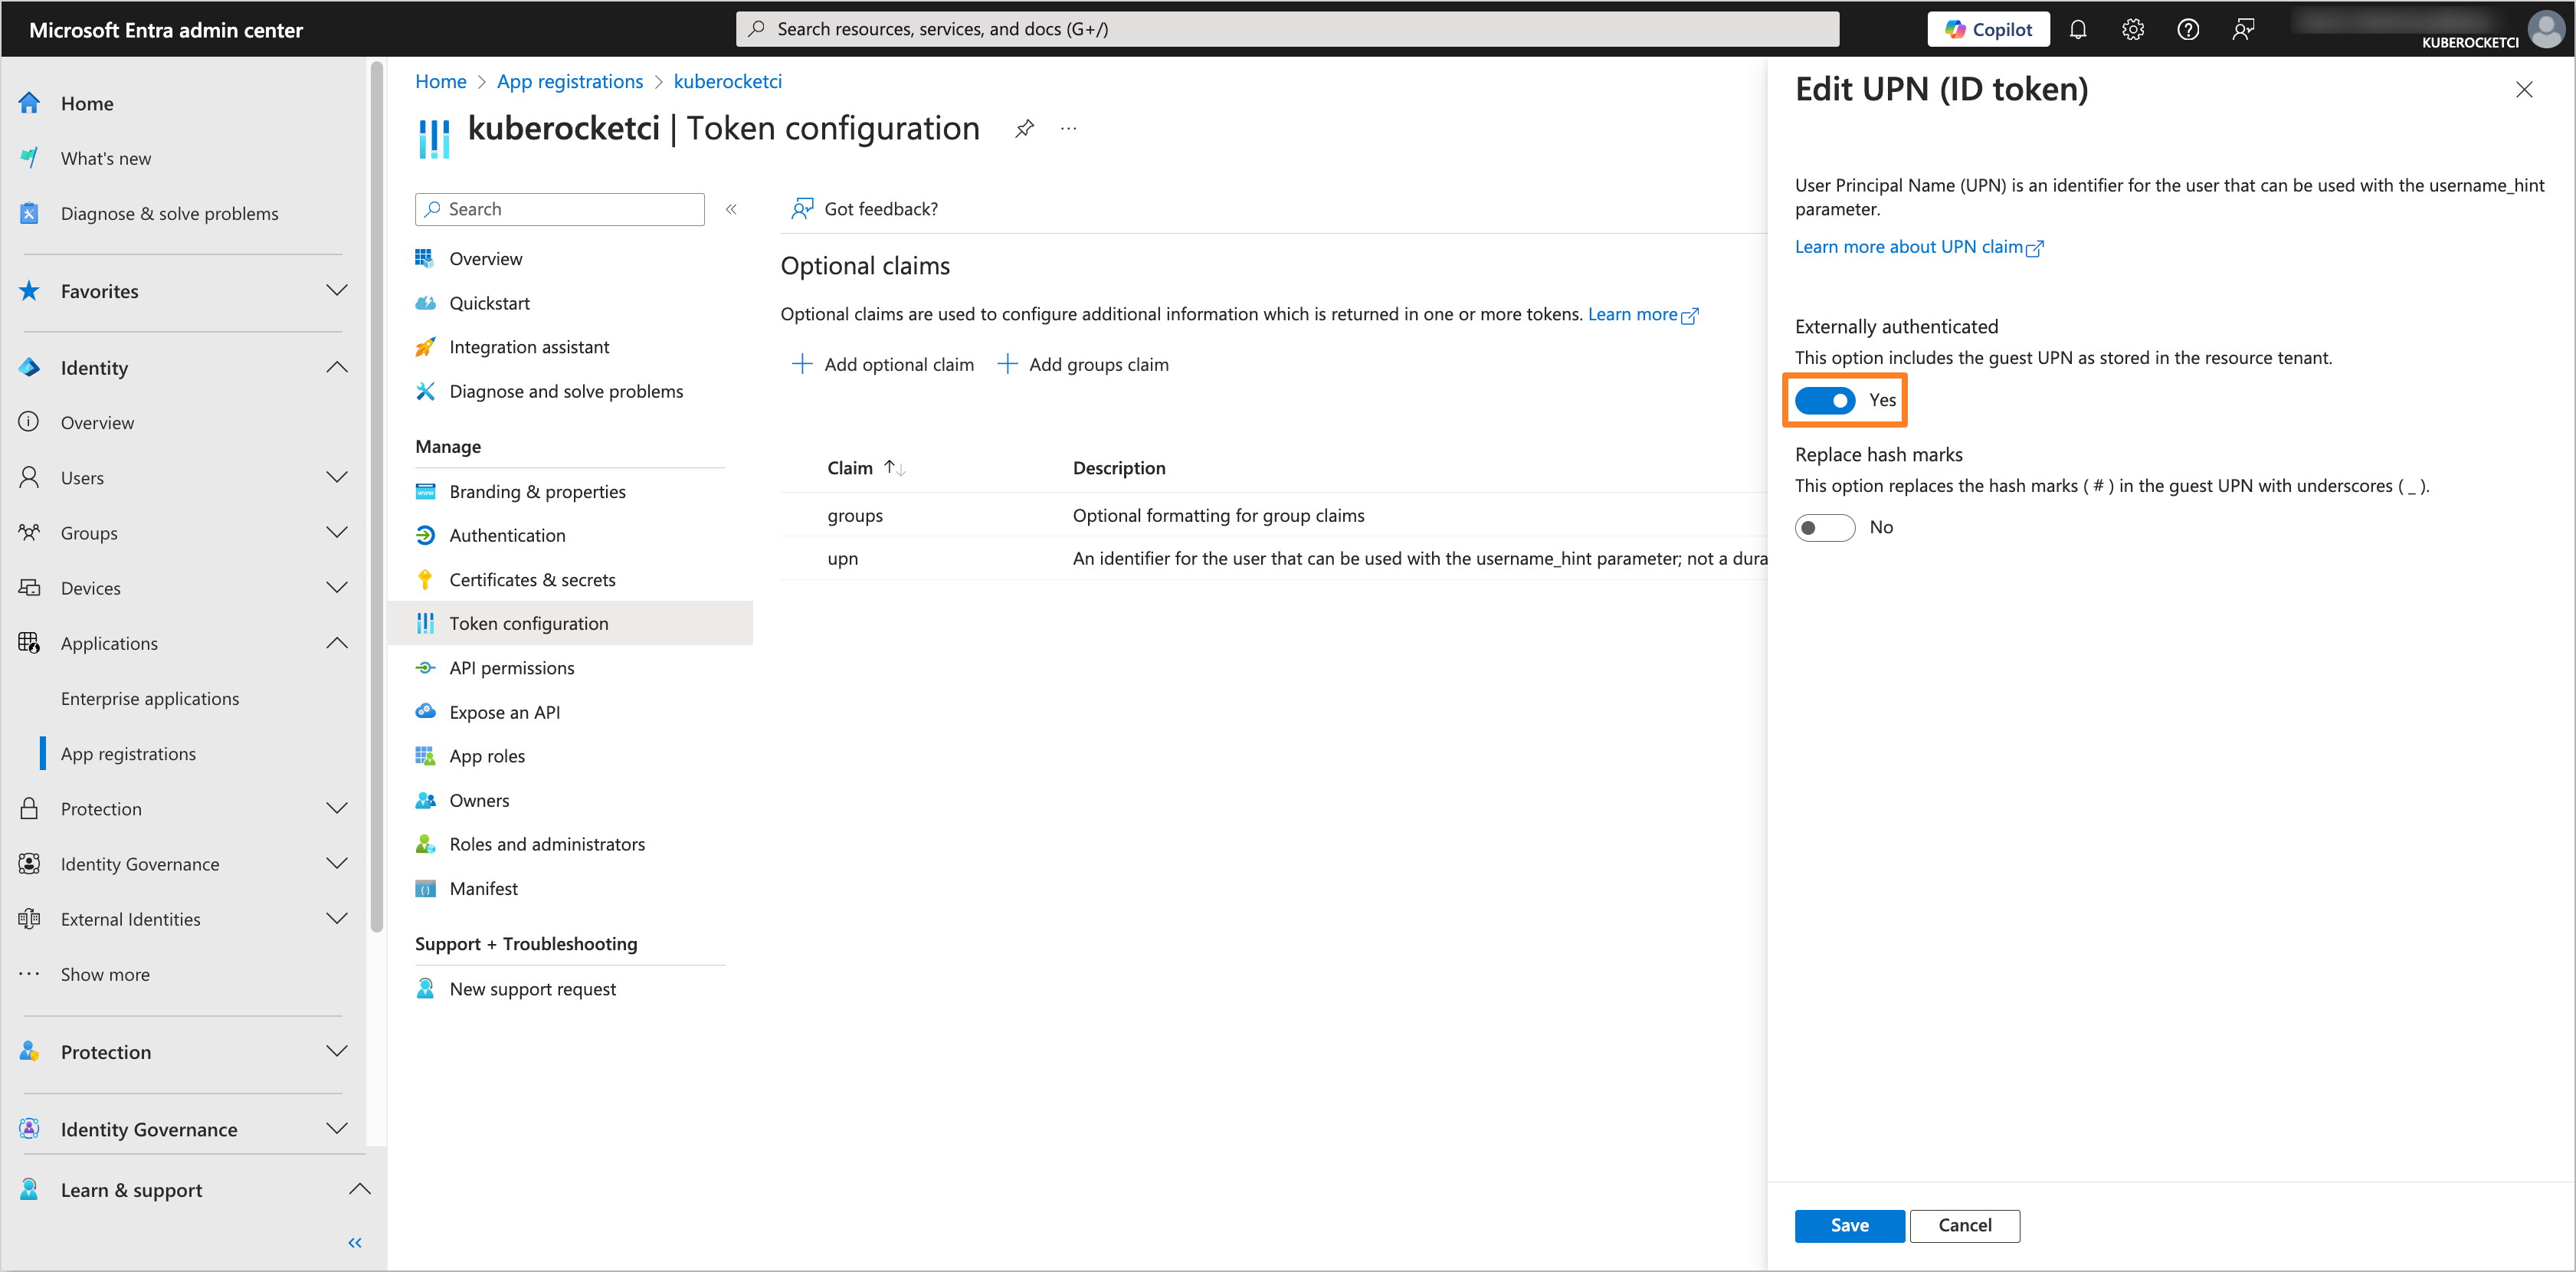
(Optional) After adding the upn claim, click on the three dots next to it, select Edit, and turn on the Externally authenticated toggle to Yes value.
noteThis step is optional and should only be performed if external users (i.e., users with User type: Guest) will be added to the Microsoft Entra Tenant and require access to the Application.
-
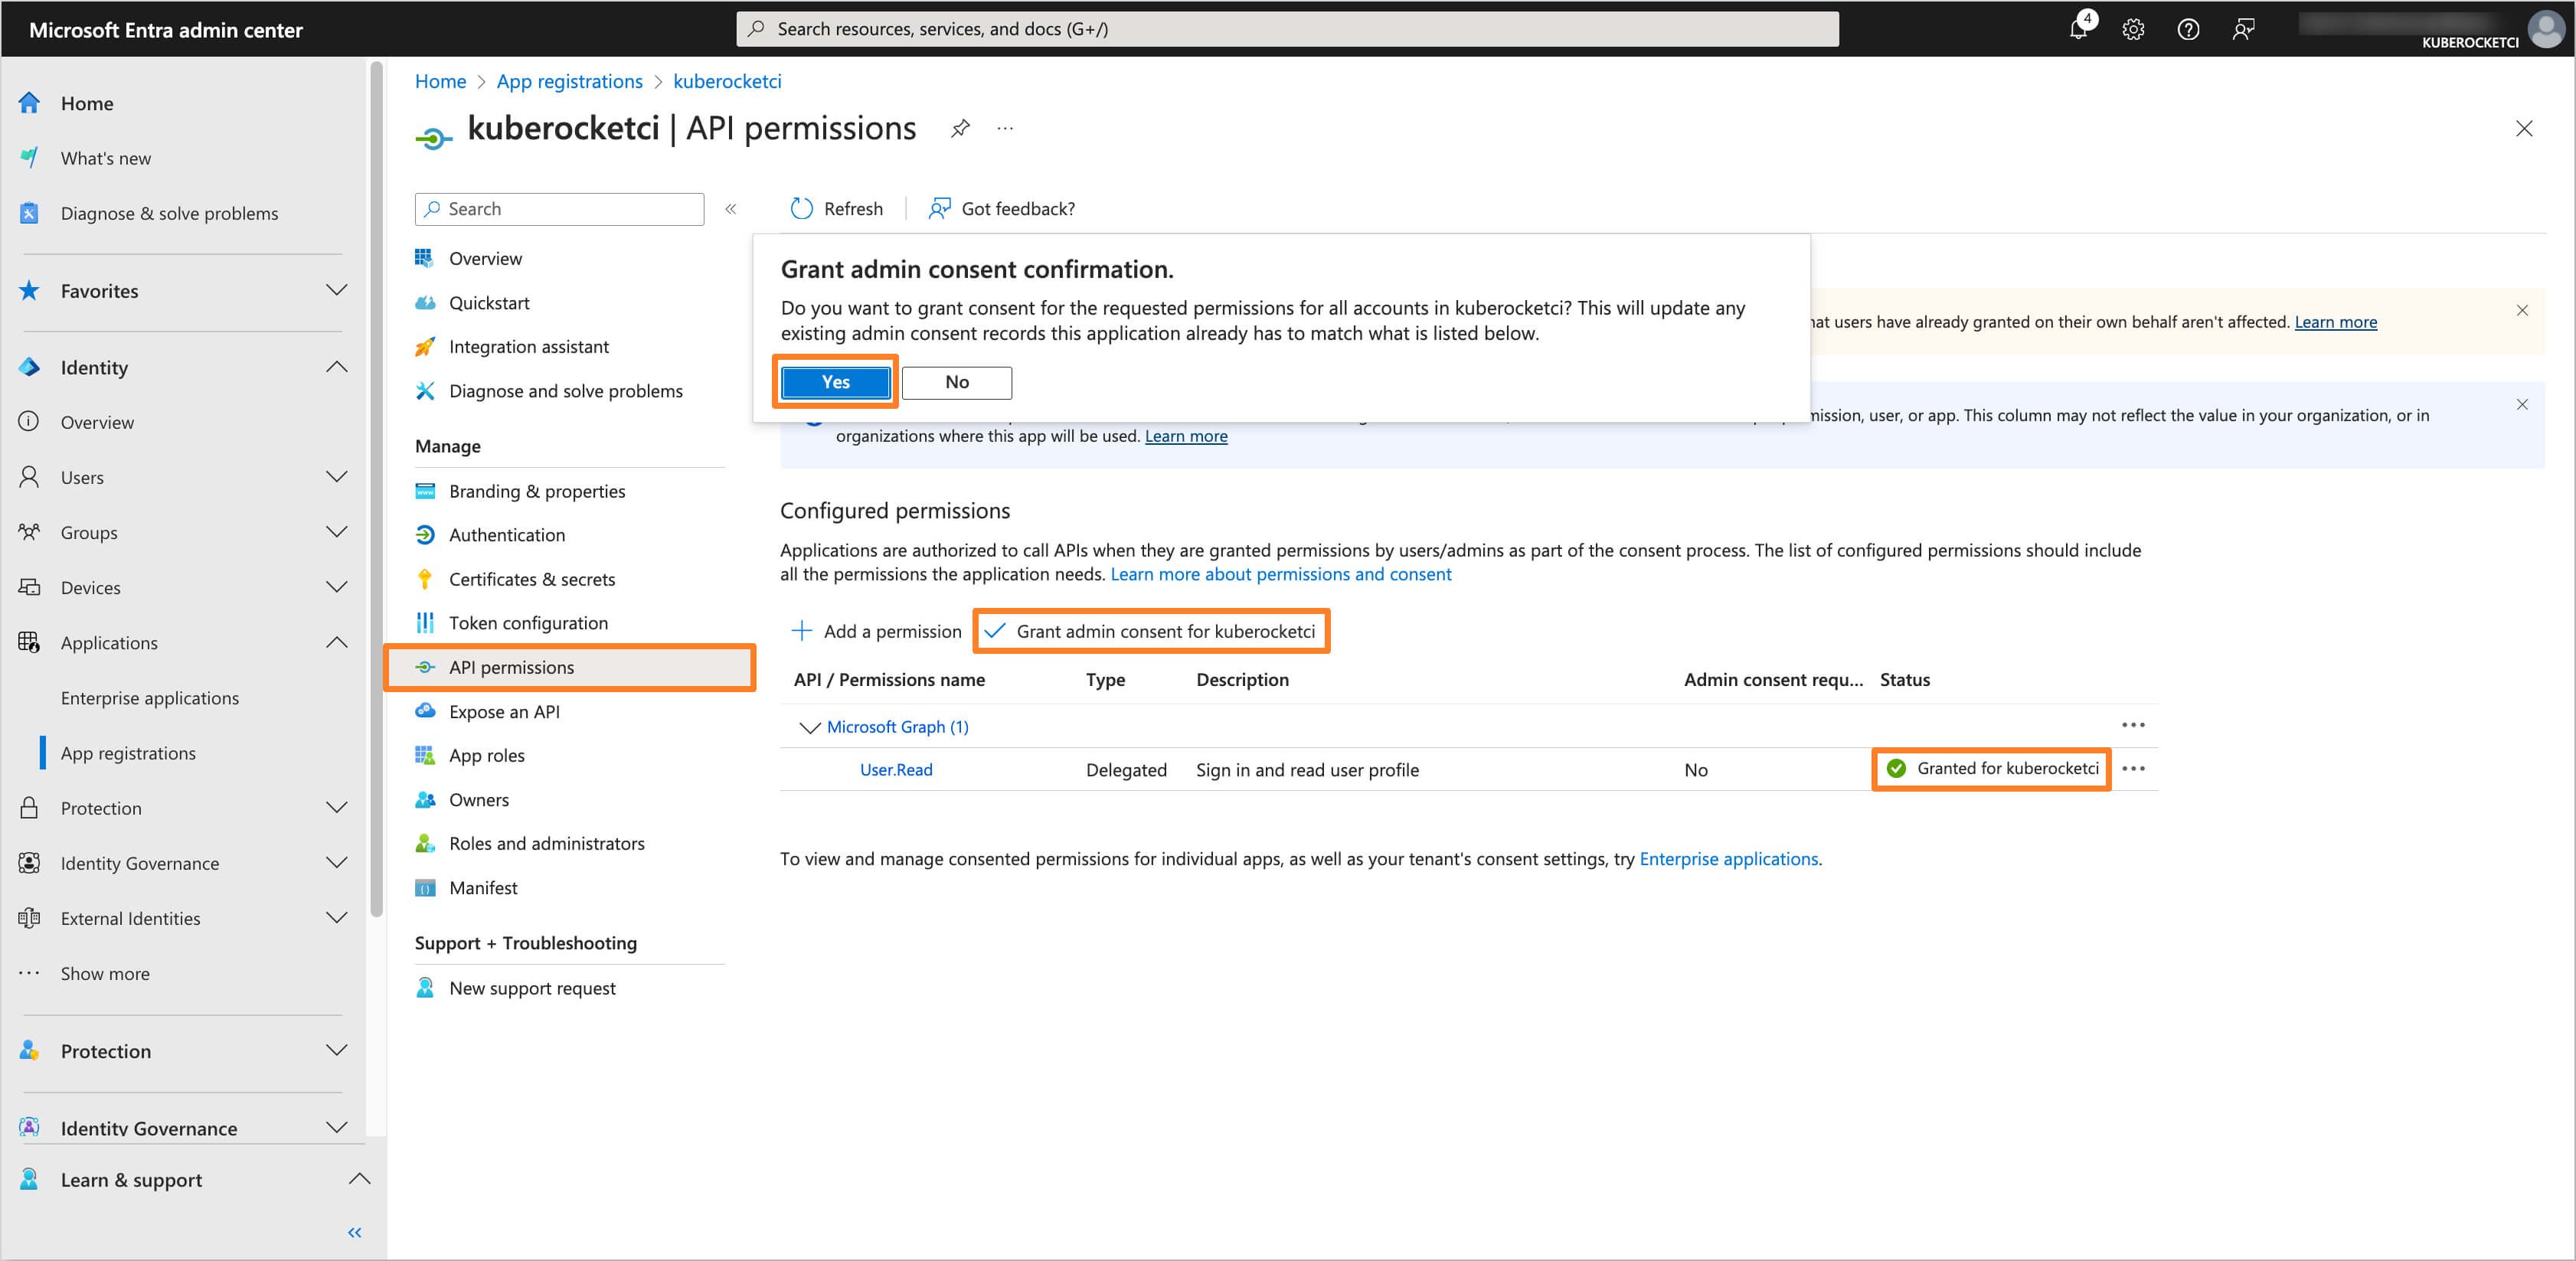
Navigate to the API permissions section. Ensure that the User.Read permission is added under the Microsoft Graph API. If not, click on the Add a permission button, select Microsoft Graph, and add the User.Read permission. After adding the permission, click on the Grant admin consent for 'Tenant name' button to grant the required permissions.
-
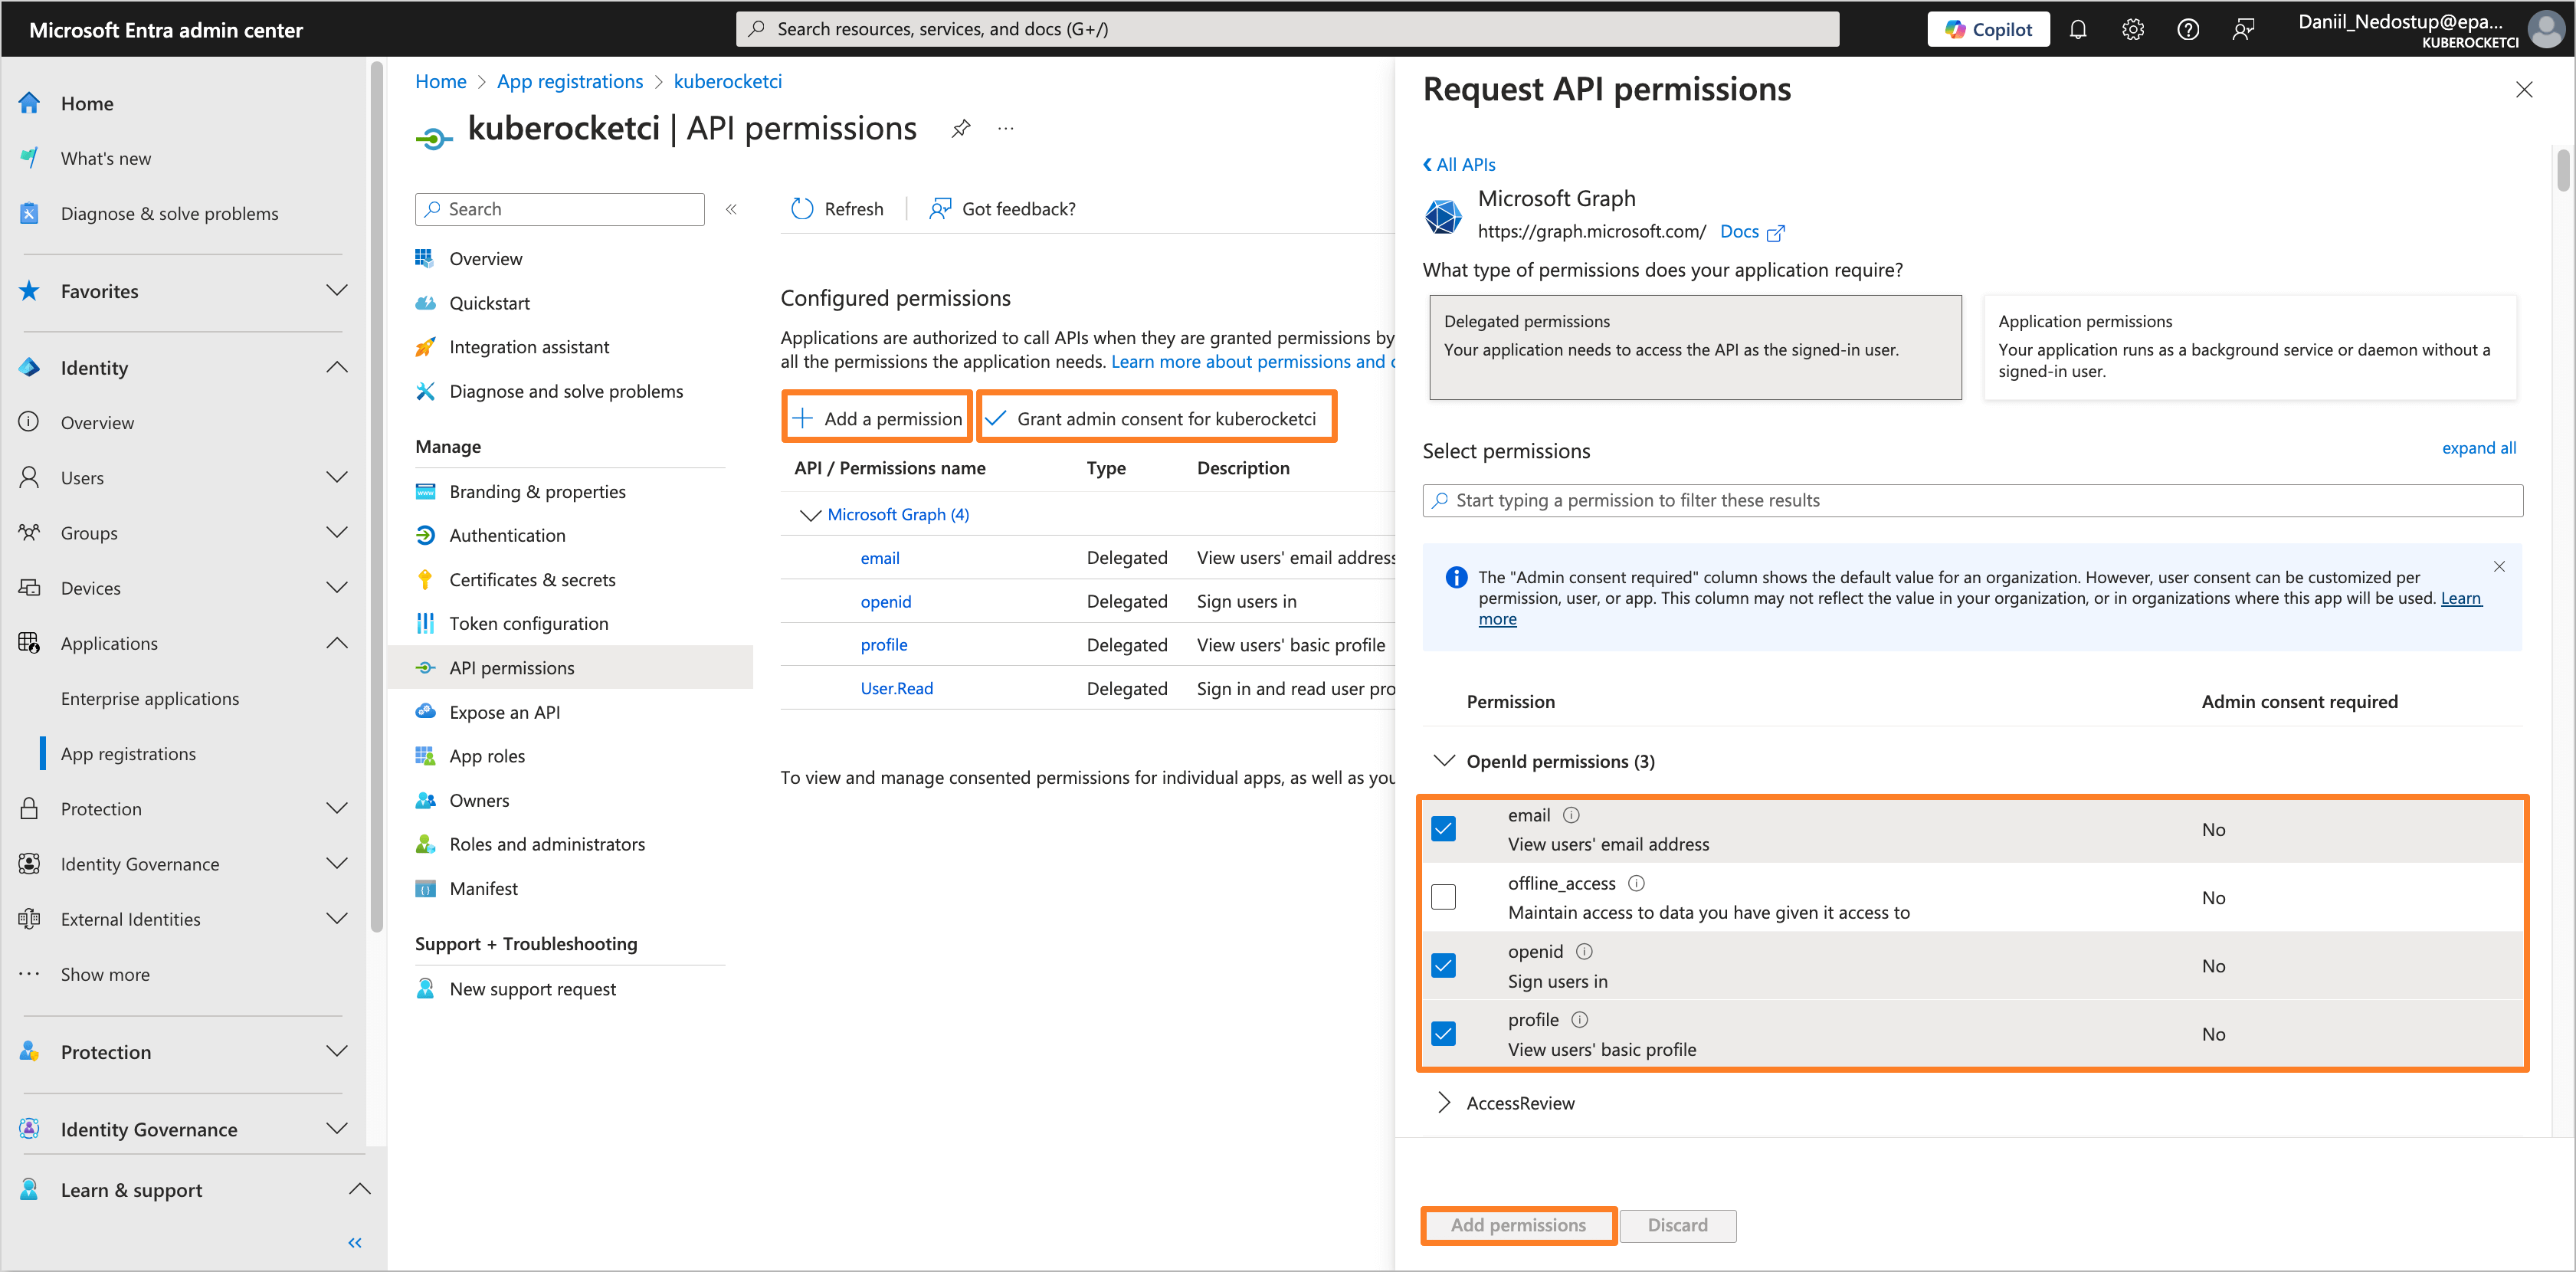
(Optional) Additionally, for Microsoft Graph API, add the OpenId permissions, such as openid, email, and profile.
noteThis step is optional and should only be performed if external users (i.e., users with User type: Guest) will be added to the Microsoft Entra Tenant and require access to the Application.
-
The OIDC Application in Microsoft Entra is now configured and ready for integration with AWS EKS.
Creating Users and Groups in Microsoft Entra
Only users who are part of the groups configured in the Microsoft Entra Admin Center will be able to authenticate to the AWS EKS cluster using OIDC.
To create users and groups in Microsoft Entra, follow these steps:
Creating a Group
-
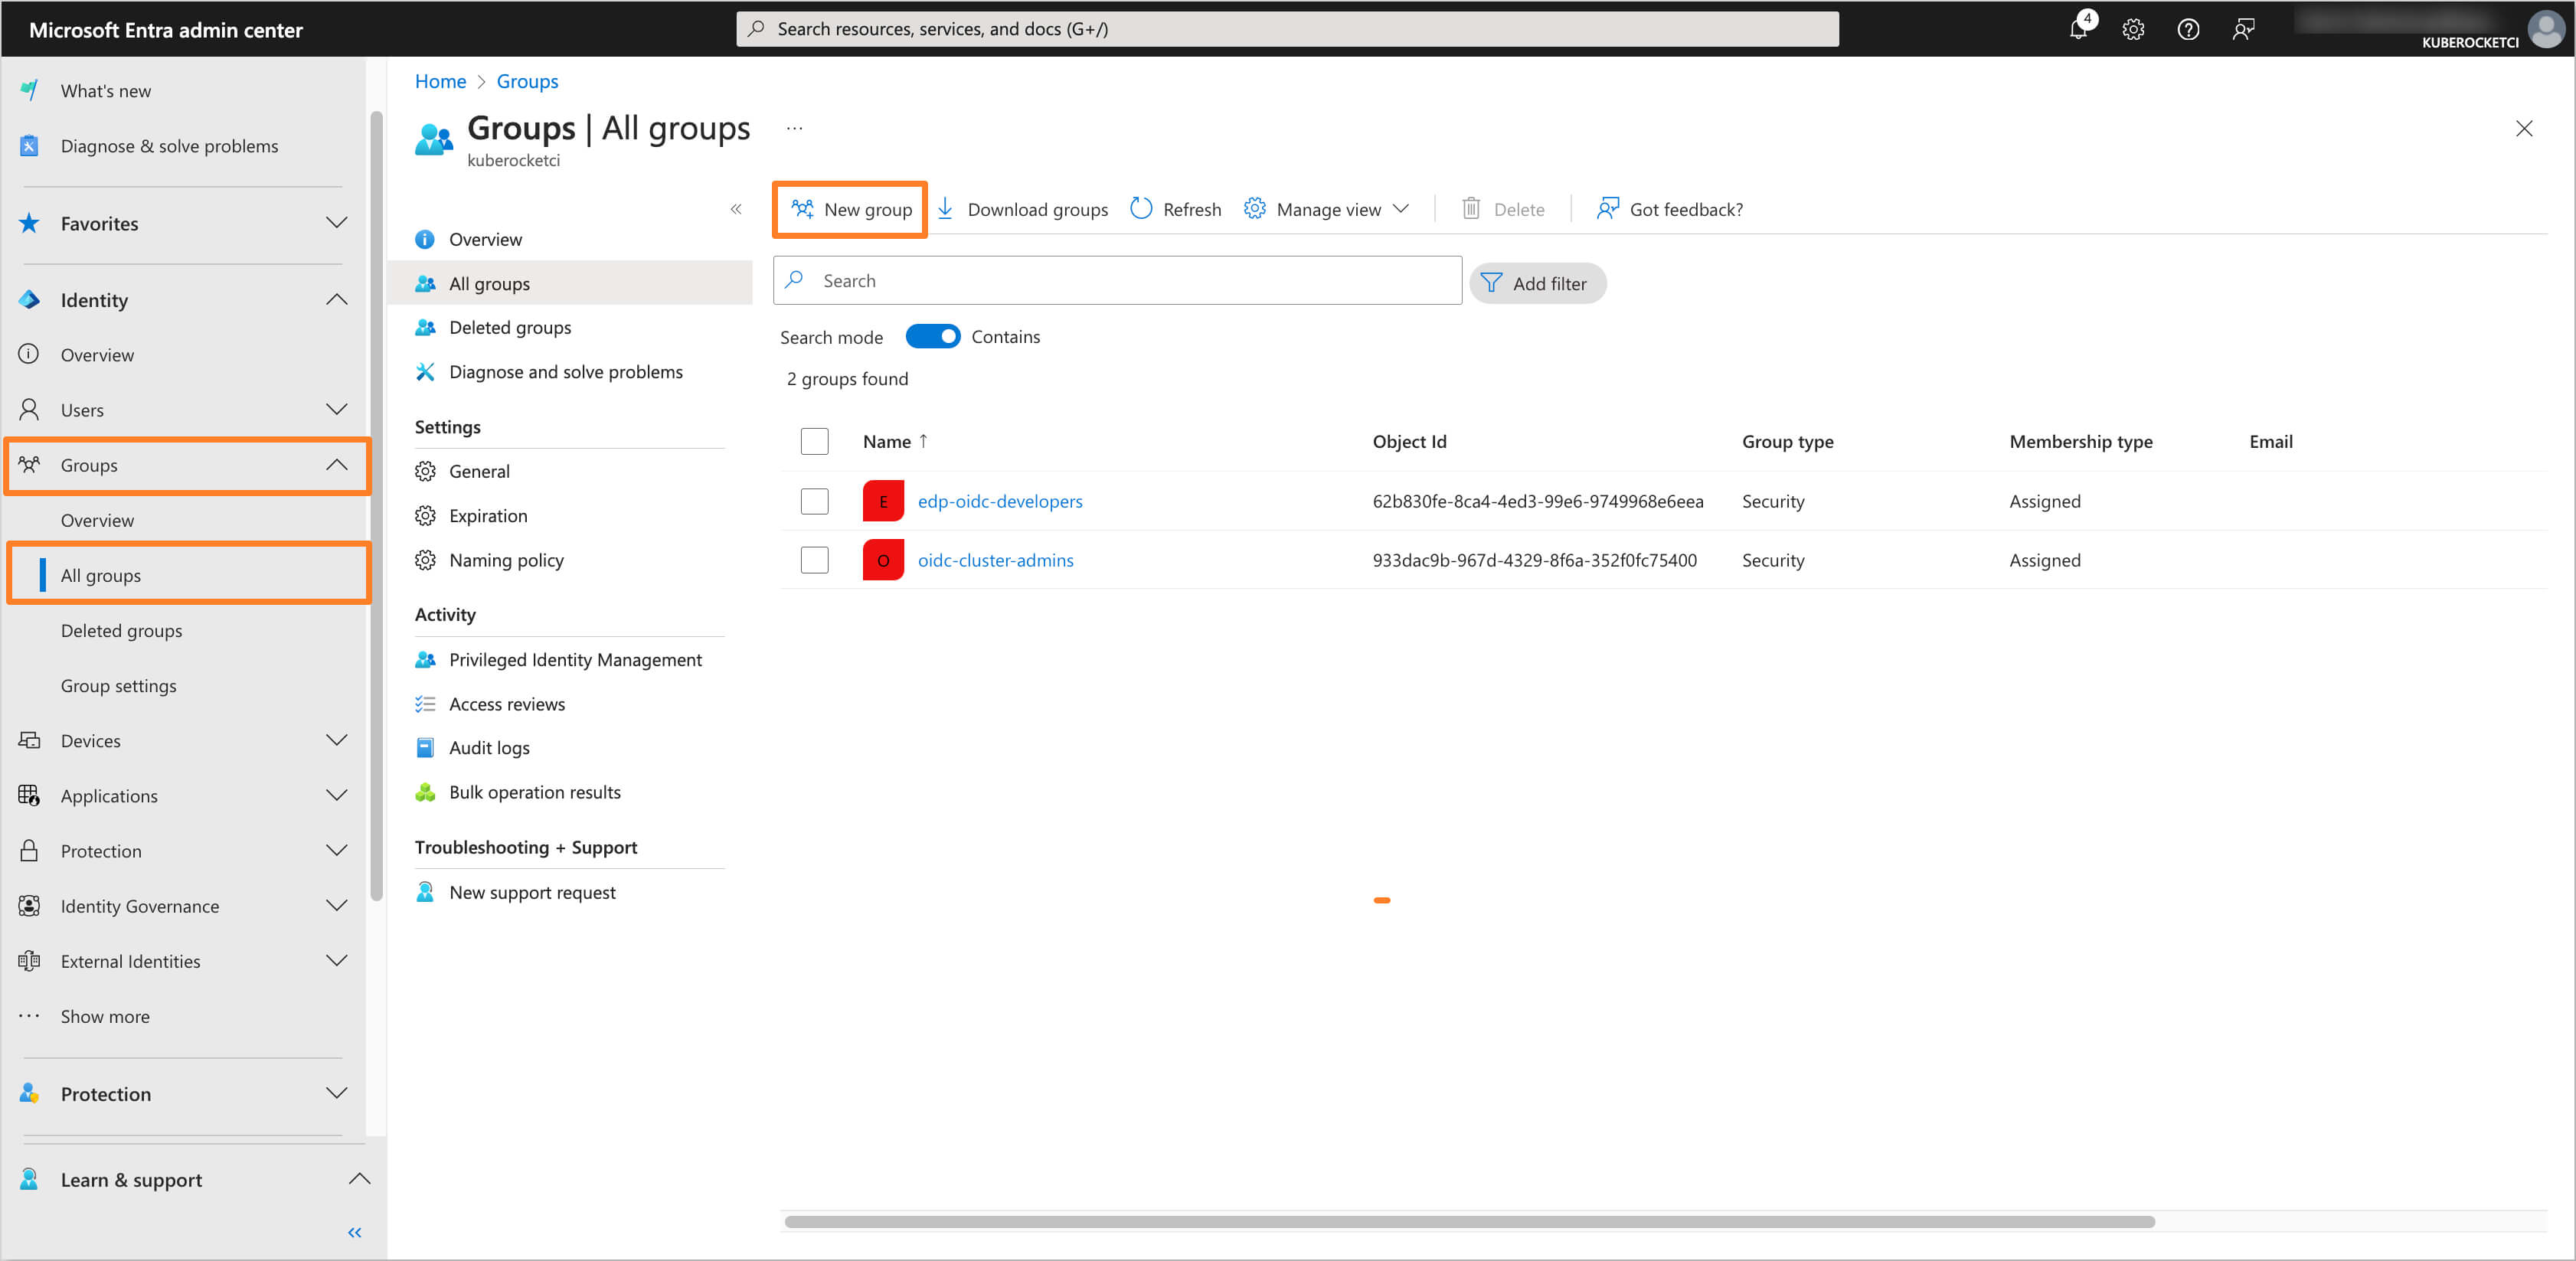
In the Microsoft Entra Admin Center, in the left sidebar menu, select Groups and then All groups. Click on New group button to create a new group(s) for users who will have access to the AWS EKS cluster.
-
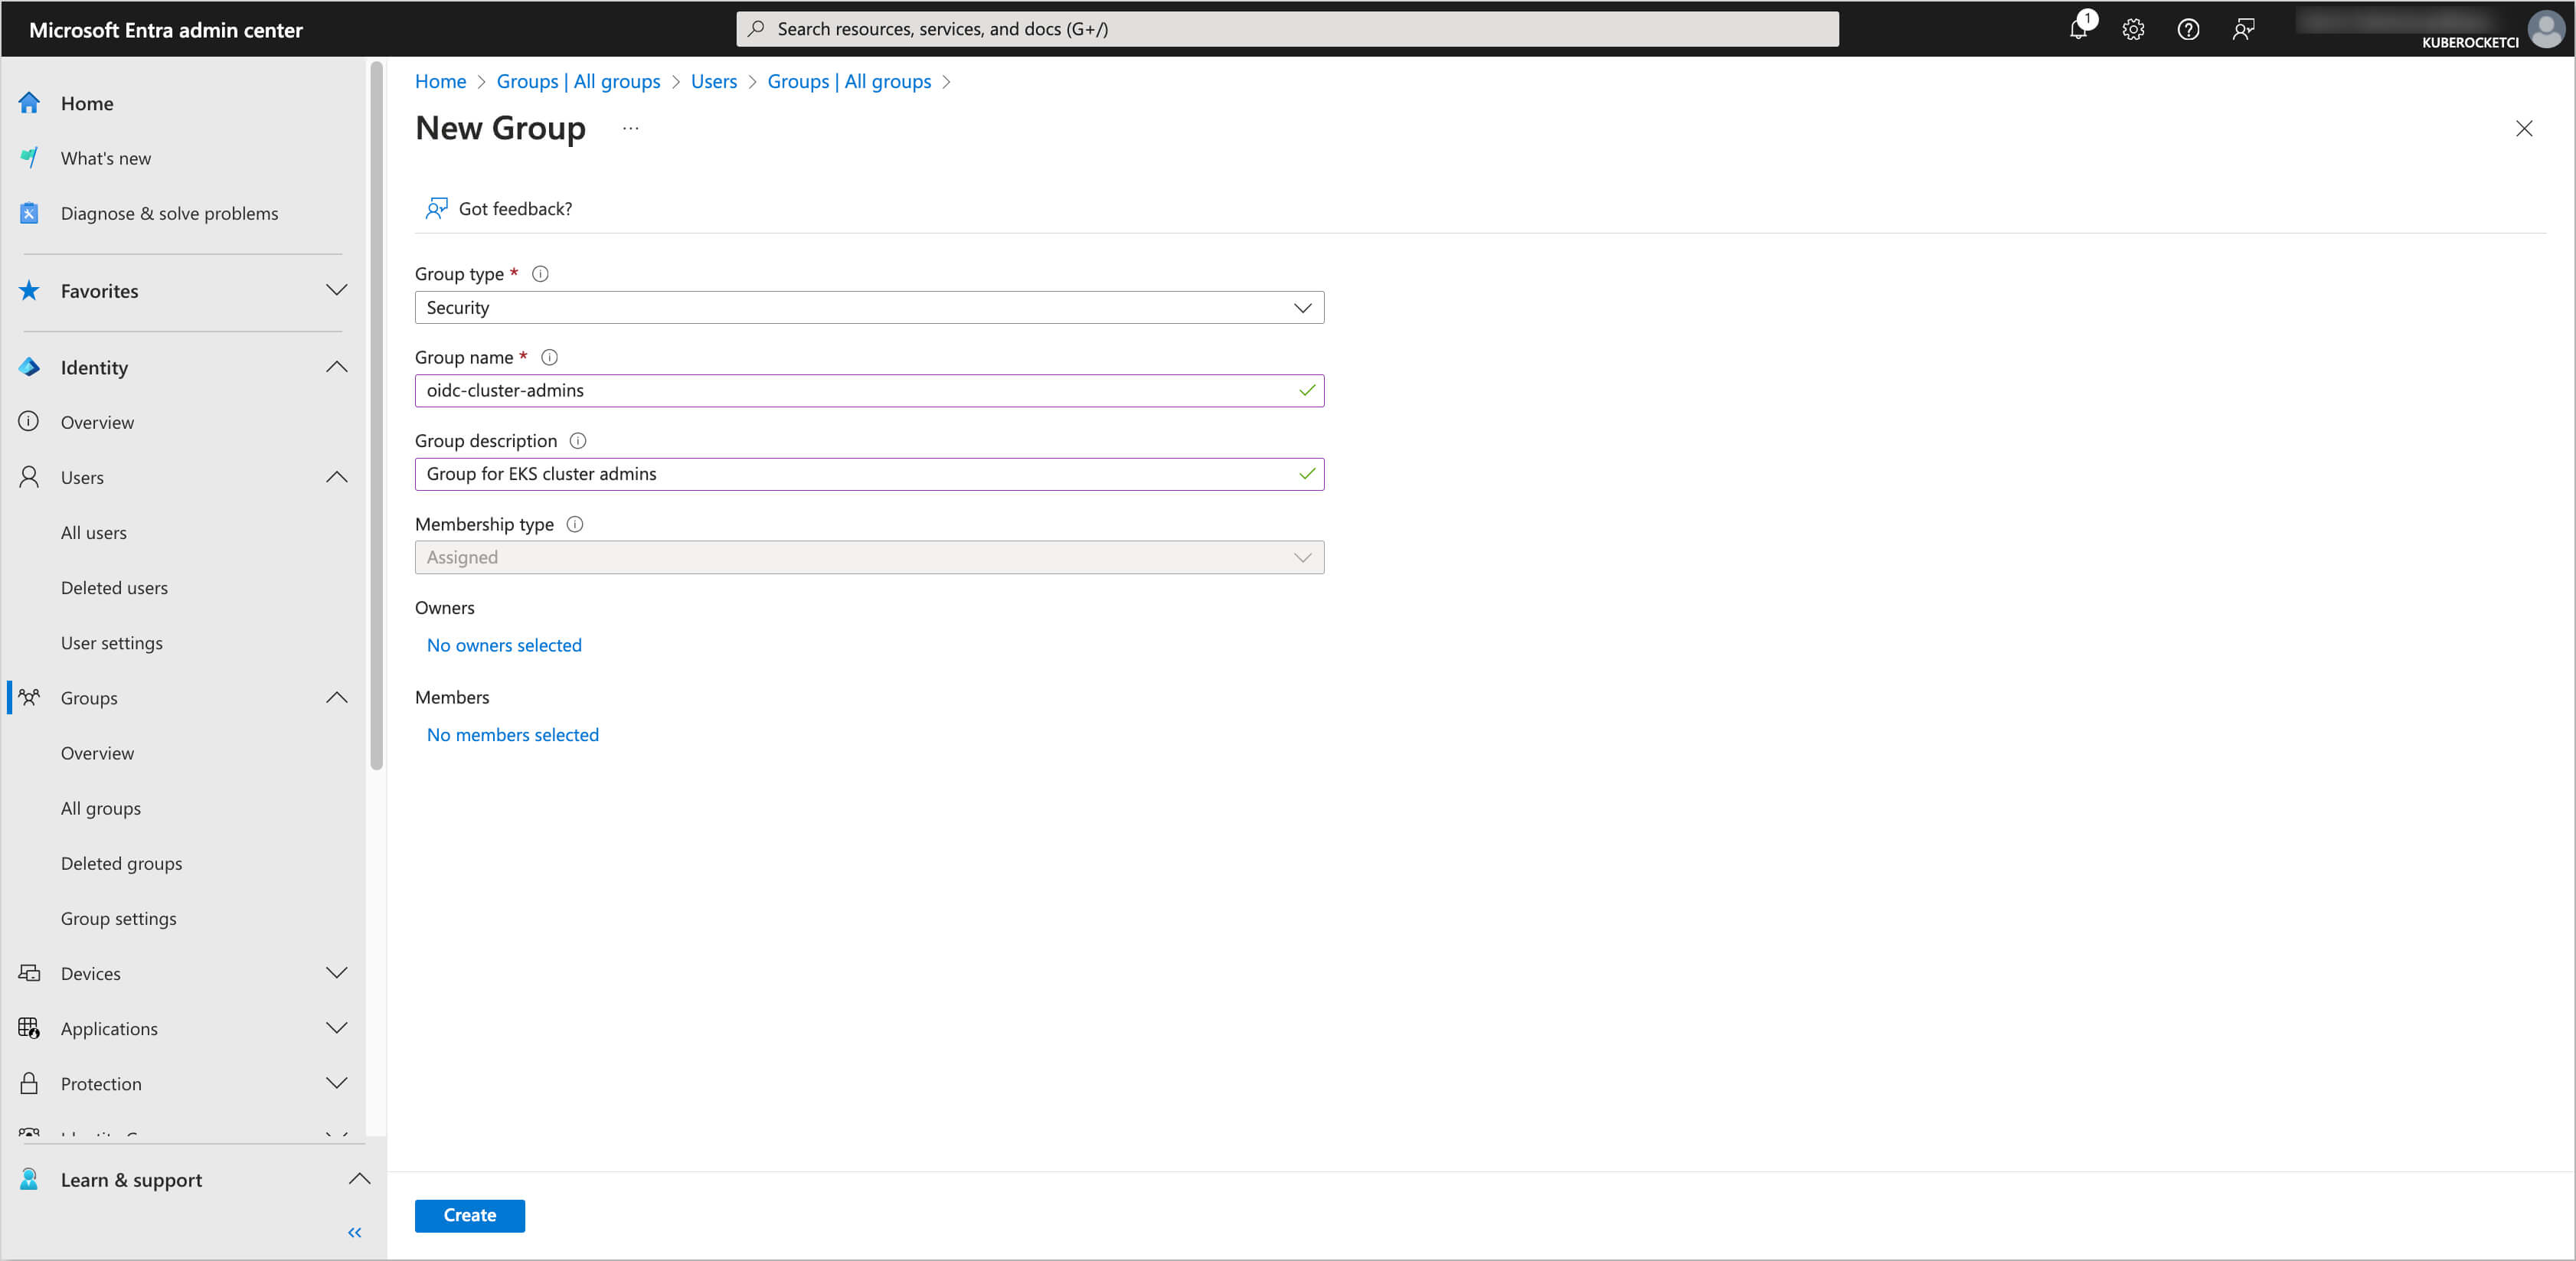
Fill in the details for the group, such as Group type and Group name. Click on the Create button to create the group.
-
The group will be created, and you can start adding users to it.
Adding Users to the Group
-
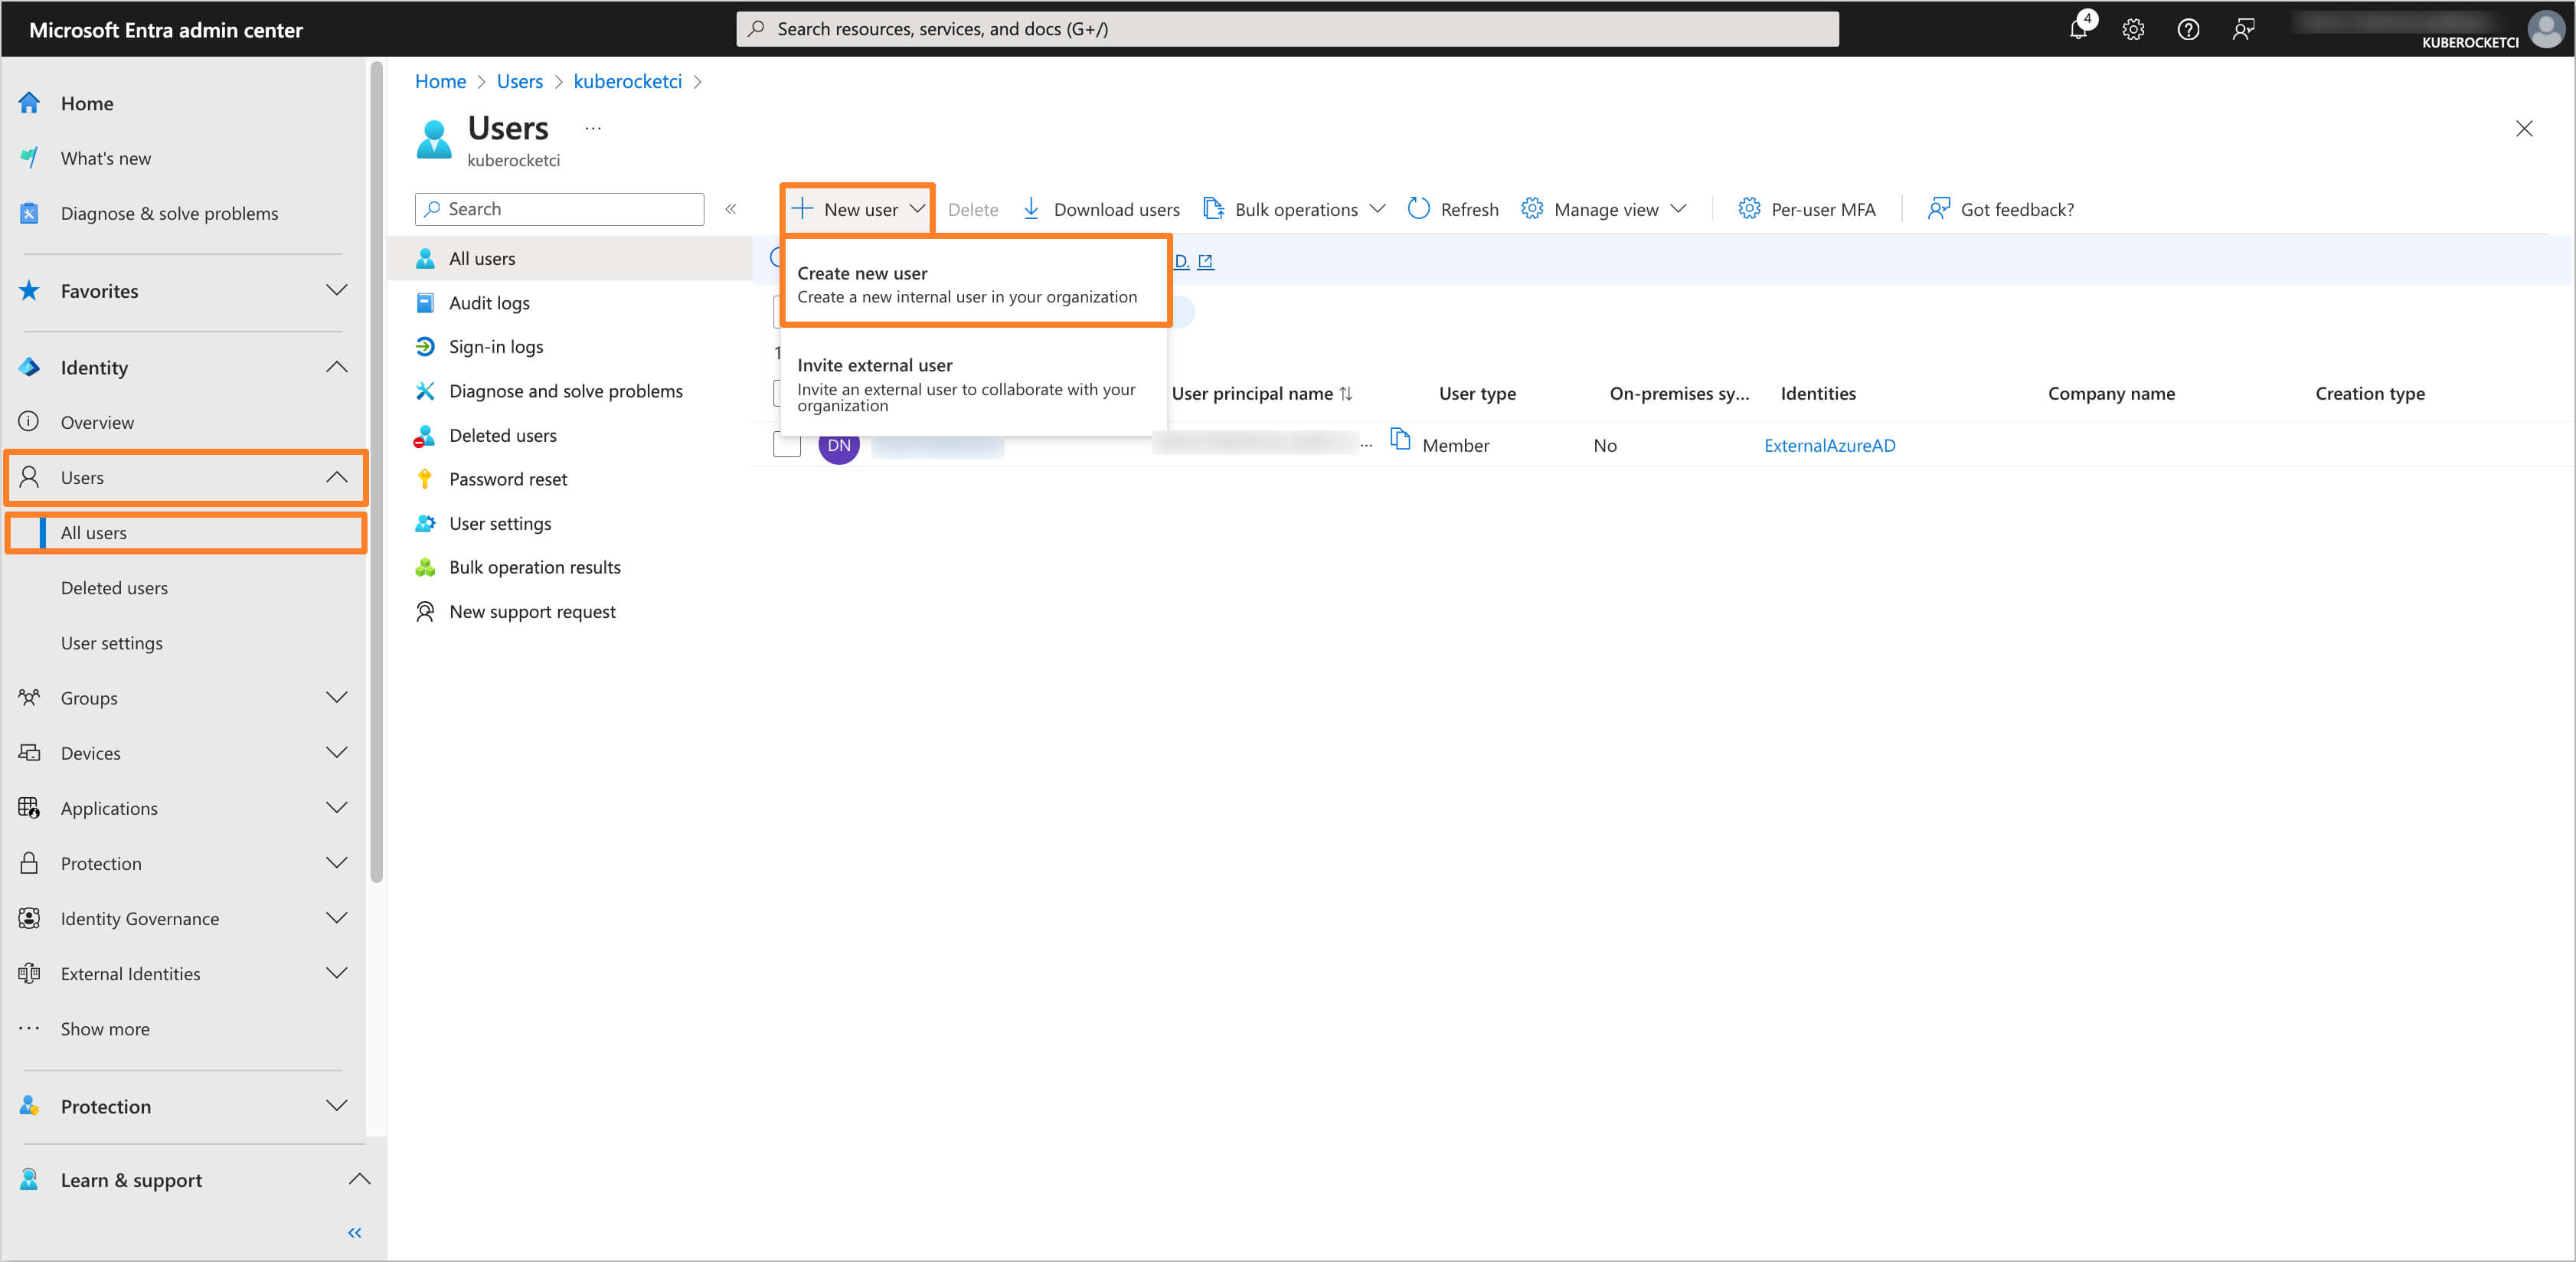
In the Microsoft Entra Admin Center, in the left sidebar menu, select Users and then click on All users. In the New user tab, click on the Create new user button to create a new user.
-
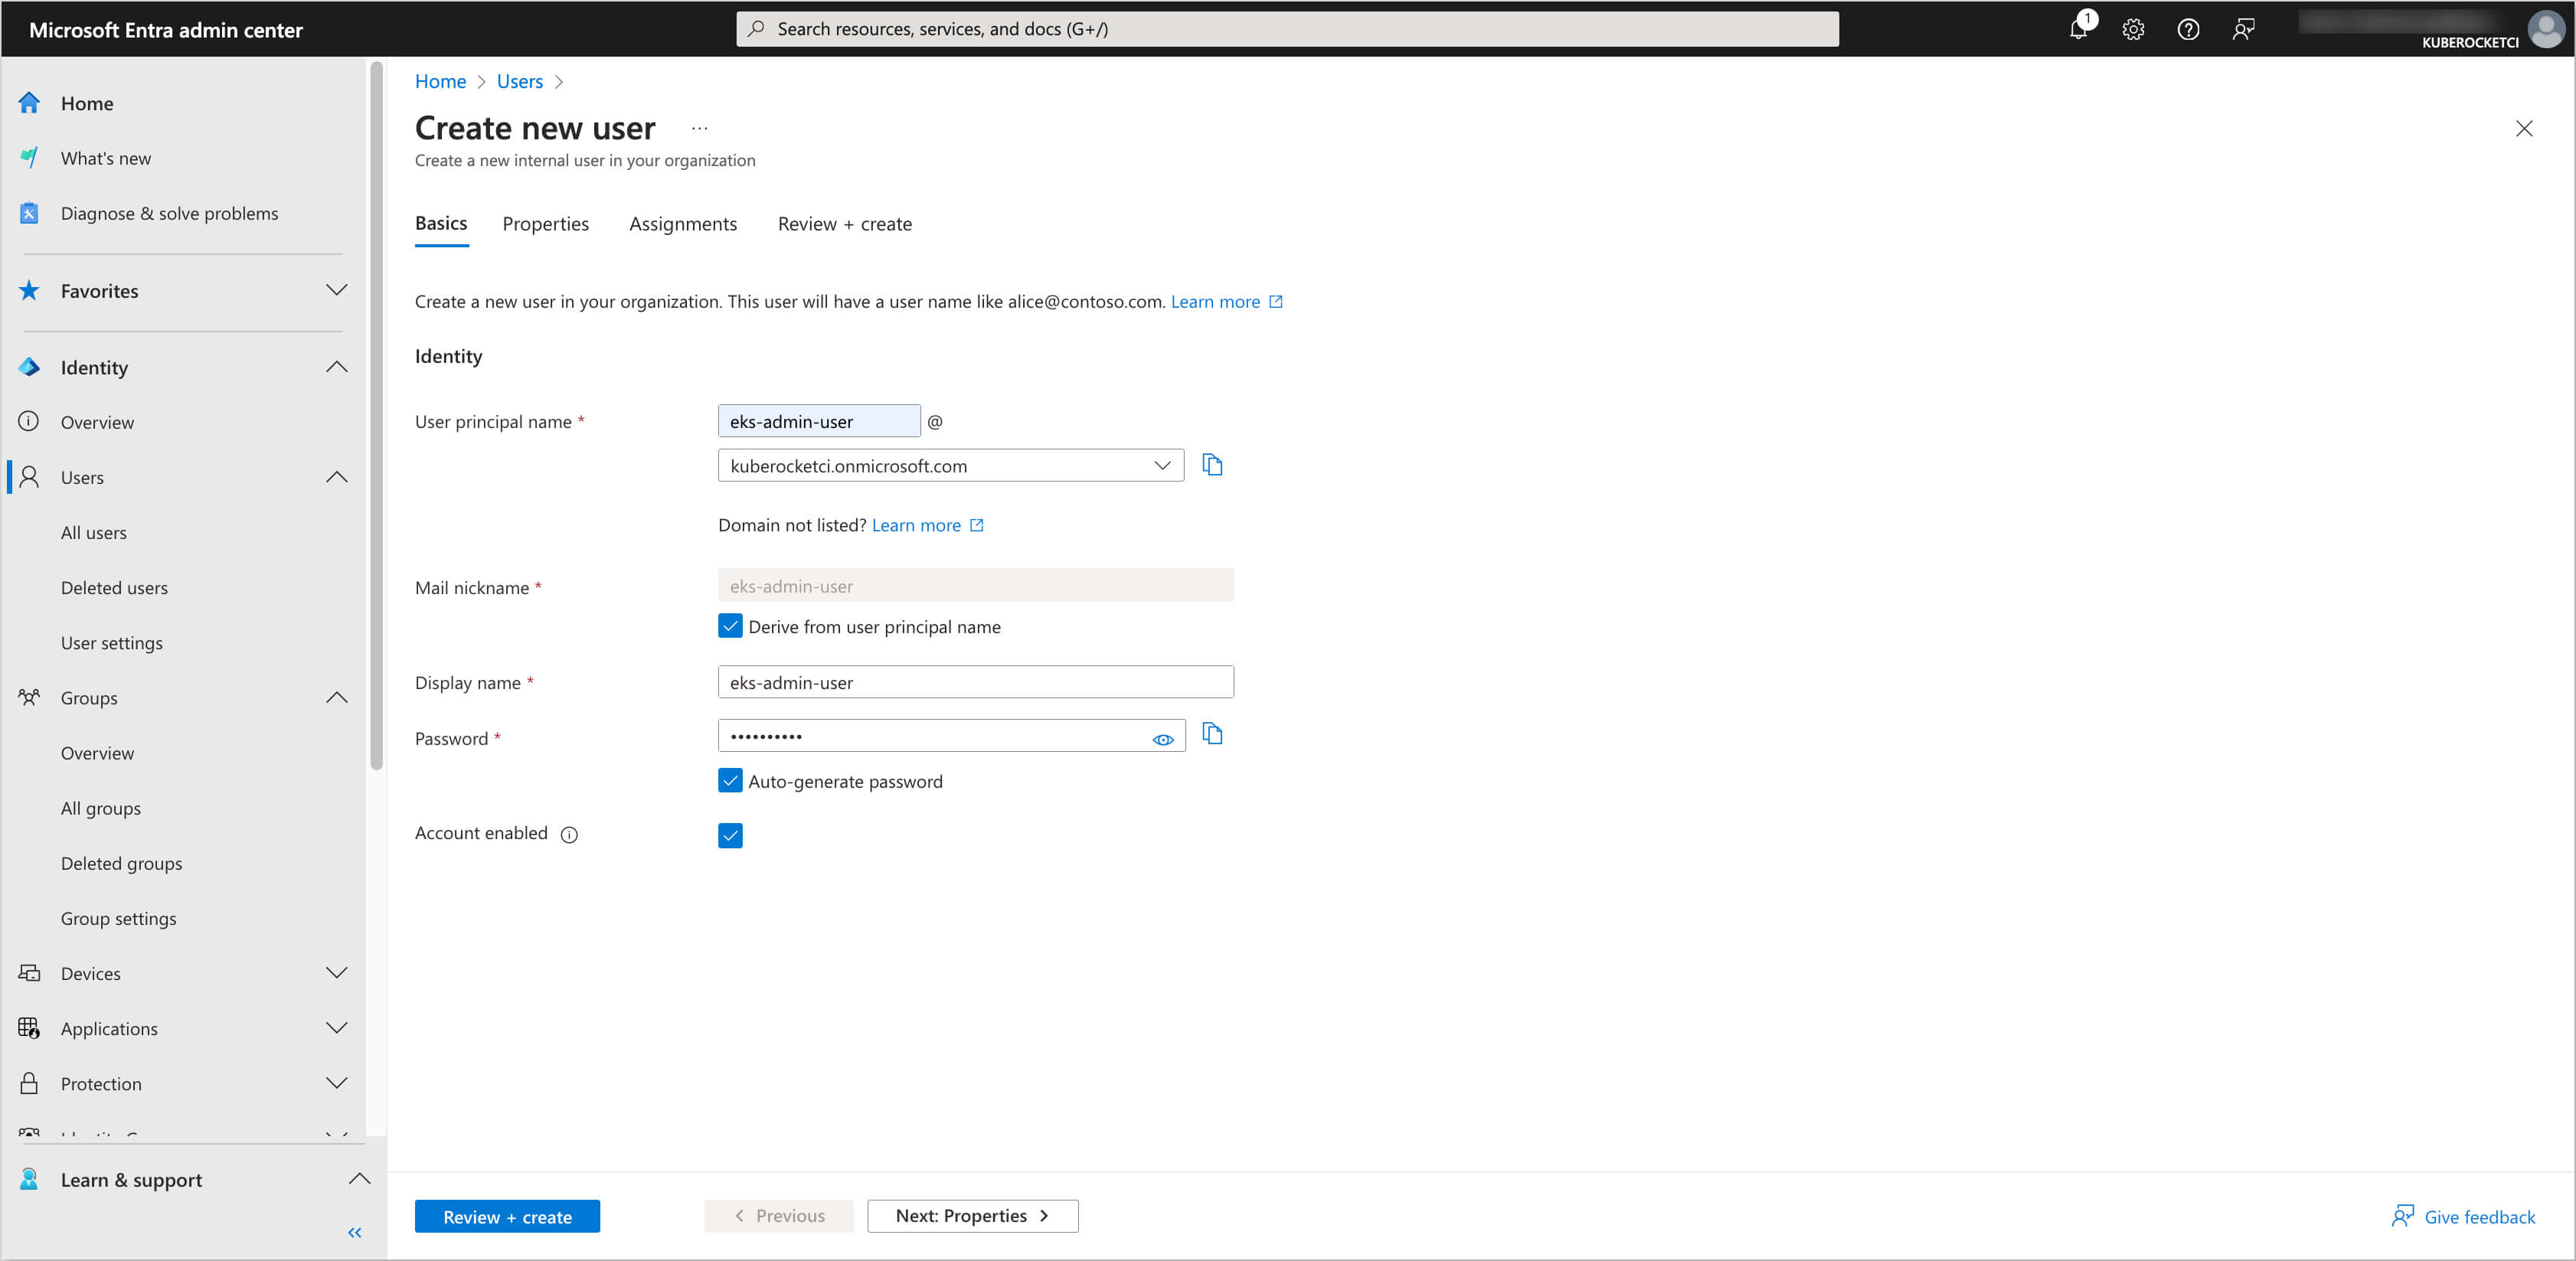
Fill in the details for the user, such as User principal name, Mail nickname, Display name, and temporary password. In the Properties tab you can set the First name, Last name, and other details.
-
In the Assignment tab, click on the Add group button. In the Select Group window, choose the group(s) you created earlier (e.g.,
oidc-cluster-admins) and click on the Select button.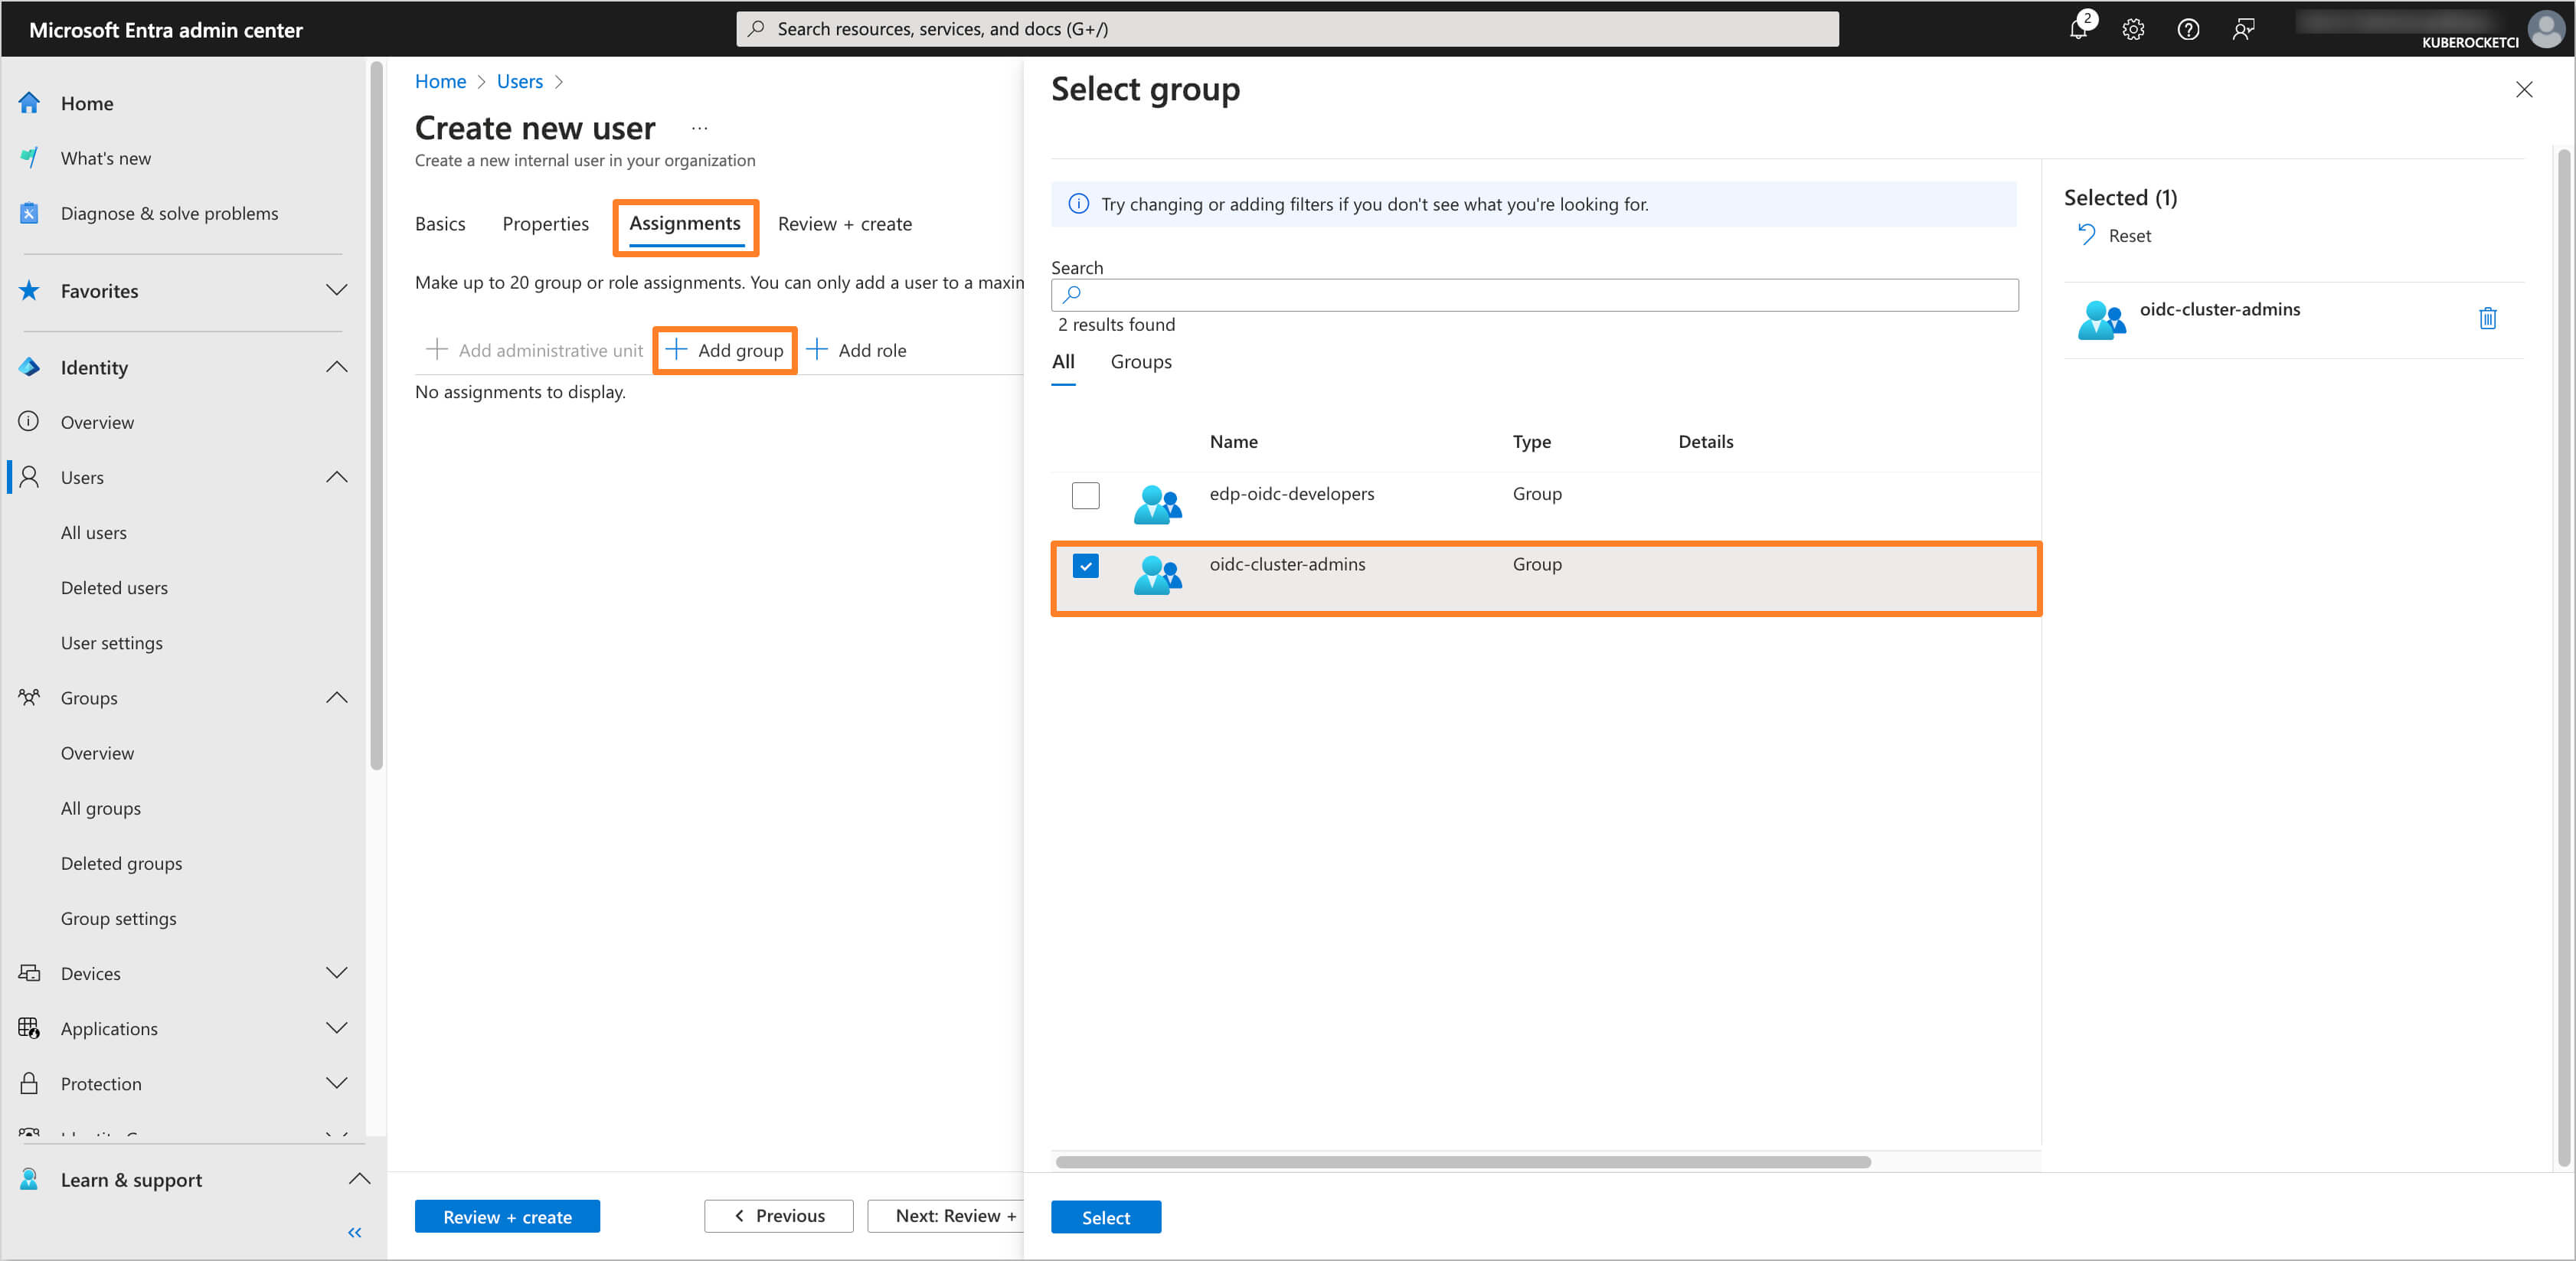
-
Click on the Review + create button to create the user. The user will be created and added to the group(s) you selected.
Configuring Microsoft Entra as an Identity Provider in AWS EKS
There are two methods to configure Microsoft Entra as an Identity Provider in AWS EKS: through the AWS Management Console and using Terraform.
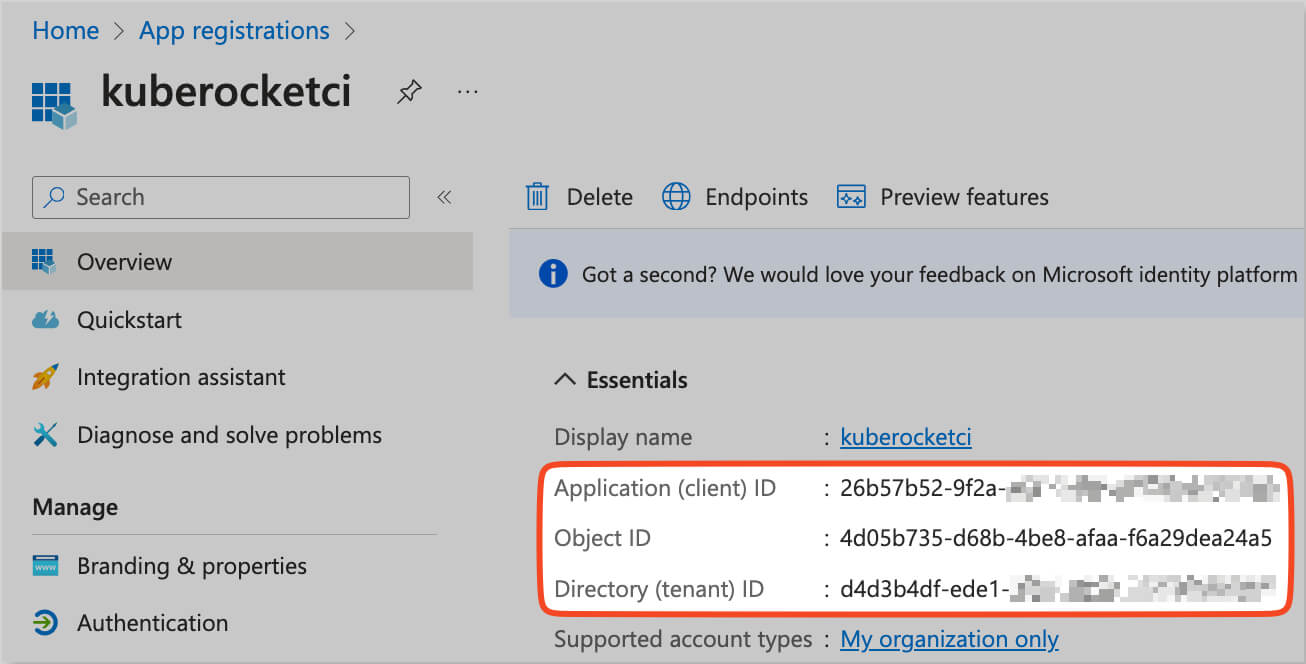
The Application data, such as Directory (tenant) ID, Application (client) ID, and Issuer URL, can be found in the Overview section of the OIDC Application in the Microsoft Entra Admin Center.
Method 1: Using the AWS Management Console
-
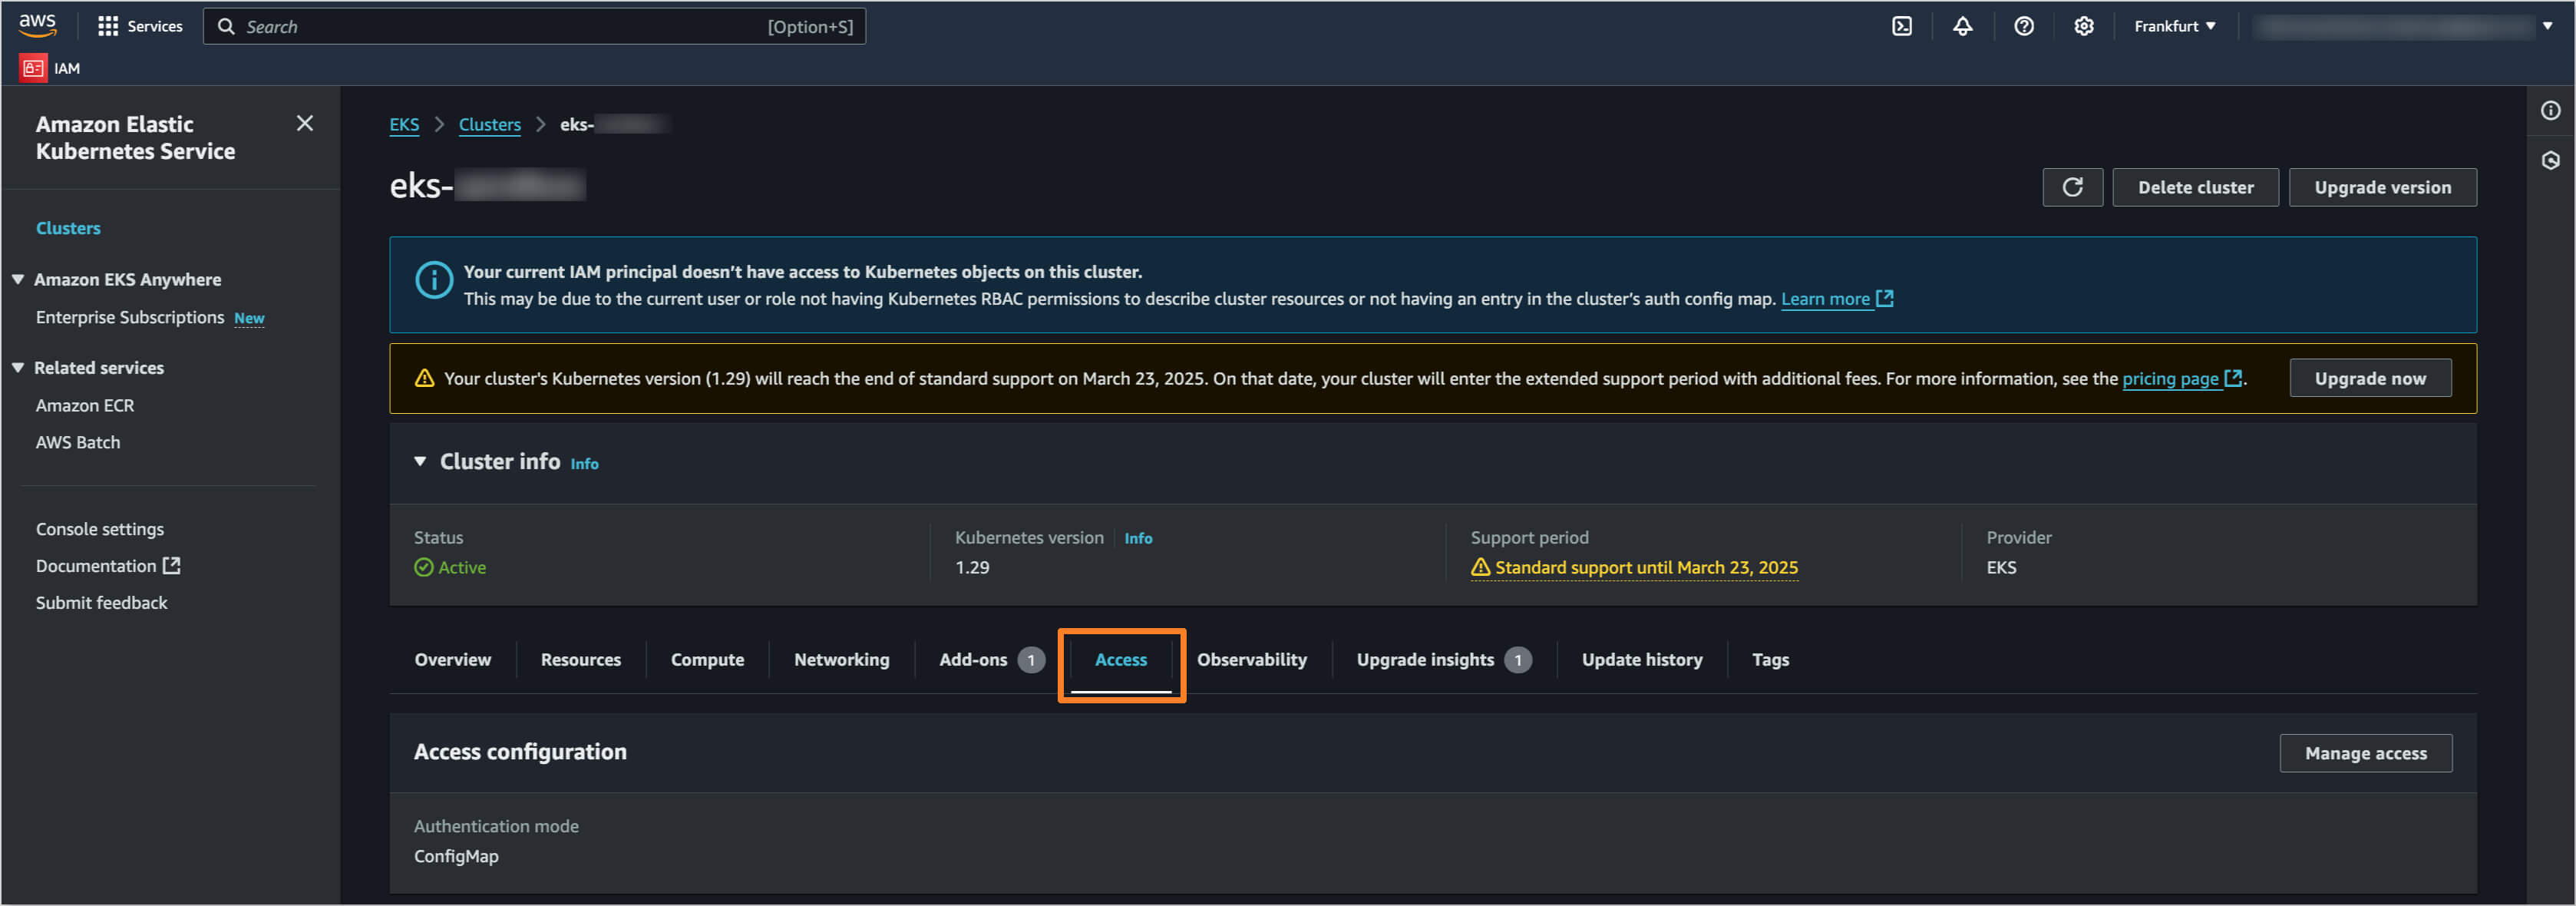
Log in to the AWS Management Console and navigate to the Amazon EKS console. Select the EKS cluster you want to configure and click on the Access tab.
-
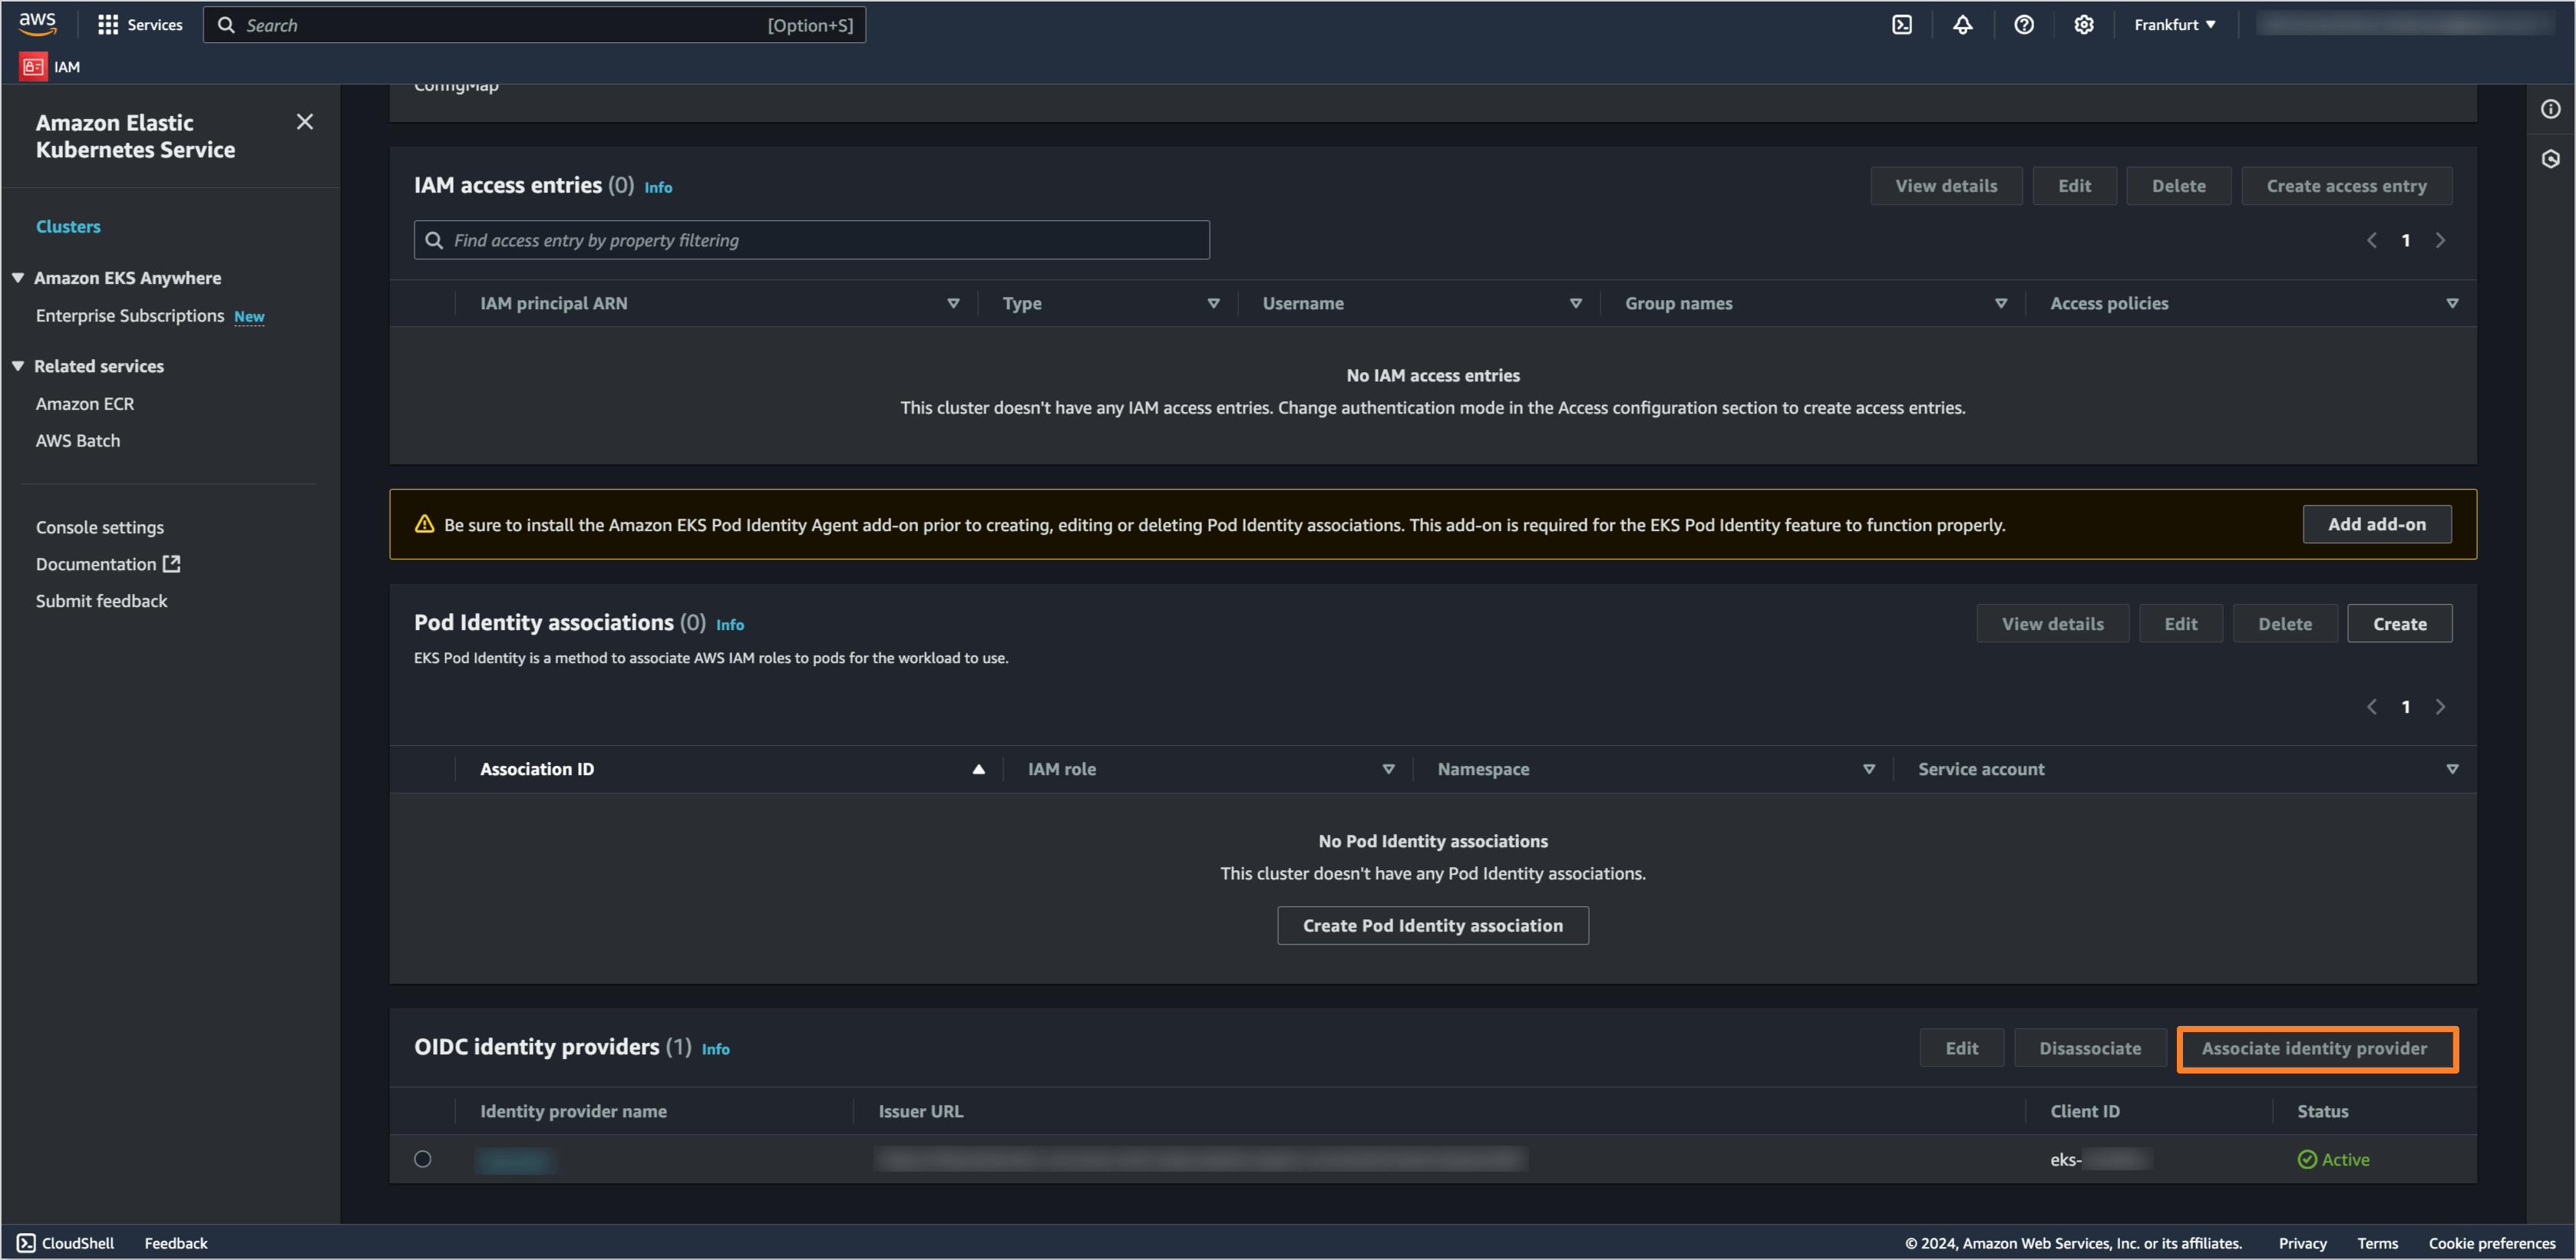
In the OIDC identity providers section, click on the Associate identity provider button.
-
Fill in the following details:
-
Name:
Entra -
Issuer URL:
https://login.microsoftonline.com/<Tenant-ID>/, where<Tenant-ID>is the Directory (tenant) ID. Ensure that the URL ends with/. -
Client ID:
<Application (client) ID>, which corresponds to the Application (client) ID of the OIDC Application. -
Username Claim:
upn. -
Groups Claim:
groups.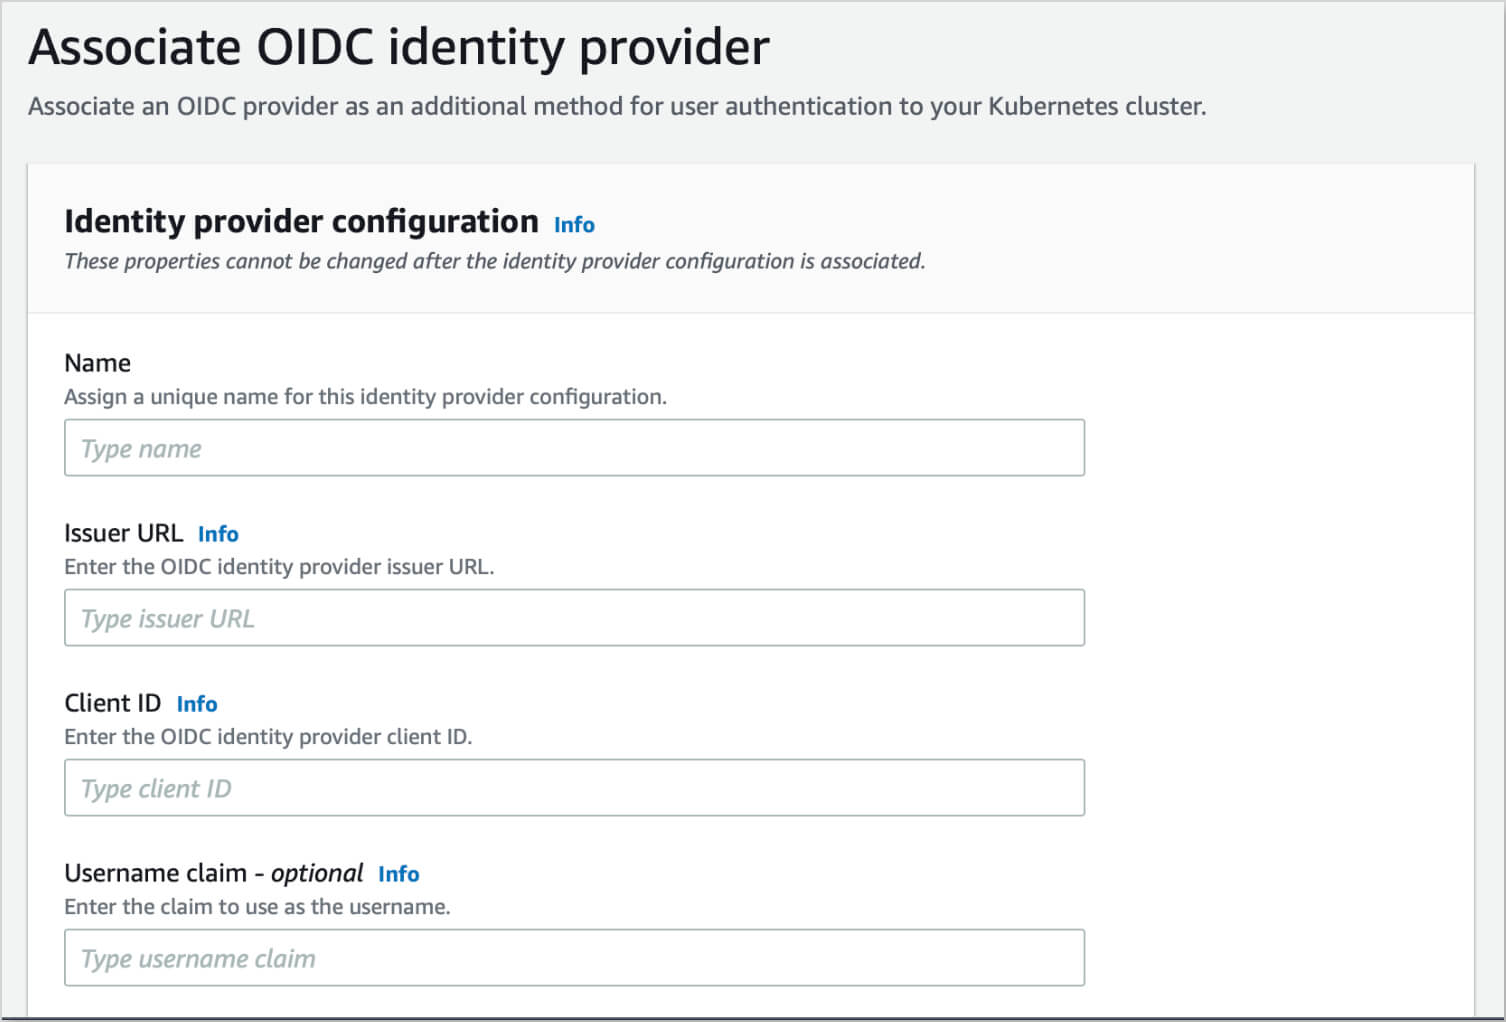
-
-
The process of applying the changes may take a few minutes. Once completed, the Microsoft Entra OIDC identity provider will be associated with the AWS EKS cluster.
Method 2: Using Terraform
To configure Microsoft Entra as an Identity Provider in AWS EKS using Terraform, you can use AWS EKS Terraform module. Here's an example of how you can do it:
- variables.tf:
variable "cluster_identity_providers" {
  description = "Configuration for OIDC identity provider"
  type        = any
  default     = {}
}
- terraform.tfvars:
cluster_identity_providers = {
  entra = {
    client_id    = "<Application (client) ID>"
    issuer_url   = "https://sts.windows.net/<Tenant ID>/"
    groups_claim = "groups"
    username_claim  = "upn"
  }
}
- main.tf:
module "eks" {
  source  = "terraform-aws-modules/eks/aws"
  version = "20.14.0"
  ...
  # OIDC Identity provider
  cluster_identity_providers = var.cluster_identity_providers
}
After applying the Terraform configuration, the Microsoft Entra OIDC identity provider will be associated with the AWS EKS cluster.
Configuring RBAC Resources in AWS EKS cluster for Microsoft Entra User Groups
In this section, user authorization will be configured using Kubernetes Role-Based Access Control (RBAC). Microsoft Entra groups will be linked to Kubernetes ClusterRoles through ClusterRoleBinding resources, enabling precise control over resource access within the EKS cluster. Additionally, Roles and RoleBindings can be used for more granular access control within specific namespaces.
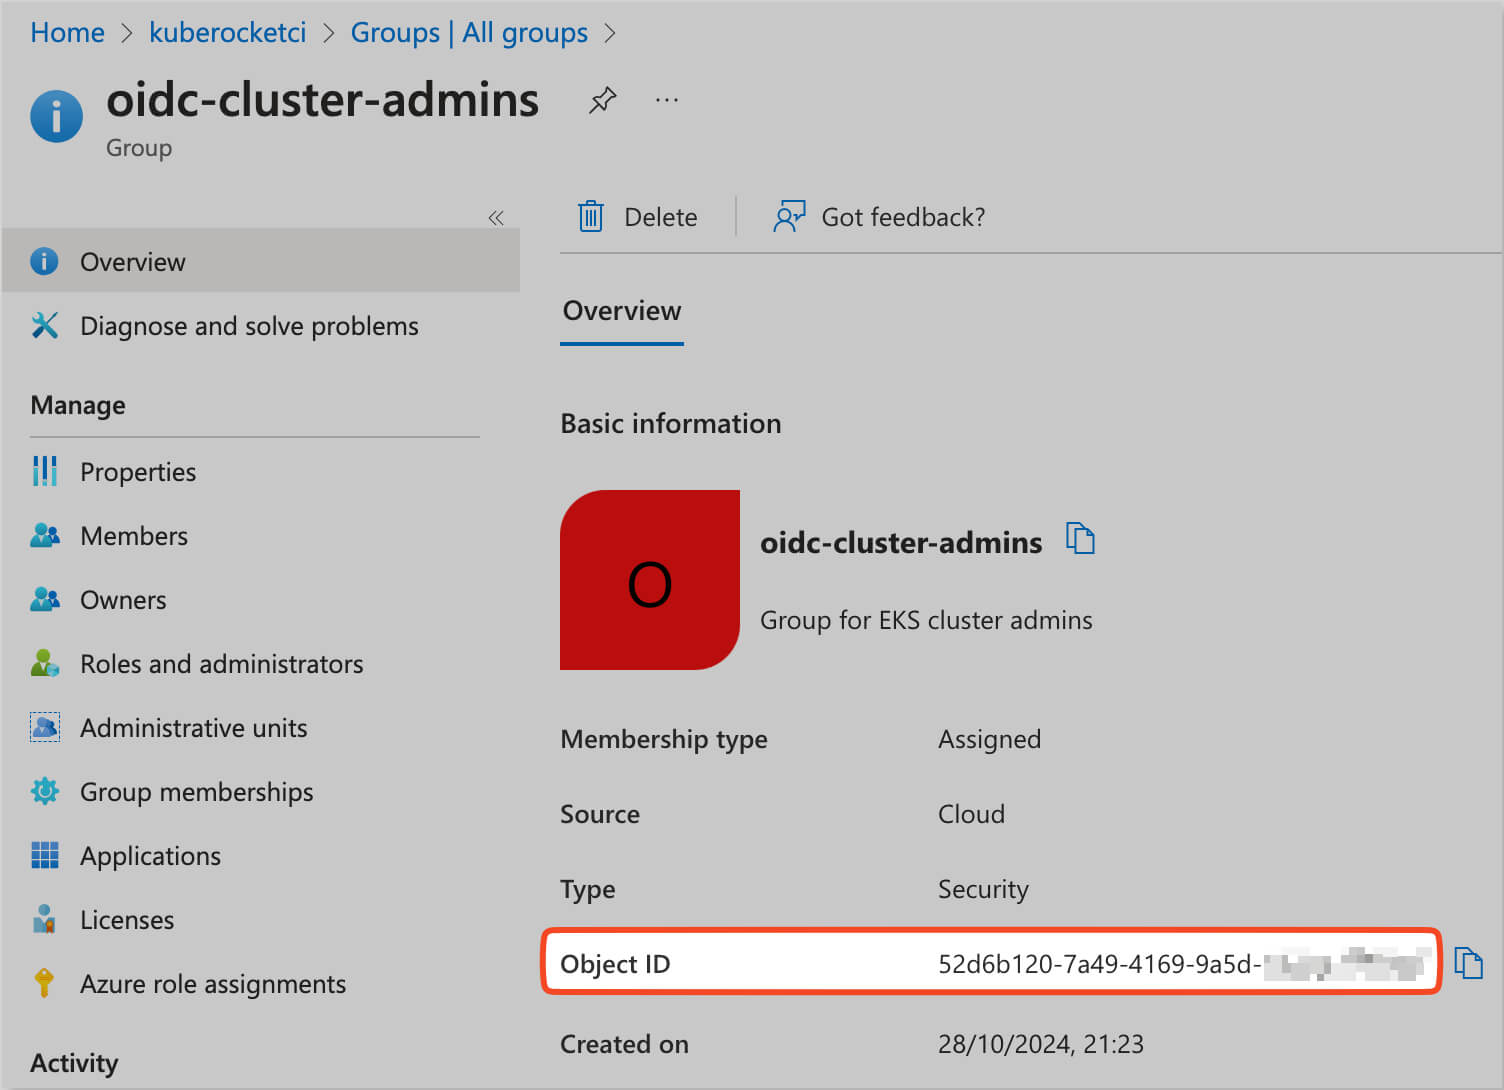
The Object ID of the Microsoft Entra group can be found in the Overview section of the group in the Microsoft Entra Admin Center.
-
Log in to the AWS EKS cluster and create the following ClusterRoleBinding resource, which associates the Microsoft Entra group
oidc-cluster-adminswith thecluster-adminKubernetes Cluster Role. Replace<your-microsoft-entra-admin-group-object-id>with the Object ID of theoidc-cluster-adminsgroup, which can be found on theGroupoverview page in the Microsoft Entra admin center.apiVersion: rbac.authorization.k8s.io/v1
kind: ClusterRoleBinding
metadata:
name: oidc-cluster-admins
roleRef:
apiGroup: rbac.authorization.k8s.io
kind: ClusterRole
name: cluster-admin
subjects:
- kind: Group
name: <your-microsoft-entra-admin-group-object-id>
apiGroup: rbac.authorization.k8s.ioSave the above YAML to a file, for example,
clusterrolebinding.yaml, and apply it to the EKS cluster using the following command:kubectl apply -f clusterrolebinding.yamlThe
oidc-cluster-adminsgroup will now havecluster-adminpermissions within the EKS cluster.
Authenticating to AWS EKS using Microsoft Entra with kubectl
To authenticate to the AWS EKS cluster using Microsoft Entra, you can use the kubectl CLI tool with the kubelogin plugin. The kubelogin plugin simplifies the OIDC authentication process by handling the token exchange and session management. Here's how you can authenticate to the EKS cluster:
-
Create or update the kubeconfig file with the OIDC configuration. Replace
<cluster-name>with the name of your EKS cluster and<region-code>with the AWS region code where the cluster is located.aws eks update-kubeconfig --region <region-code> --name <cluster-name> -
Execute the following command to create a new kubeconfig context using the
kubeloginplugin. Replace<cluster-name>with the name of your EKS cluster.kubectl config set-credentials "eks" \
--exec-api-version=client.authentication.k8s.io/v1beta1 \
--exec-command=kubelogin \
--exec-arg=get-token \
--exec-arg=--oidc-issuer-url \
--exec-arg=https://sts.windows.net/<Tenant ID>/ \
--exec-arg=--oidc-client-id \
--exec-arg=<Application (client) ID> \
--exec-arg=--oidc-client-secret \
--exec-arg=<Application (client) Secret>Replace
<Tenant ID>,<Application (client) ID>, and<Application (client) Secret>with the corresponding values from the OIDC Application in the Microsoft Entra Admin Center.noteYou can test the authentication to the EKS cluster immediately by running the following command:
kubectl --user=eks get nodes -
Set the context for the kubeconfig file to use the
eksuser and the OIDC configuration. Replace<cluster-name>with the name of your EKS cluster.kubectl config set-context eks --user=eks --cluster=<cluster-name>To switch to the
ekscontext, execute the following command:kubectl config use-context eksTest the authentication by running the following command:
kubectl get nodes
Configuring KubeRocketCI Portal with Microsoft Entra OIDC Authentication
-
Starting from version 3.11, KubeRocketCI platform supports Microsoft Entra as an Identity Provider for OIDC authentication in the Portal UI. To configure Microsoft Entra OIDC authentication, navigate to the edp-install Helm chart repository and set the following values in the
values.yamlfile:...
edp-headlamp:
enabled: true
config:
oidc:
enabled: true
issuerUrl: "https://sts.windows.net/<Tenant ID>/"
clientID: "<Application (client) ID>"
clientSecretName: "<name of the secret containing the client-secret value>"
clientSecretKey: "clientSecret"
...Replace
<Tenant ID>and<Application (client) ID>with the corresponding values from the OIDC Application in the Microsoft Entra Admin Center. Also, specify the name of the Kubernetes Secret containing the Application Client secret value in theclientSecretNamefield. -
In the Microsoft Entra Admin Center, navigate to the created OIDC Application and select the Authentication section. In the Redirect URIs field, add the URL of the KubeRocketCI Portal, for example,
https://portal-<krci-namespace>.<dns-wildcard>/oidc-callback.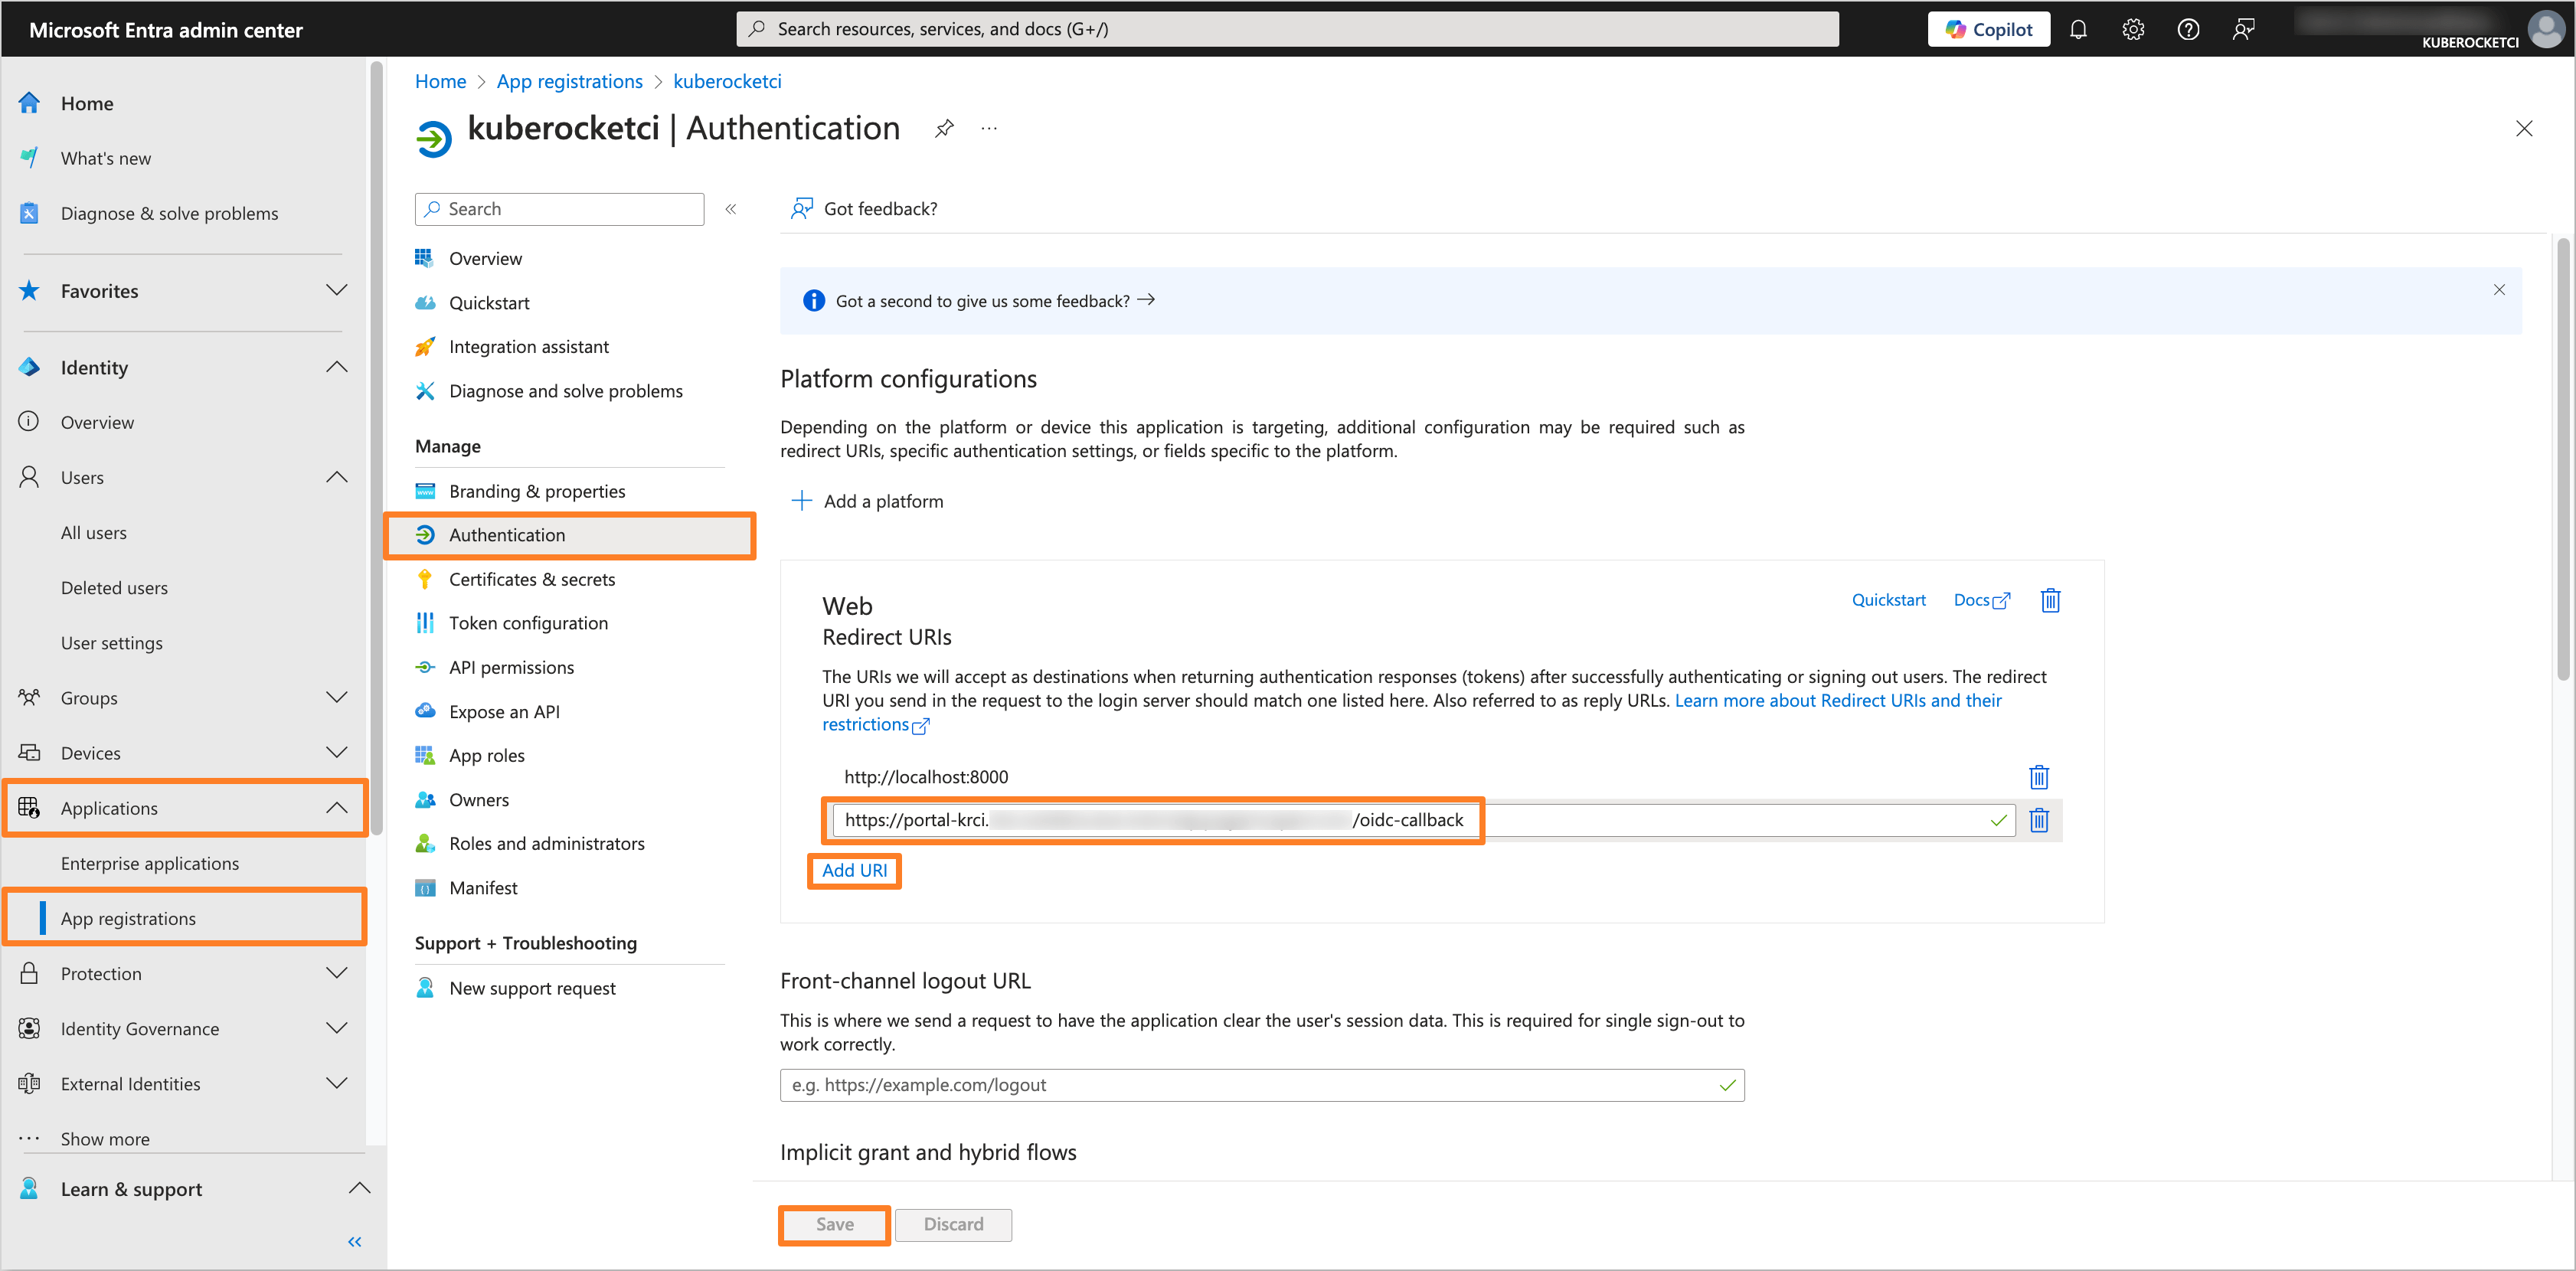
-
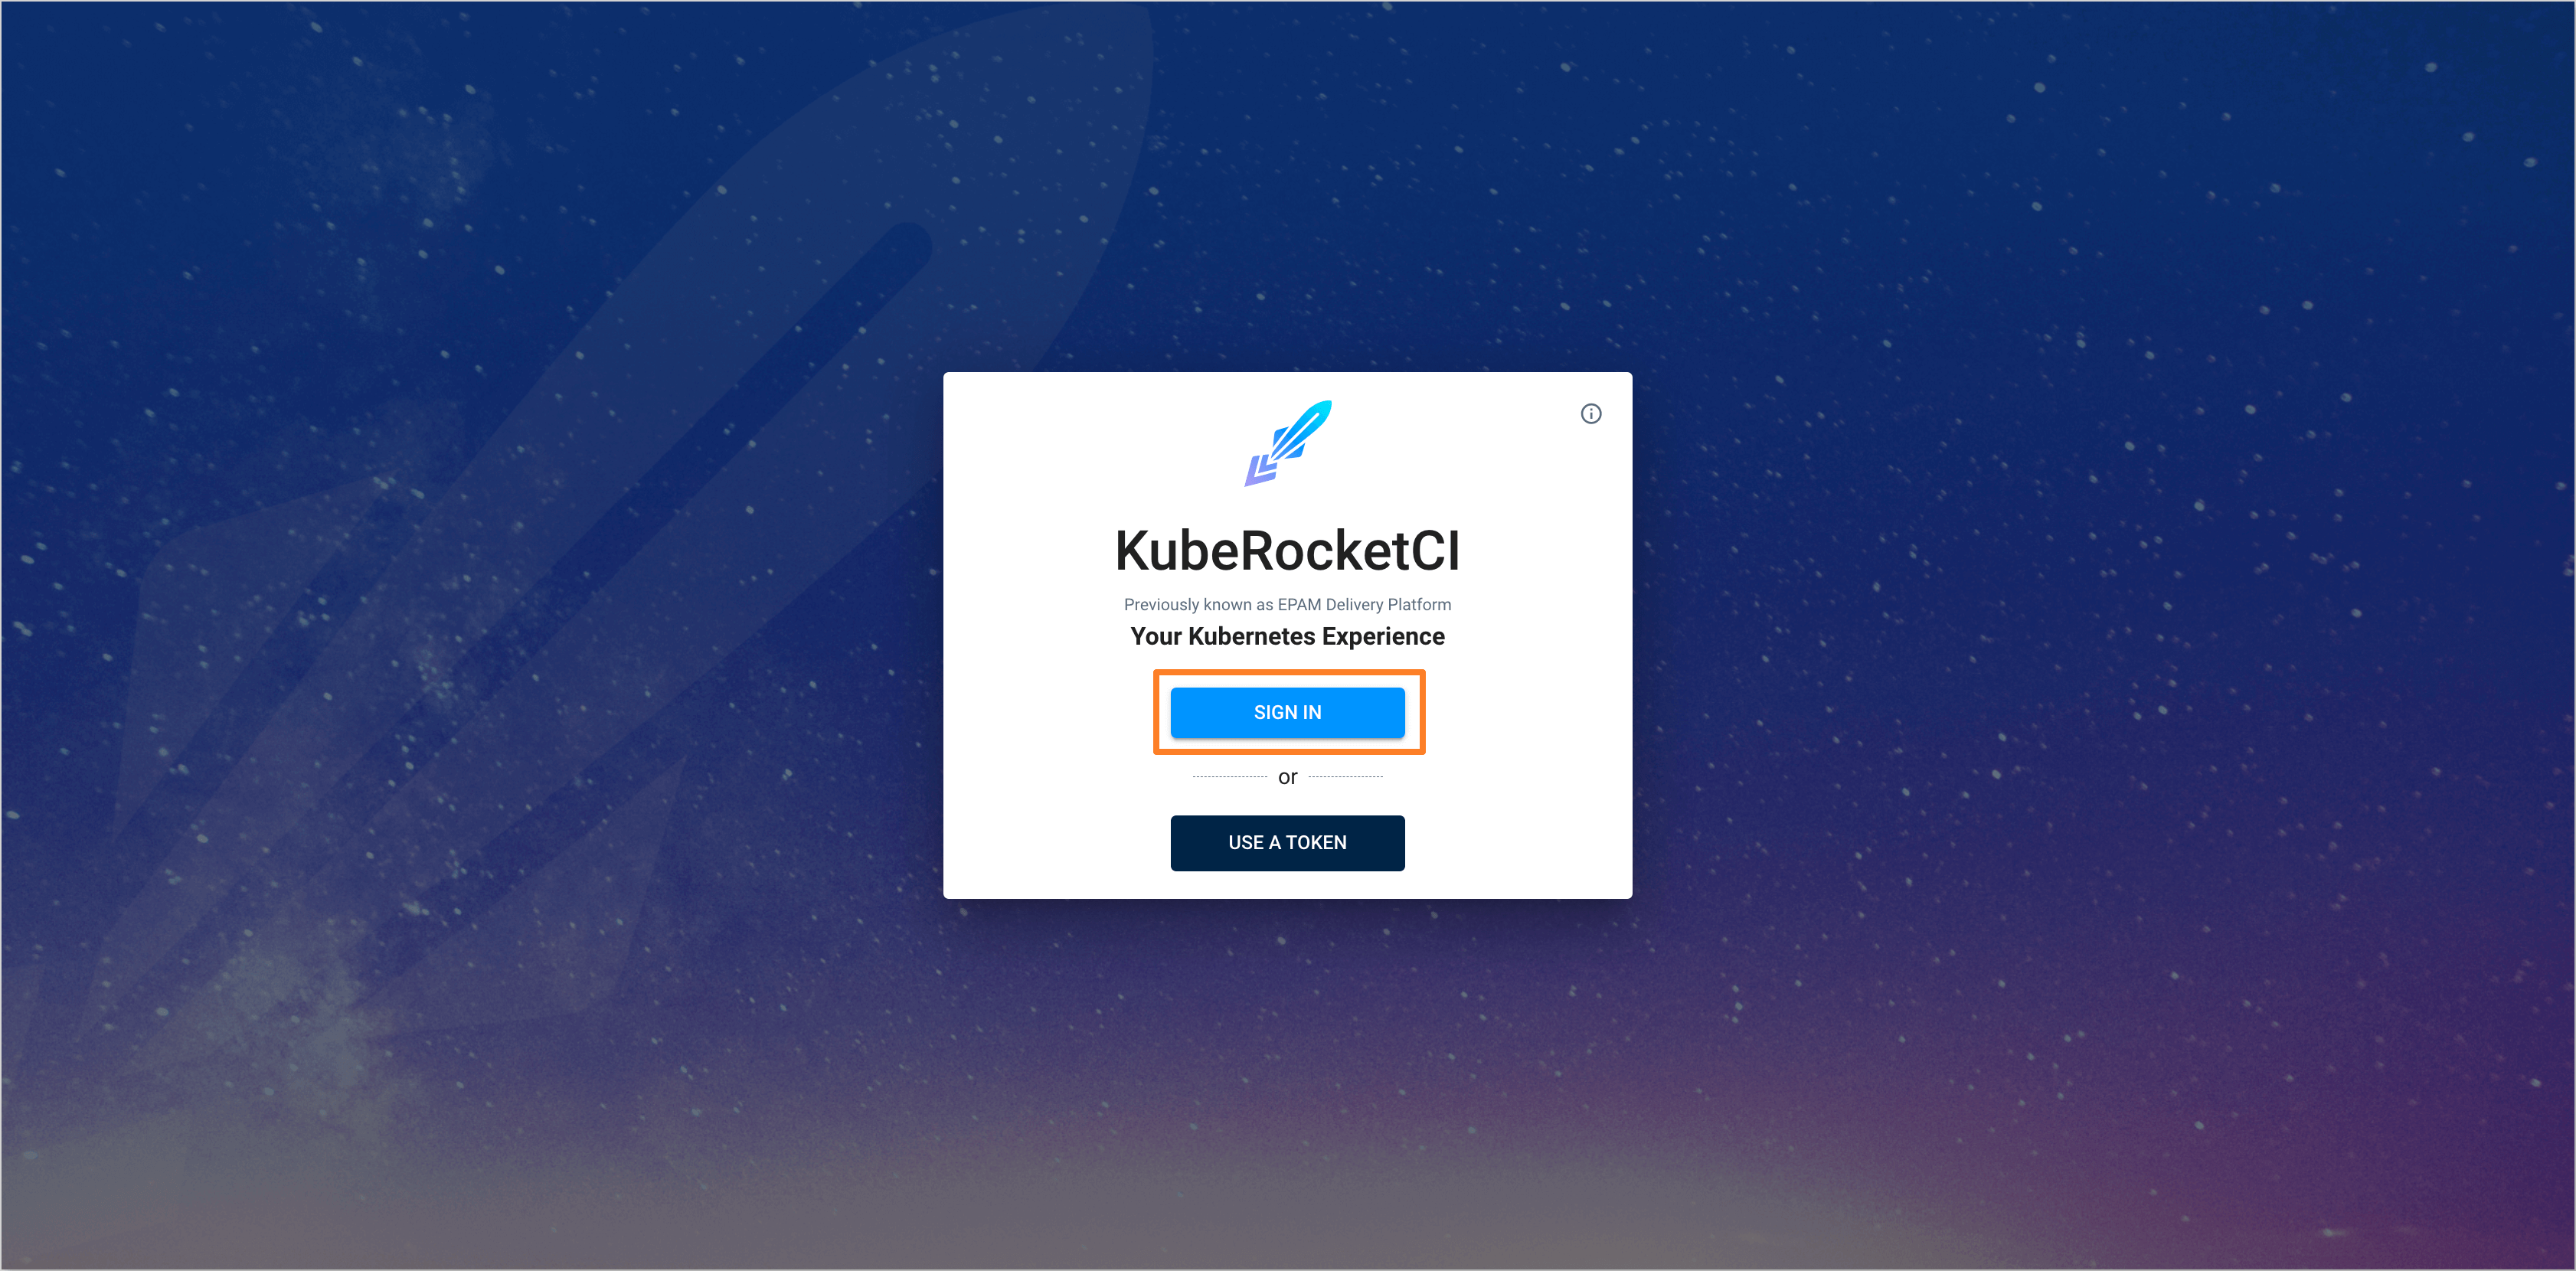
After applying the changes, the KubeRocketCI Portal will be configured to use Microsoft Entra OIDC authentication. Users will be able to log in to the Portal using Sign In option.
Conclusion
Integrating OpenID Connect (OIDC) authentication with Microsoft Entra in AWS EKS is a powerful way to enhance security and streamline user access management. By leveraging the capabilities of SSO, OIDC, and Microsoft Entra, organizations can simplify authentication processes, enforce access controls, and ensure secure navigation across cloud-native environments. Whether you're managing user identities, enhancing compliance, or improving user experience, this integration provides a robust solution to meet your identity and access management needs. By following the steps outlined in this guide, you can configure Microsoft Entra as an Identity Provider in AWS EKS, authenticate users using OIDC, and secure access to your EKS clusters and KubeRocketCI Portal effectively.
