Harbor OIDC Configuration
This guide outlines the steps for integrating OIDC (OpenID Connect) authorization with Harbor, facilitating Single Sign-On (SSO) capabilities. By adopting OIDC, Harbor gains a unified authentication mechanism, simplifying user access management and enhancing security. This approach centralizes user permissions and access control, streamlining administration through a singular configuration interface.
Prerequisites
Before the beginning, ensure your installation meets the following criteria:
- Keycloak is installed;
- KubeRocketCI is installed.
Configure Keycloak
This section details the procedure to configure Harbor with Keycloak for secure authentication using the following steps:
-
Generate the Keycloak Client Secret:
Start by creating a secret named
keycloak-client-harbor-secretfor Keycloak. This can be accomplished either through the commands provided below or by employing the External Secrets Operator. The secret acts as a secure token for establishing communication between Keycloak and Harbor.Generate the secret using OpenSSL and store it in a Kubernetes secret within the platform namespace (e.g,
edp):KEYCLOAK_CLIENT_HARBOR_SECRET=$(openssl rand -base64 32 | head -c 32)
kubectl -n edp create secret generic keycloak-client-harbor-secret \
--from-literal=cookie-secret=${KEYCLOAK_CLIENT_HARBOR_SECRET} -
Deploy the KeycloakClient Custom Resource:
Proceed to create the
KeycloakClientcustom resource by applying theharborkeycloakclient.yamlconfiguration in the appropriate namespace. This step involves utilizing the previously generatedkeycloak-client-harbor-secret. Upon successful deployment, Keycloak will register Harbor as a client, with the Kubernetes secret serving as the client password.Apply the
harborkeycloakclient.yamlto establish the resource:apiVersion: v1.edp.epam.com/v1
kind: KeycloakClient
metadata:
name: harbor
spec:
advancedProtocolMappers: true
clientId: harbor
directAccess: true
public: false
secret: keycloak-client-harbor-secret
defaultClientScopes:
- profile
- email
- roles
targetRealm: control-plane
webUrl: <harbor_endpoint>
protocolMappers:
- name: roles
protocol: openid-connect
protocolMapper: oidc-usermodel-realm-role-mapper
config:
access.token.claim: true
claim.name: roles
id.token.claim: true
userinfo.token.claim: true
multivalued: trueEnsure to replace
<harbor_endpoint>with your actual Harbor URL. This configuration links Harbor to Keycloak, enabling OIDC-based Single Sign-On (SSO) for a streamlined authentication process.
Configure Harbor
The next stage is to configure Harbor. Proceed with following the steps below:
-
Log in to Harbor UI with an account that has Harbor system administrator privileges. To get the administrator password, execute the command below:
kubectl get secret harbor -n harbor -o jsonpath='{.data.HARBOR_ADMIN_PASSWORD}' | base64 --decode -
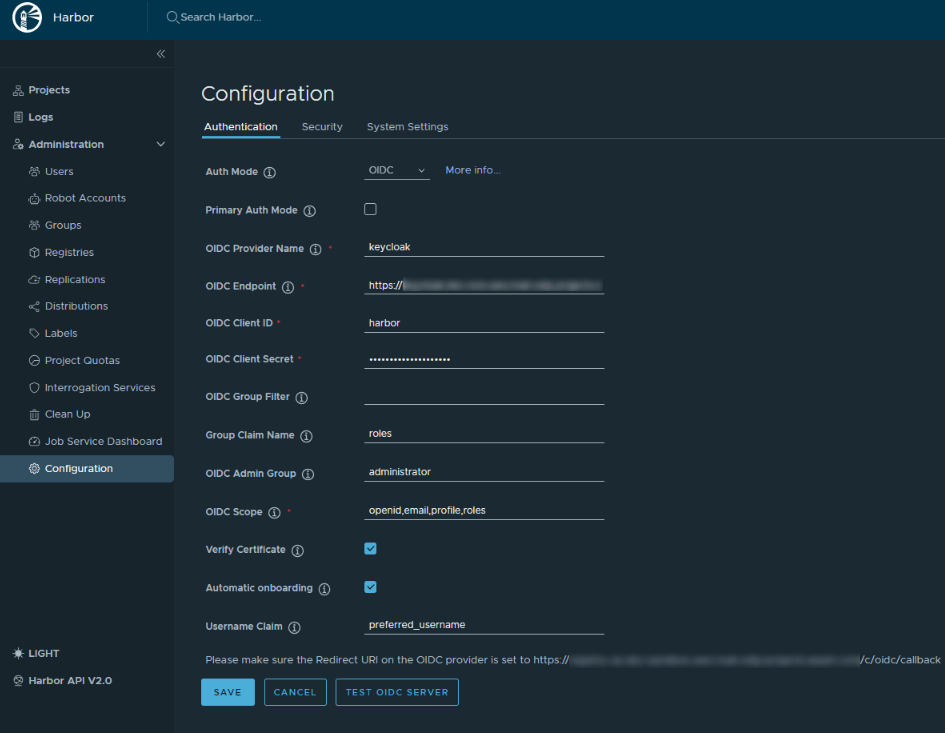
Navigate to Administration -> Configuration -> Authentication. Configure OIDC using the parameters below:
auth_mode: oidc_auth
oidc_name: keycloak
oidc_endpoint: <keycloak_endpoint>/auth/realms/control-plane
oidc_client_id: harbor
oidc_client_secret: <keycloak-client-harbor-secret>
oidc_groups_claim: roles
oidc_admin_group: administrator
oidc_scope: openid,email,profile,roles
verify_certificate: true
oidc_auto_onboard: true
oidc_user_claim: preferred_username
As a result, users will be prompted to authenticate themselves when logging in to Harbor UI.