Guide: Microsoft Entra SSO integration with AWS EKS & KubeRocketCI Portal
This guide provides instructions on how to configure OpenID Connect (OIDC) authentication for the AWS EKS cluster and the KubeRocketCI Portal using Microsoft Entra as the Identity Provider (IdP), as well as how to configure the default namespace and user picture in the KubeRocketCI Portal using Microsoft Entra extension attributes.
Prerequisites
- Access to the Microsoft Entra Admin Center with administrative privileges.
- A running AWS EKS cluster with the necessary permissions for access and management.
- The kubelogin plugin installed for authenticating to the EKS cluster using OIDC.
- The kubectl CLI tool installed.
- The aws cli tool installed.
- The curl tool installed.
Integrate AWS EKS and KubeRocketCI Portal with Microsoft Entra
For a detailed step-by-step guide on integrating OIDC authentication for AWS EKS and the KubeRocketCI Portal with Microsoft Entra, please refer to the Integrating OIDC Authentication with Microsoft Entra in AWS EKS blog post.
The blog covers the process of creating a Microsoft Entra tenant, configuring an application, and managing users and groups. It also explains how to integrate the created application with the AWS EKS cluster and set up authentication for the KubeRocketCI Portal.
Configure Default Namespace
After logging in to the KubeRocketCI Portal, it is necessary to manually configure the Default namespace and Allowed Namespaces. To automate this process, it is possible to use the Microsoft Entra extension attributes.
Follow the steps below to configure the default namespace extension attribute in Microsoft Entra and assign it to the user:
-
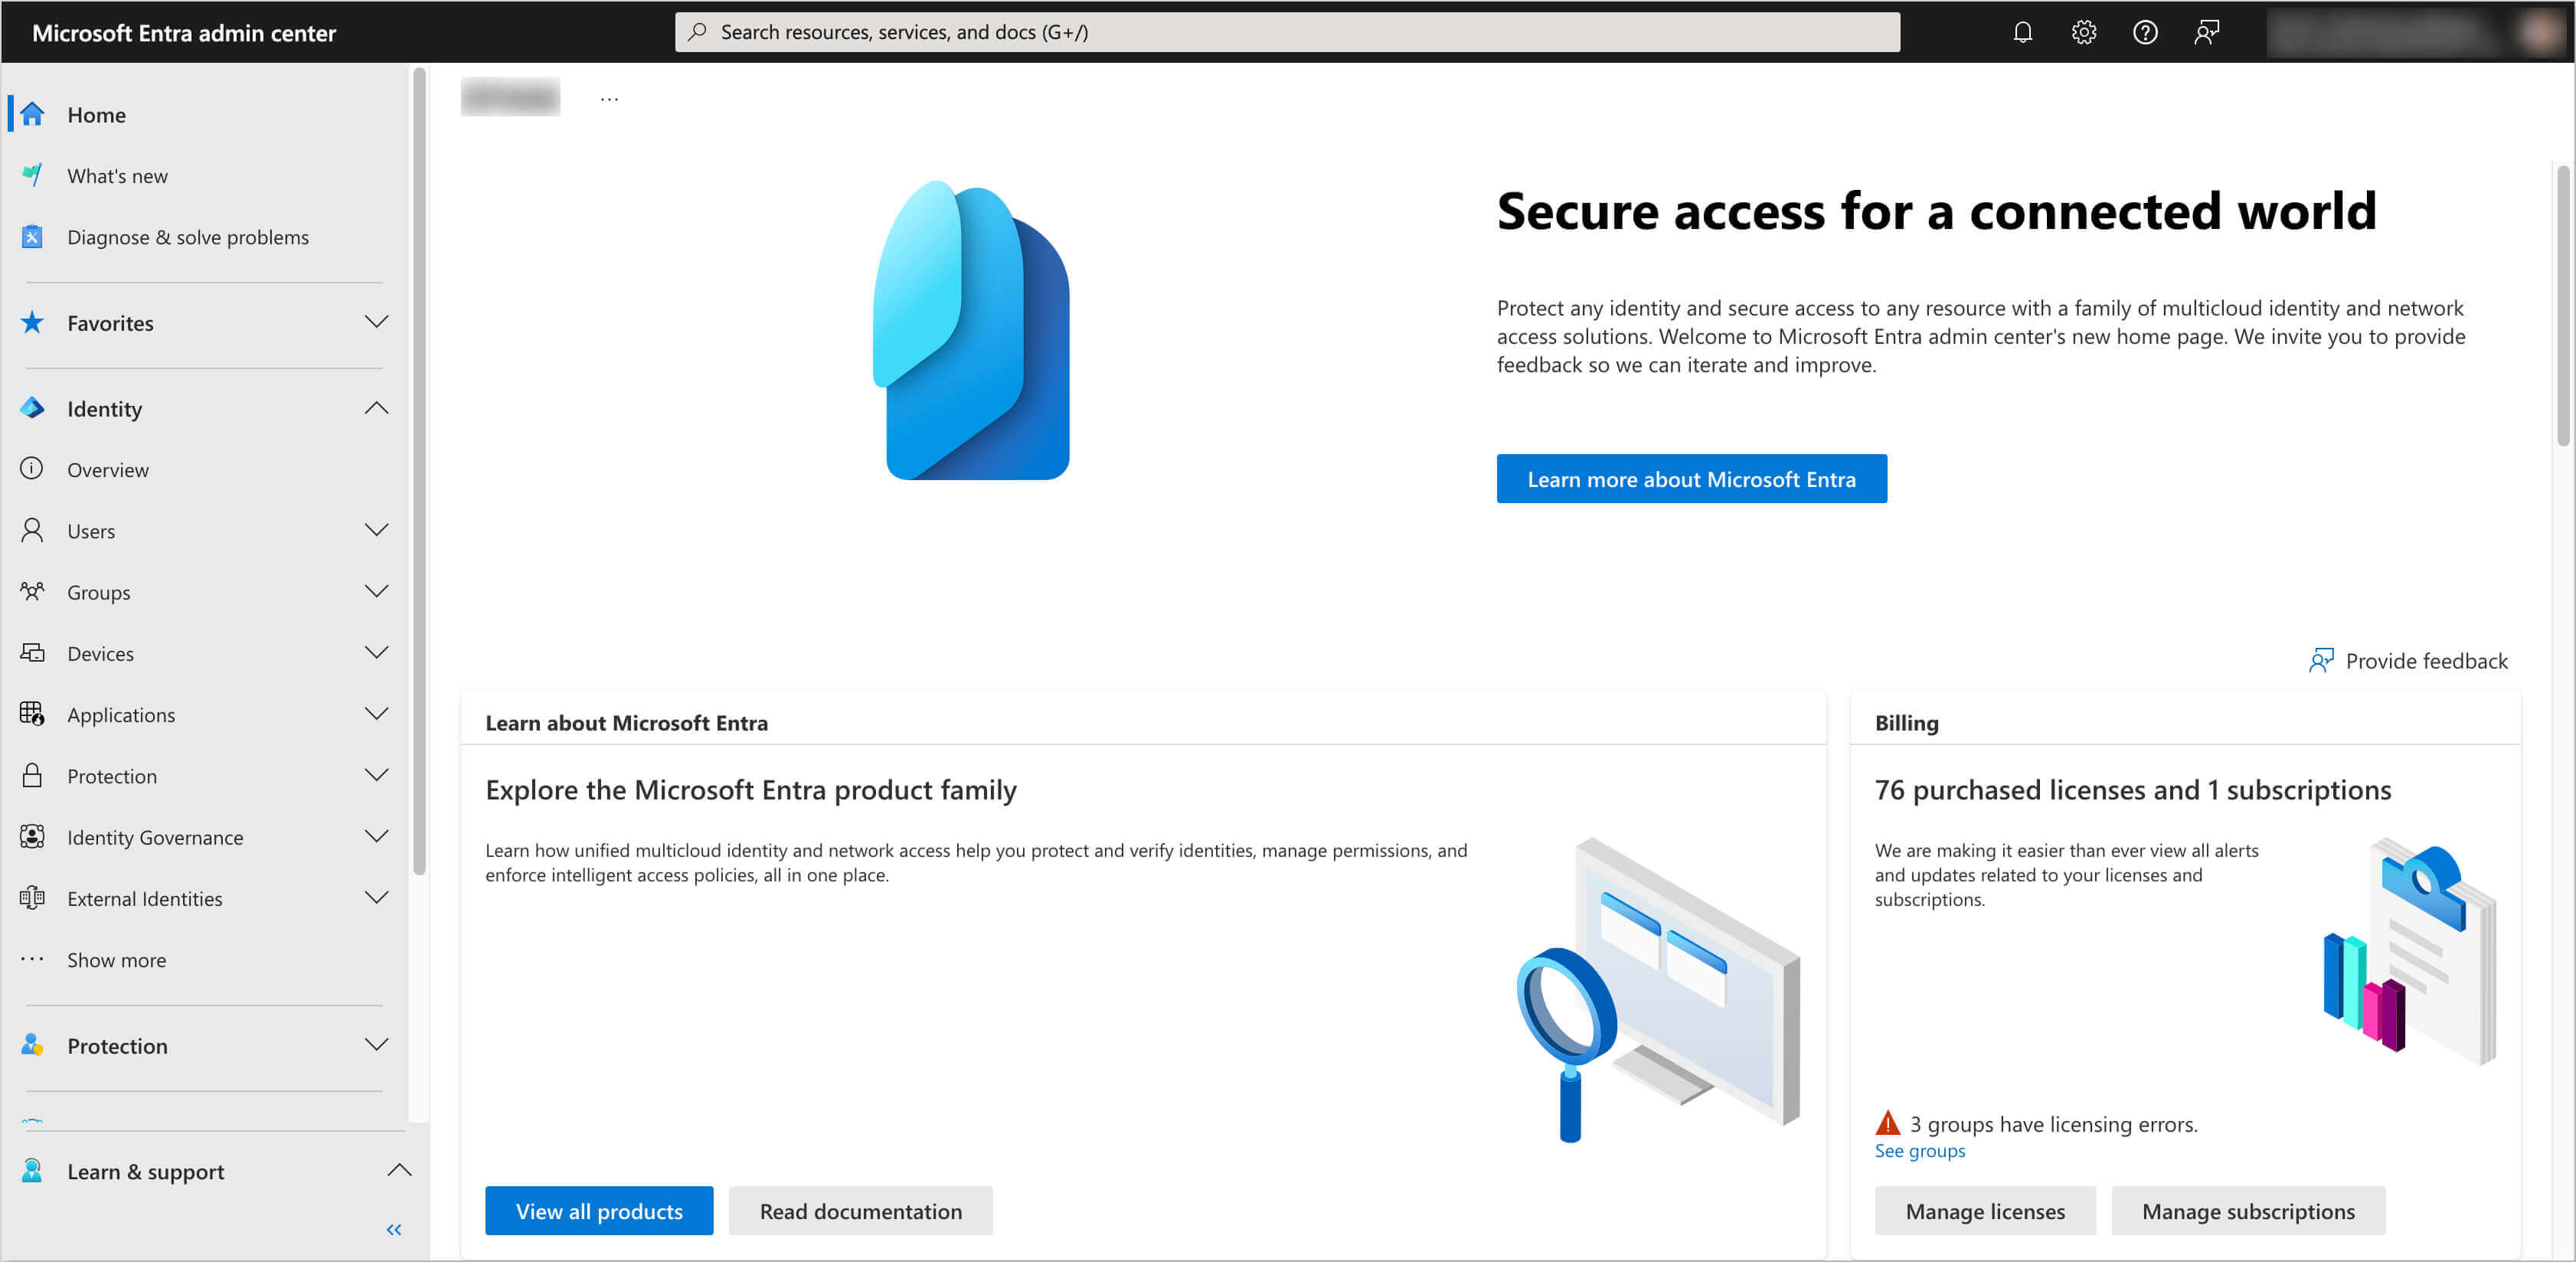
Log in to the Microsoft Entra Admin Center.
-
In the left sidebar menu, select Applications and navigate to the application created during the OIDC integration process with AWS EKS and the KubeRocketCI Portal (e.g.,
eks).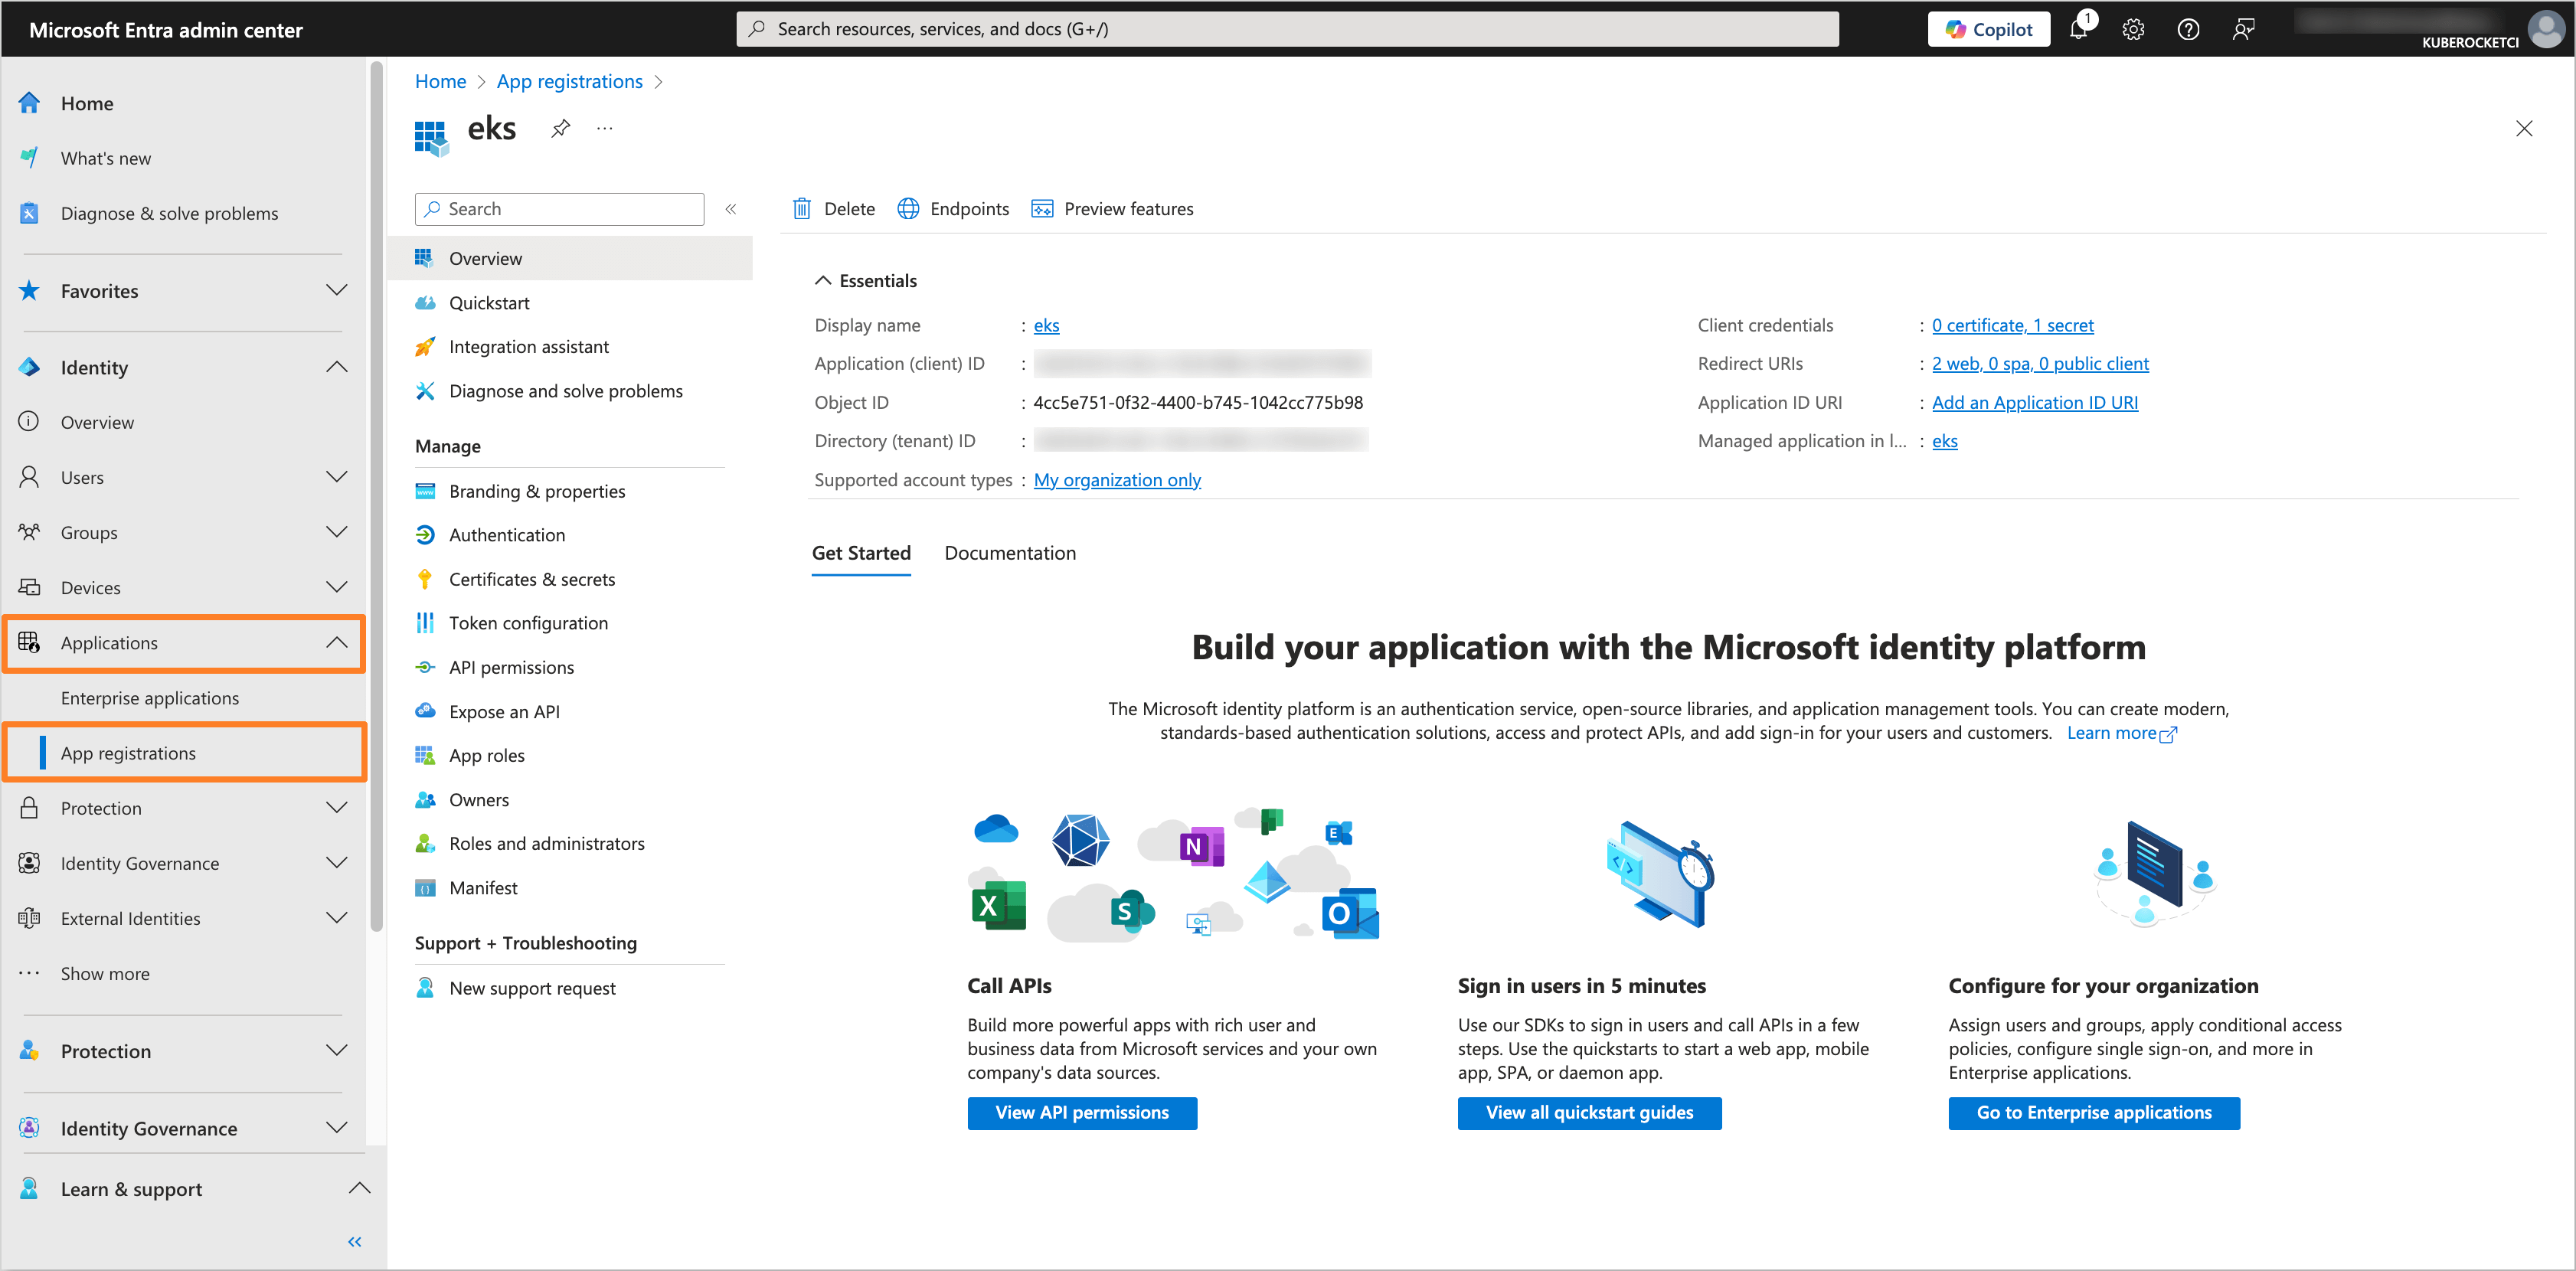
-
In the application tab, navigate to the API permissions section. Click on the Add a permission button. Select Microsoft Graph and then Application permissions. Add the following permissions:
- Application.ReadWrite.All
- User.ReadWrite.All
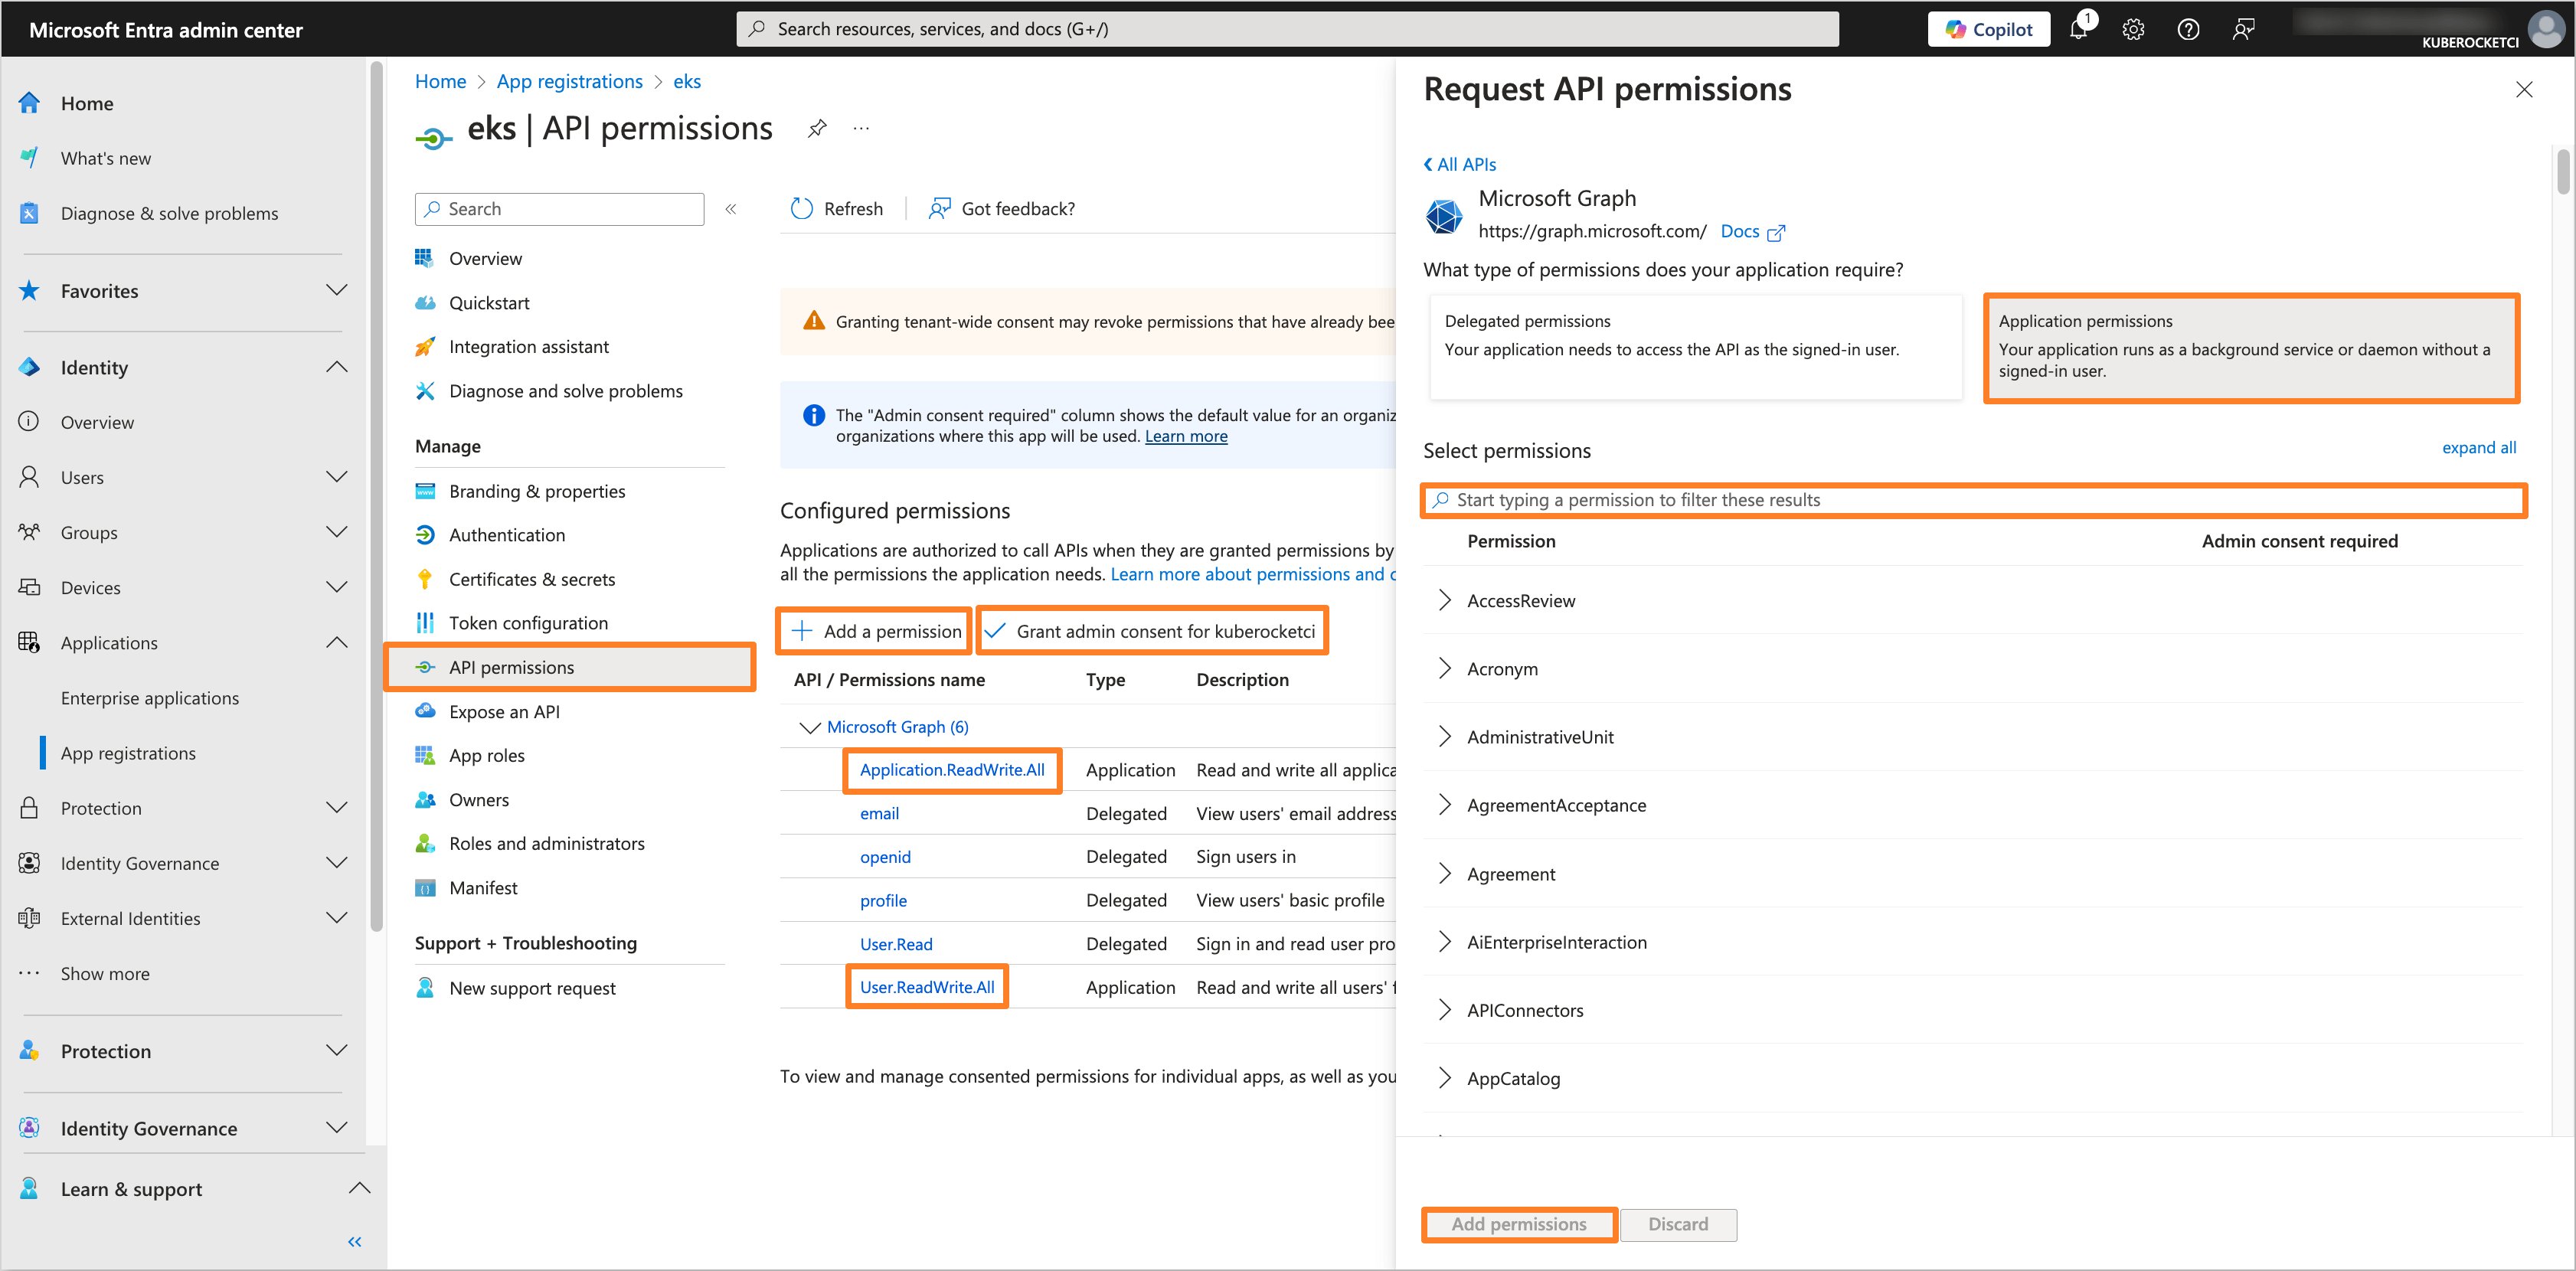
After adding the permissions, click on the Grant admin consent for 'Tenant name' button to grant the required permissions.
-
Navigate to the local terminal and run the following command to get the access token:
noteYou can use the jq tool to parse the JSON response. If you do not have it installed, you can drop the
| jq -r '.access_token'part from the command.curl -X POST "https://login.microsoftonline.com/<tenant_id>/oauth2/v2.0/token" \
-d "client_id=<application_client_id>" \
-d "client_secret=<application_client_secret>" \
-d "scope=https://graph.microsoft.com/.default" \
-d "grant_type=client_credentials" | jq -r '.access_token'Replace
<tenant_id>,<application_client_id>, and<application_client_secret>with the corresponding values from the Microsoft Entra application.Save the access token for further use.
-
Create the
default_namespaceextension attribute for the Microsoft Entra application by running the following command:curl -X POST "https://graph.microsoft.com/v1.0/applications/<application_object_id>/extensionProperties" \
-H "Authorization: Bearer <access_token>" \
-H "Content-Type: application/json" \
-d '{
"name": "default_namespace",
"dataType": "String",
"targetObjects": ["User"]
}'Replace
<application_object_id>with the Object ID of the Microsoft Entra application and<access_token>with the saved access token. -
Assign the
default_namespaceextension attribute to the user by running the following command:curl -X PATCH "https://graph.microsoft.com/v1.0/users/<user_object_id>" \
-H "Authorization: Bearer <access_token>" \
-H "Content-Type: application/json" \
-d '{
"extension_<application_client_id>_default_namespace": "<default_namespace>"
}'Replace
<user_object_id>,<application_client_id>,<access_token>, and<default_namespace>with the user Object ID, application Client ID, saved access token, and the name of the desired default namespace, respectively. -
Navigate to the Microsoft Entra Admin Center. In the left sidebar menu, select Applications and navigate to the Enterprise application created for OIDC integration with AWS EKS and the KubeRocketCI Portal (e.g.,
eks).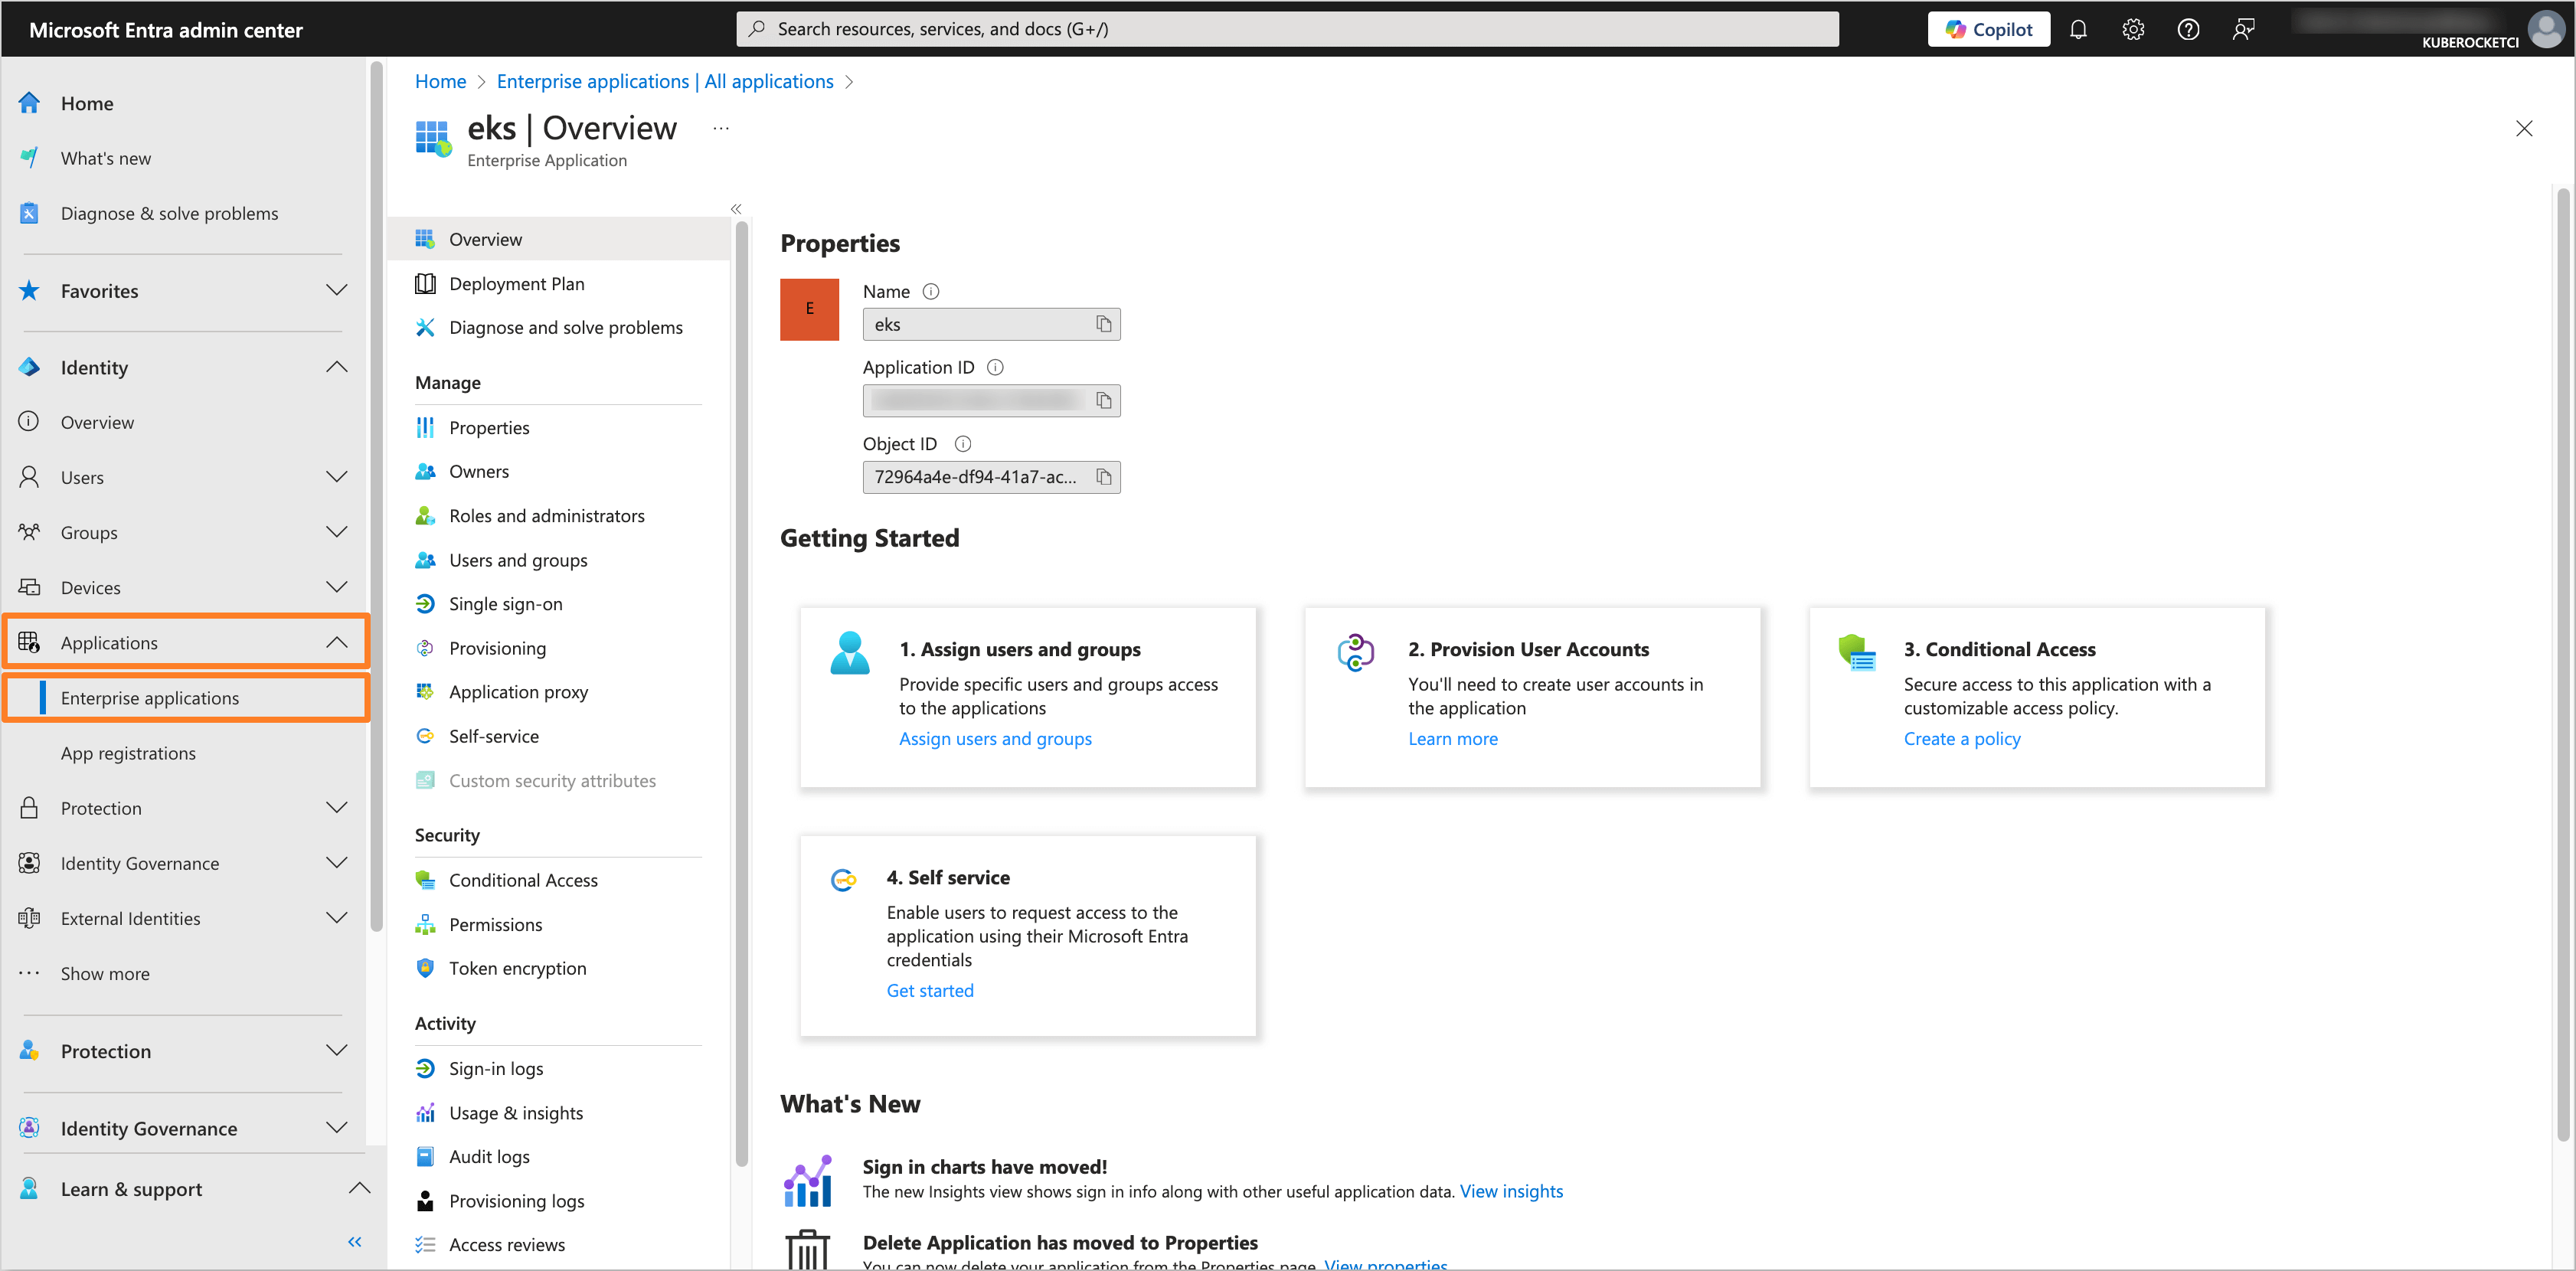
-
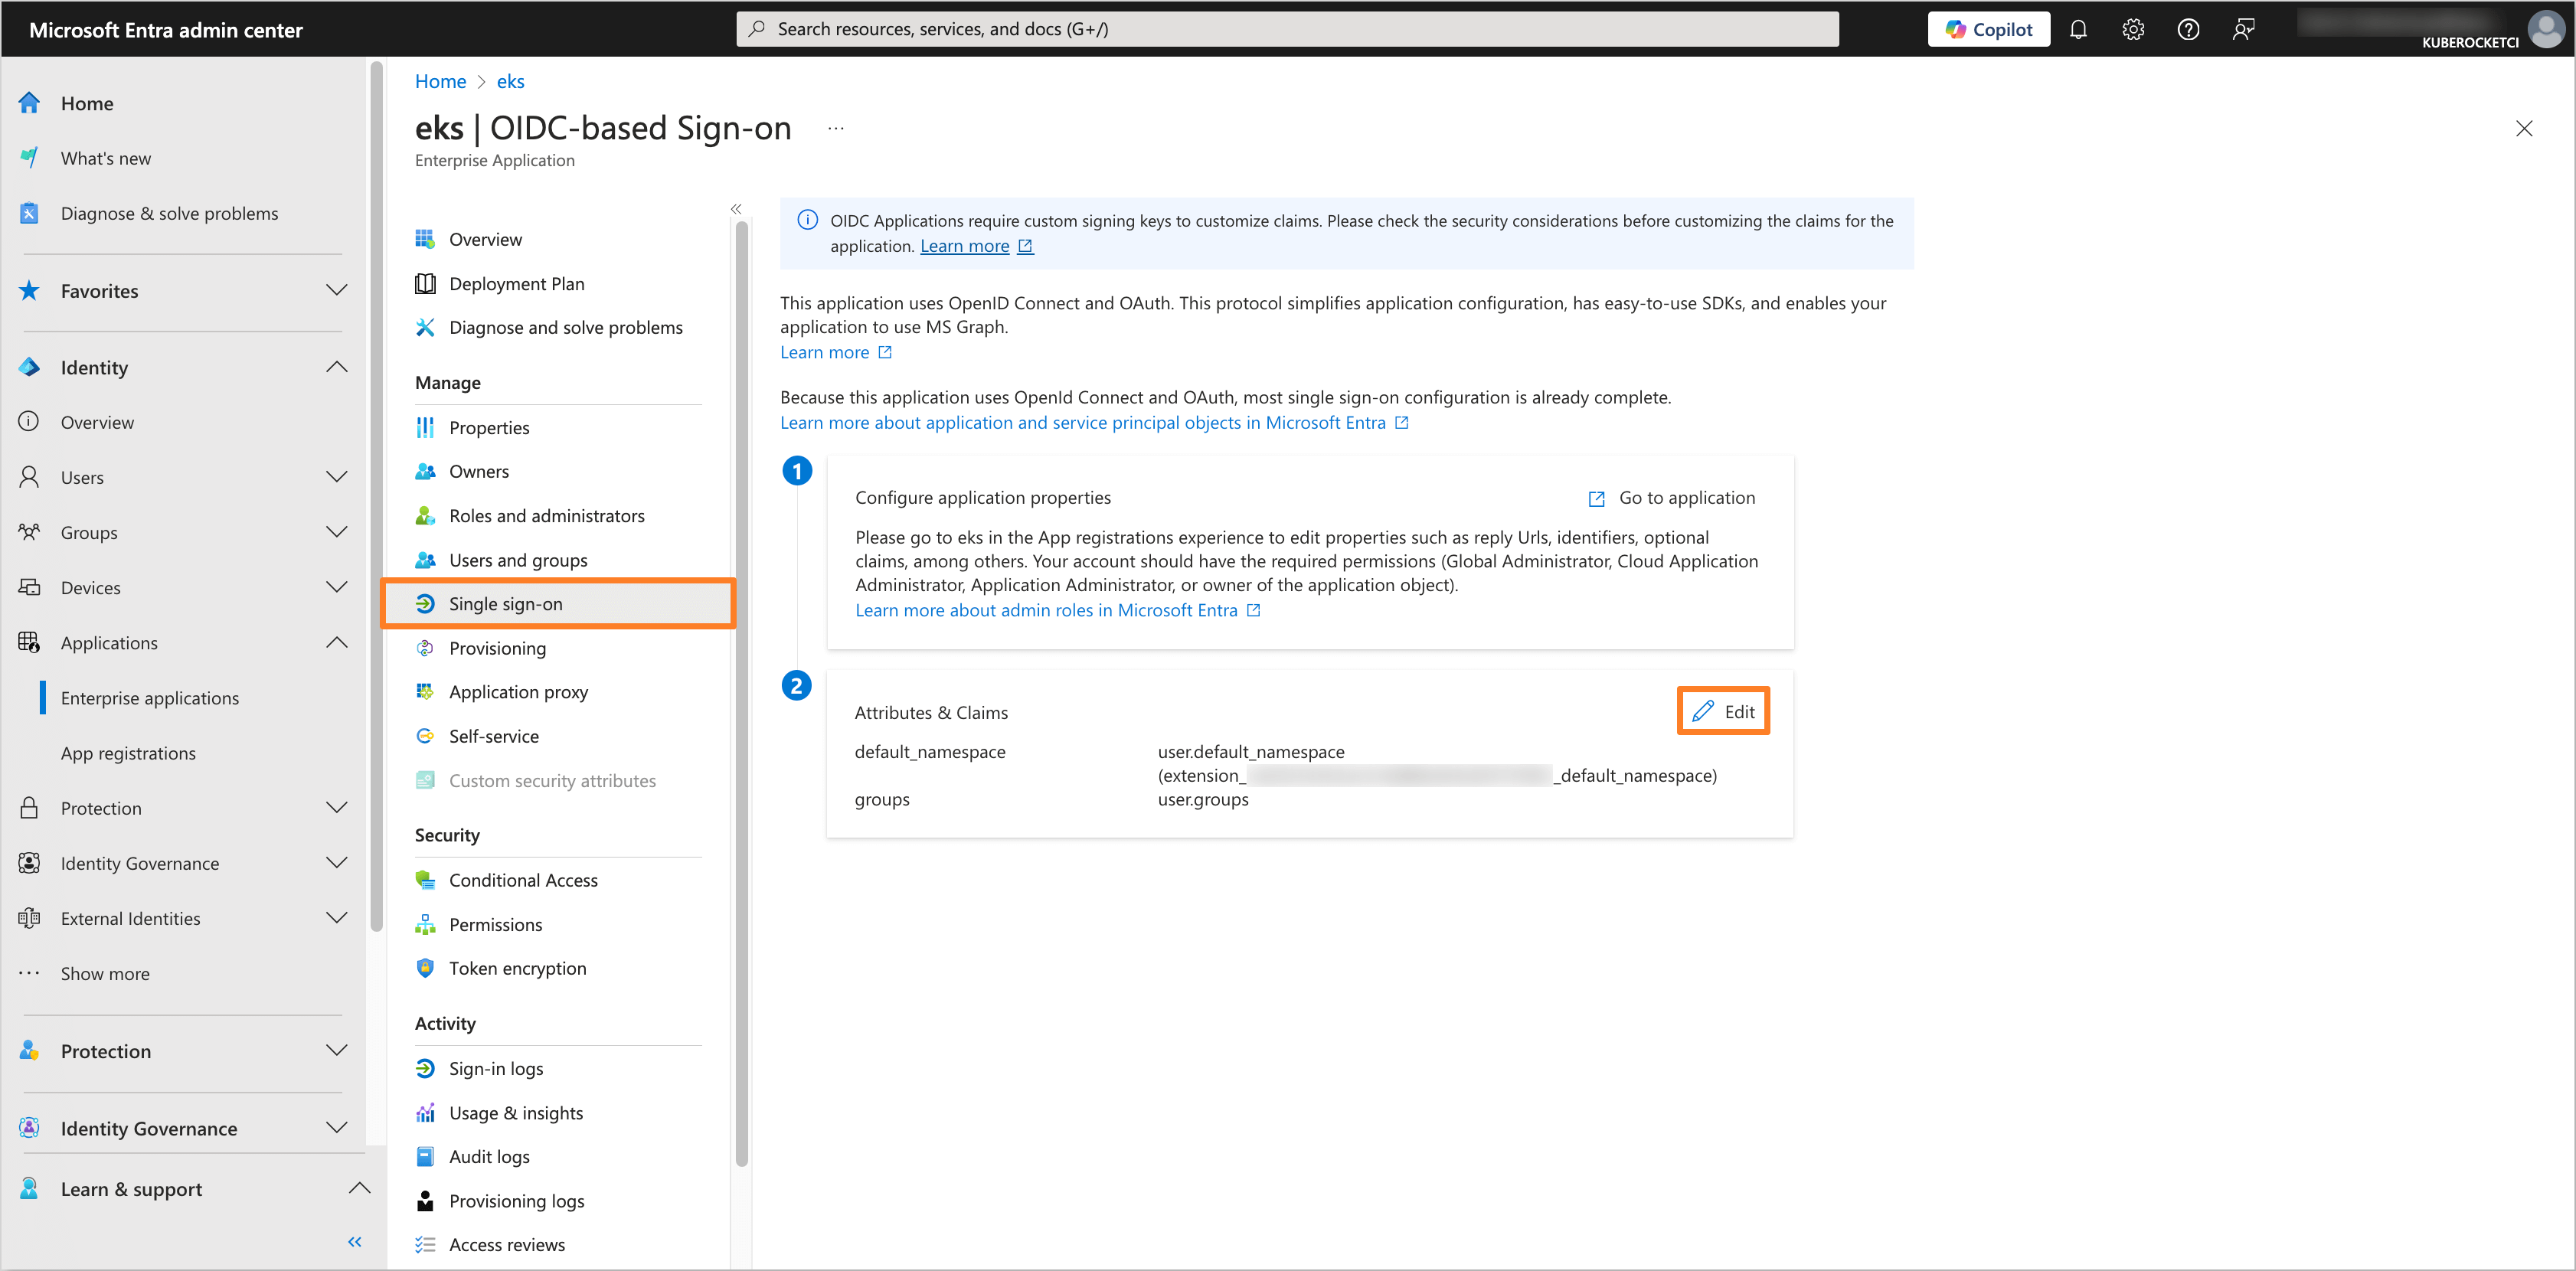
In the application tab, navigate to the Single sign-on section. In the Attributes & Claims tab, click on the Edit button.
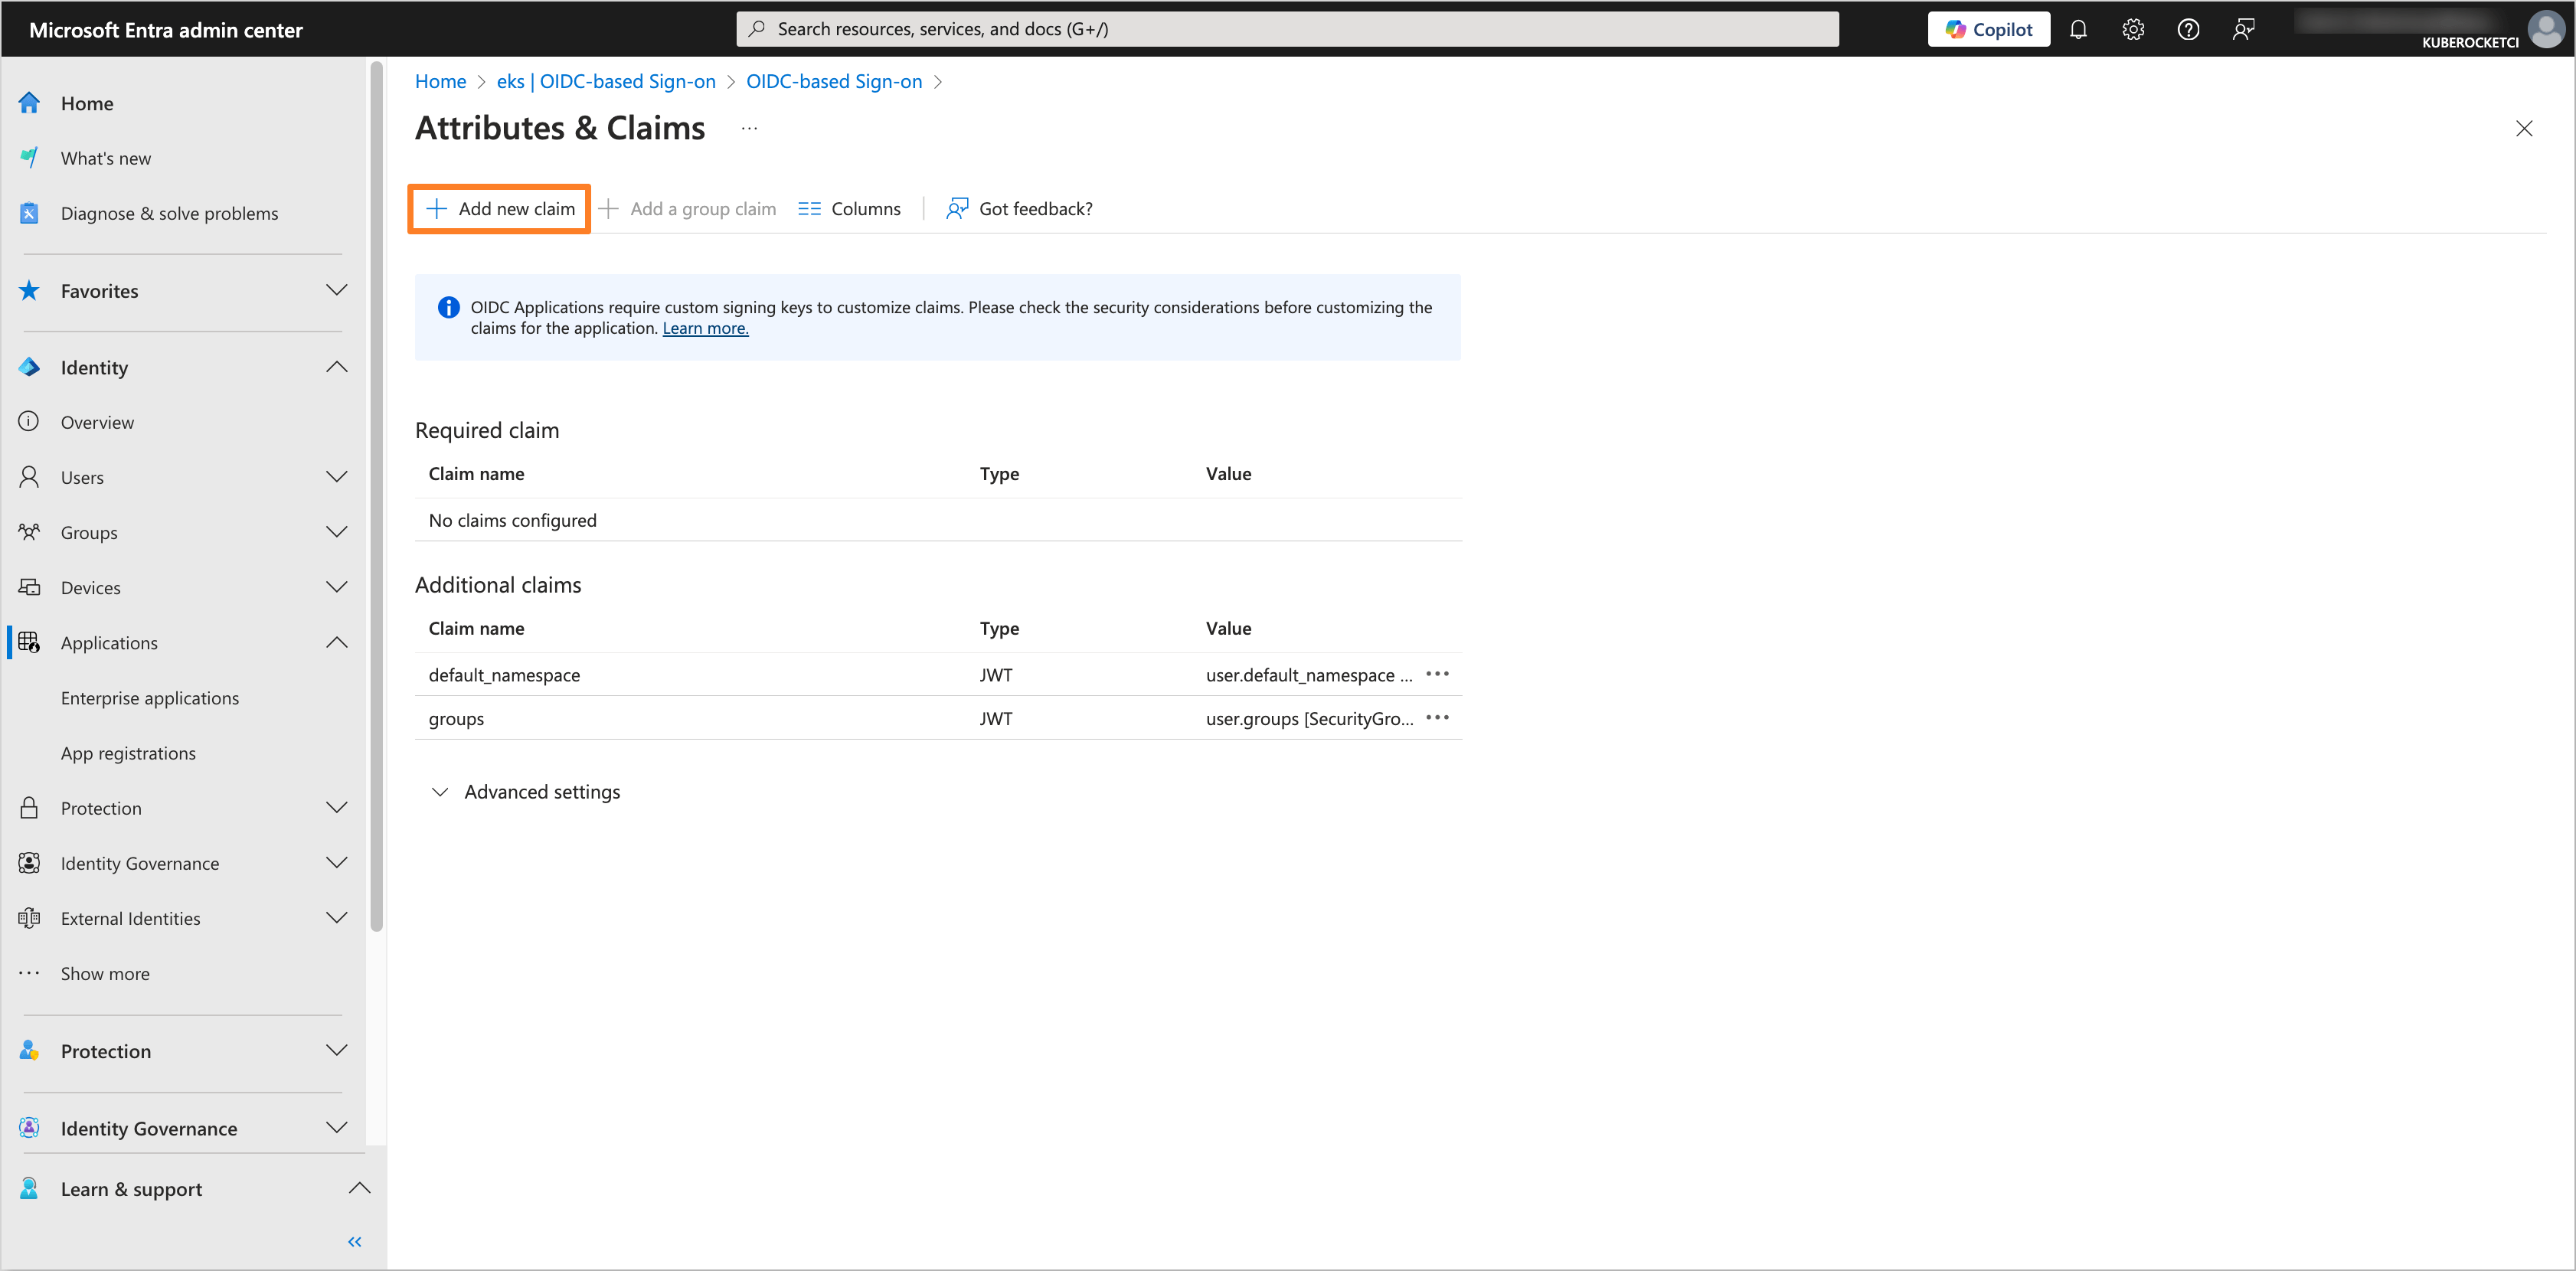
After that, click on the Add new claim button.
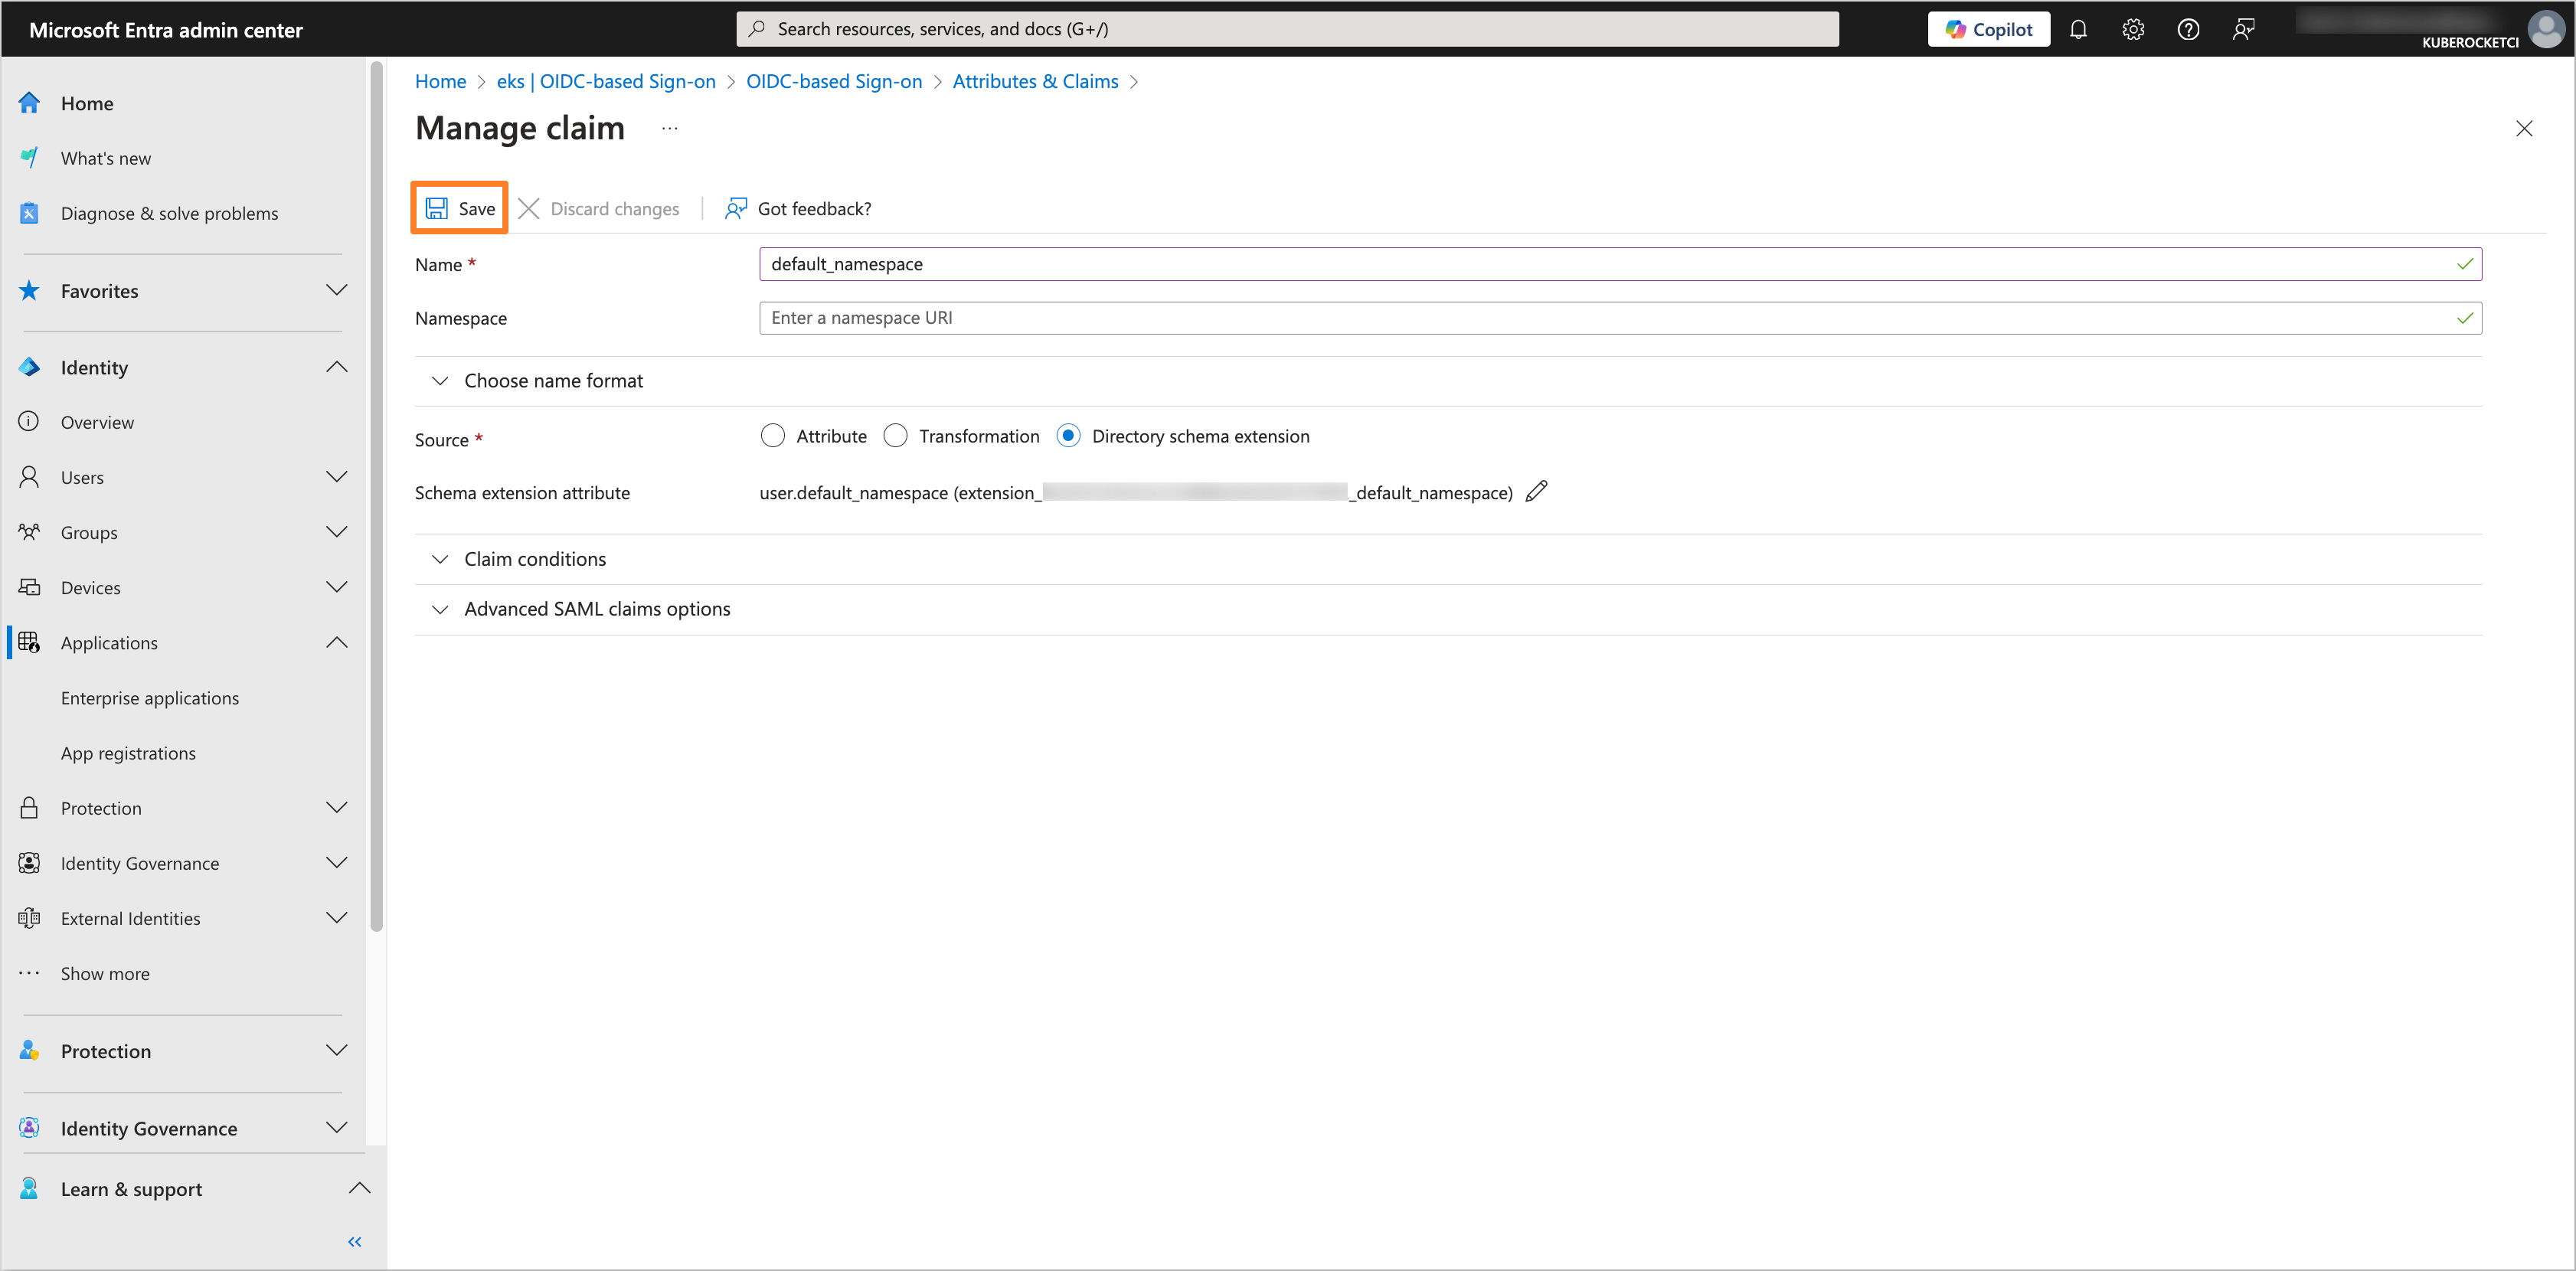
Fill in the Name field with
default_namespaceand select the Source asDirectory schema extension.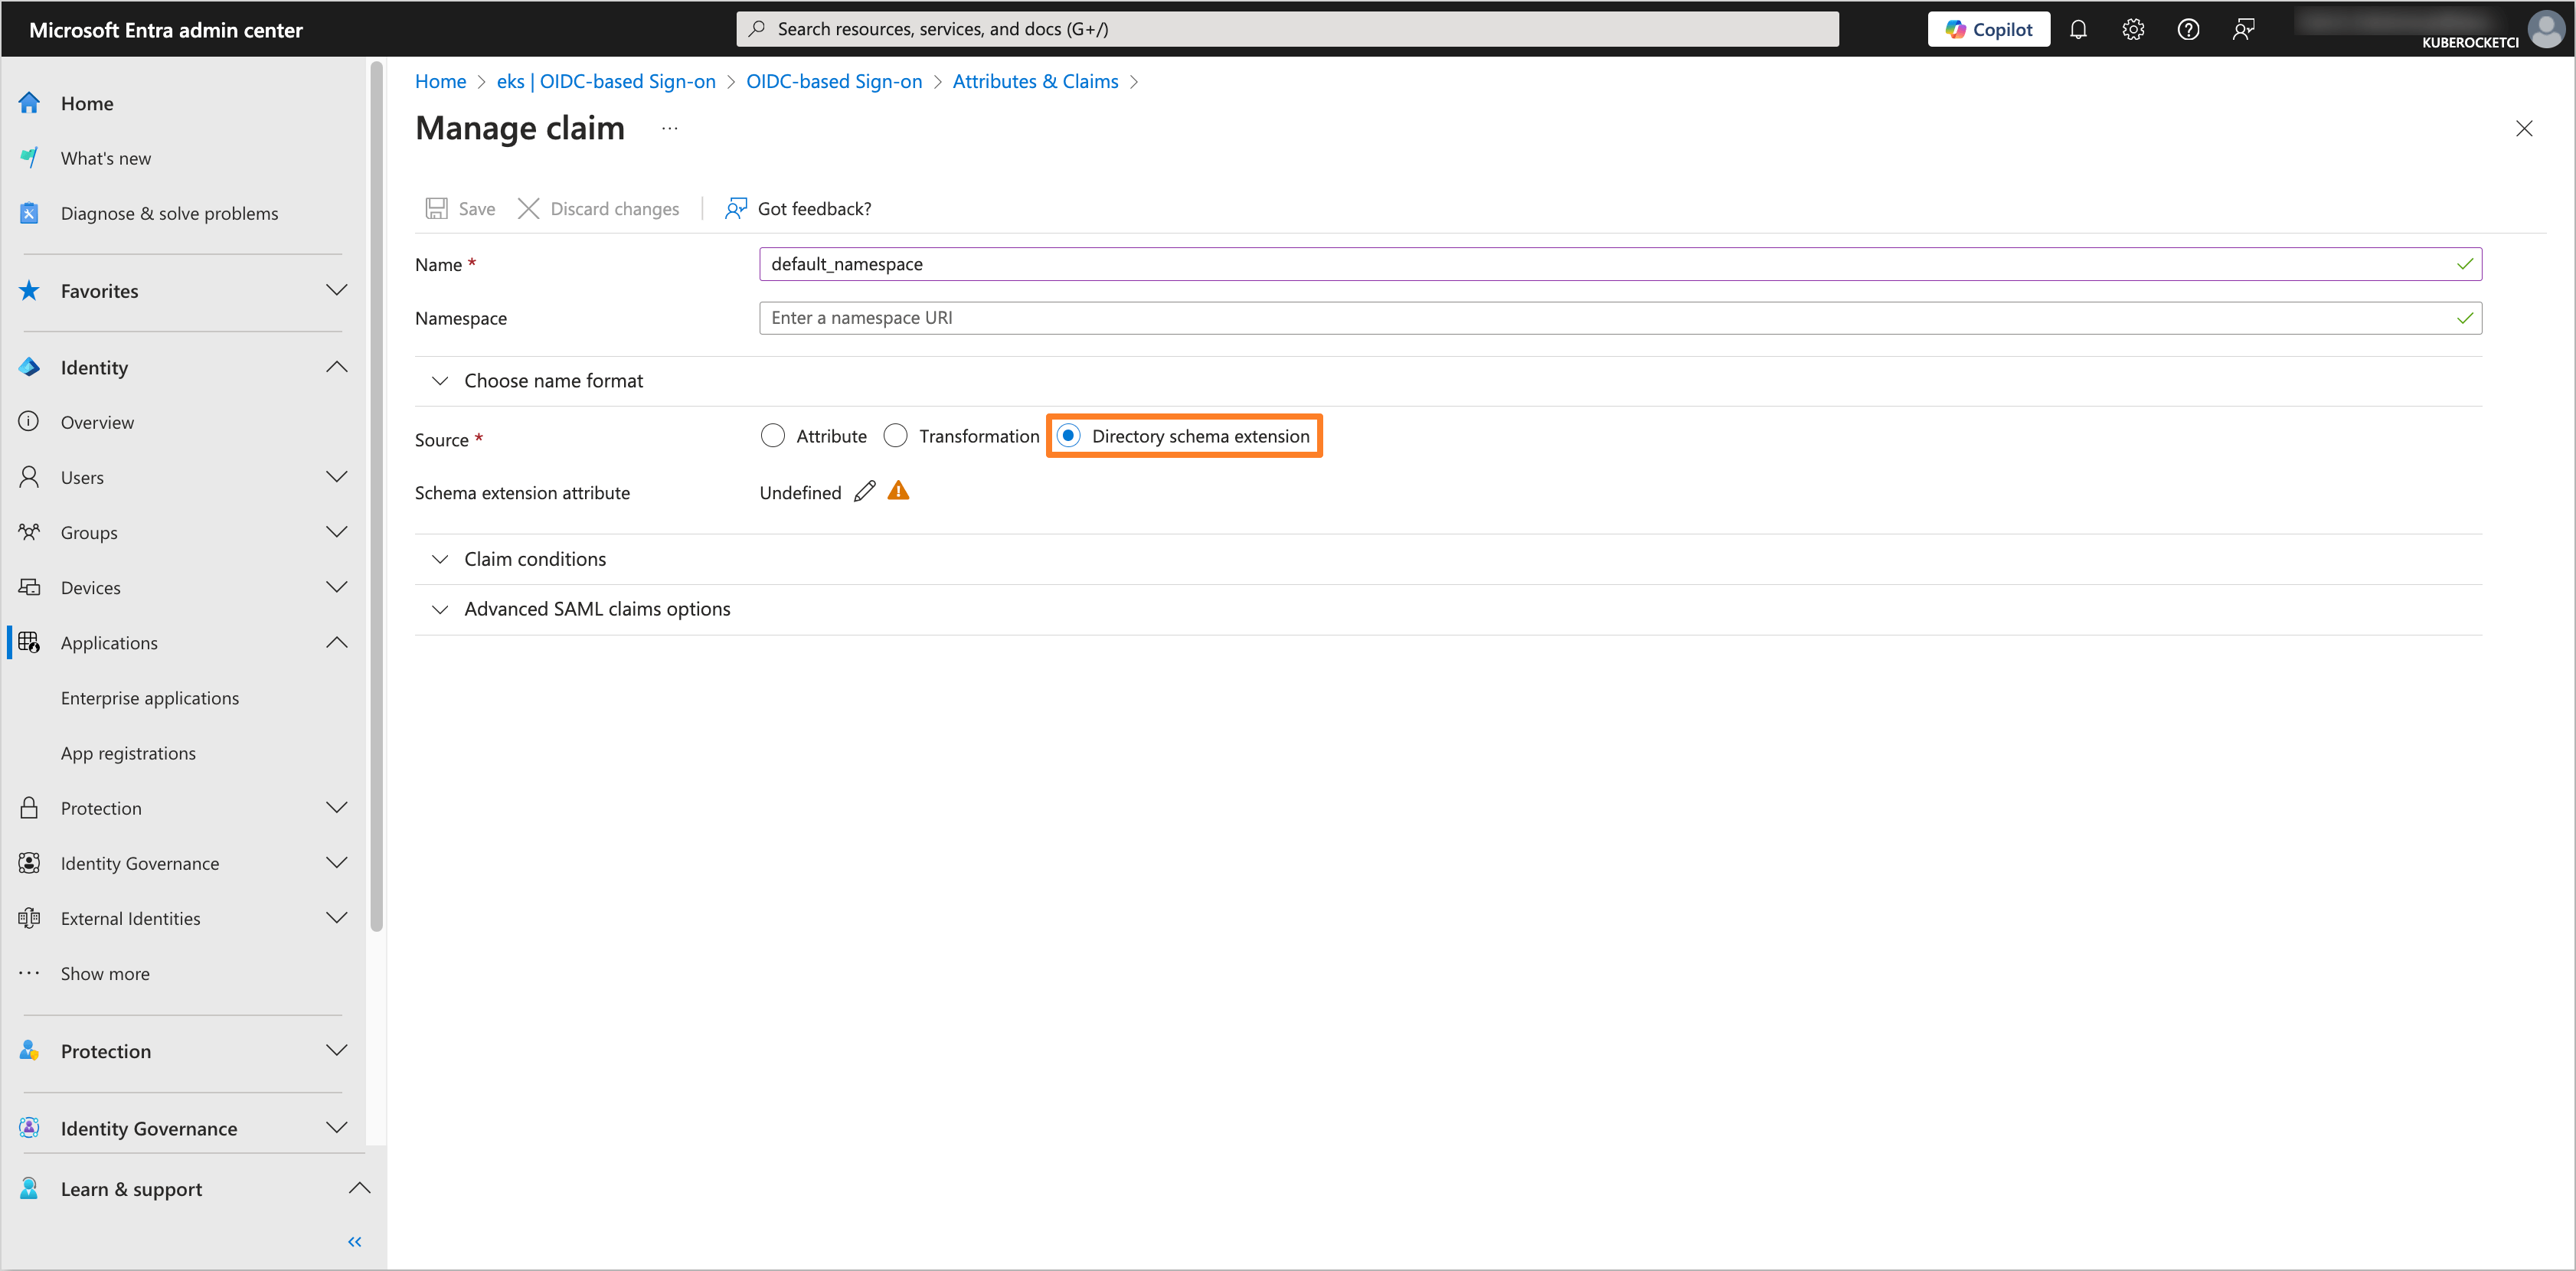
In the Select Application tab, choose the application created for OIDC integration with AWS EKS and the KubeRocketCI Portal (e.g.,
eks). Click on the Select button.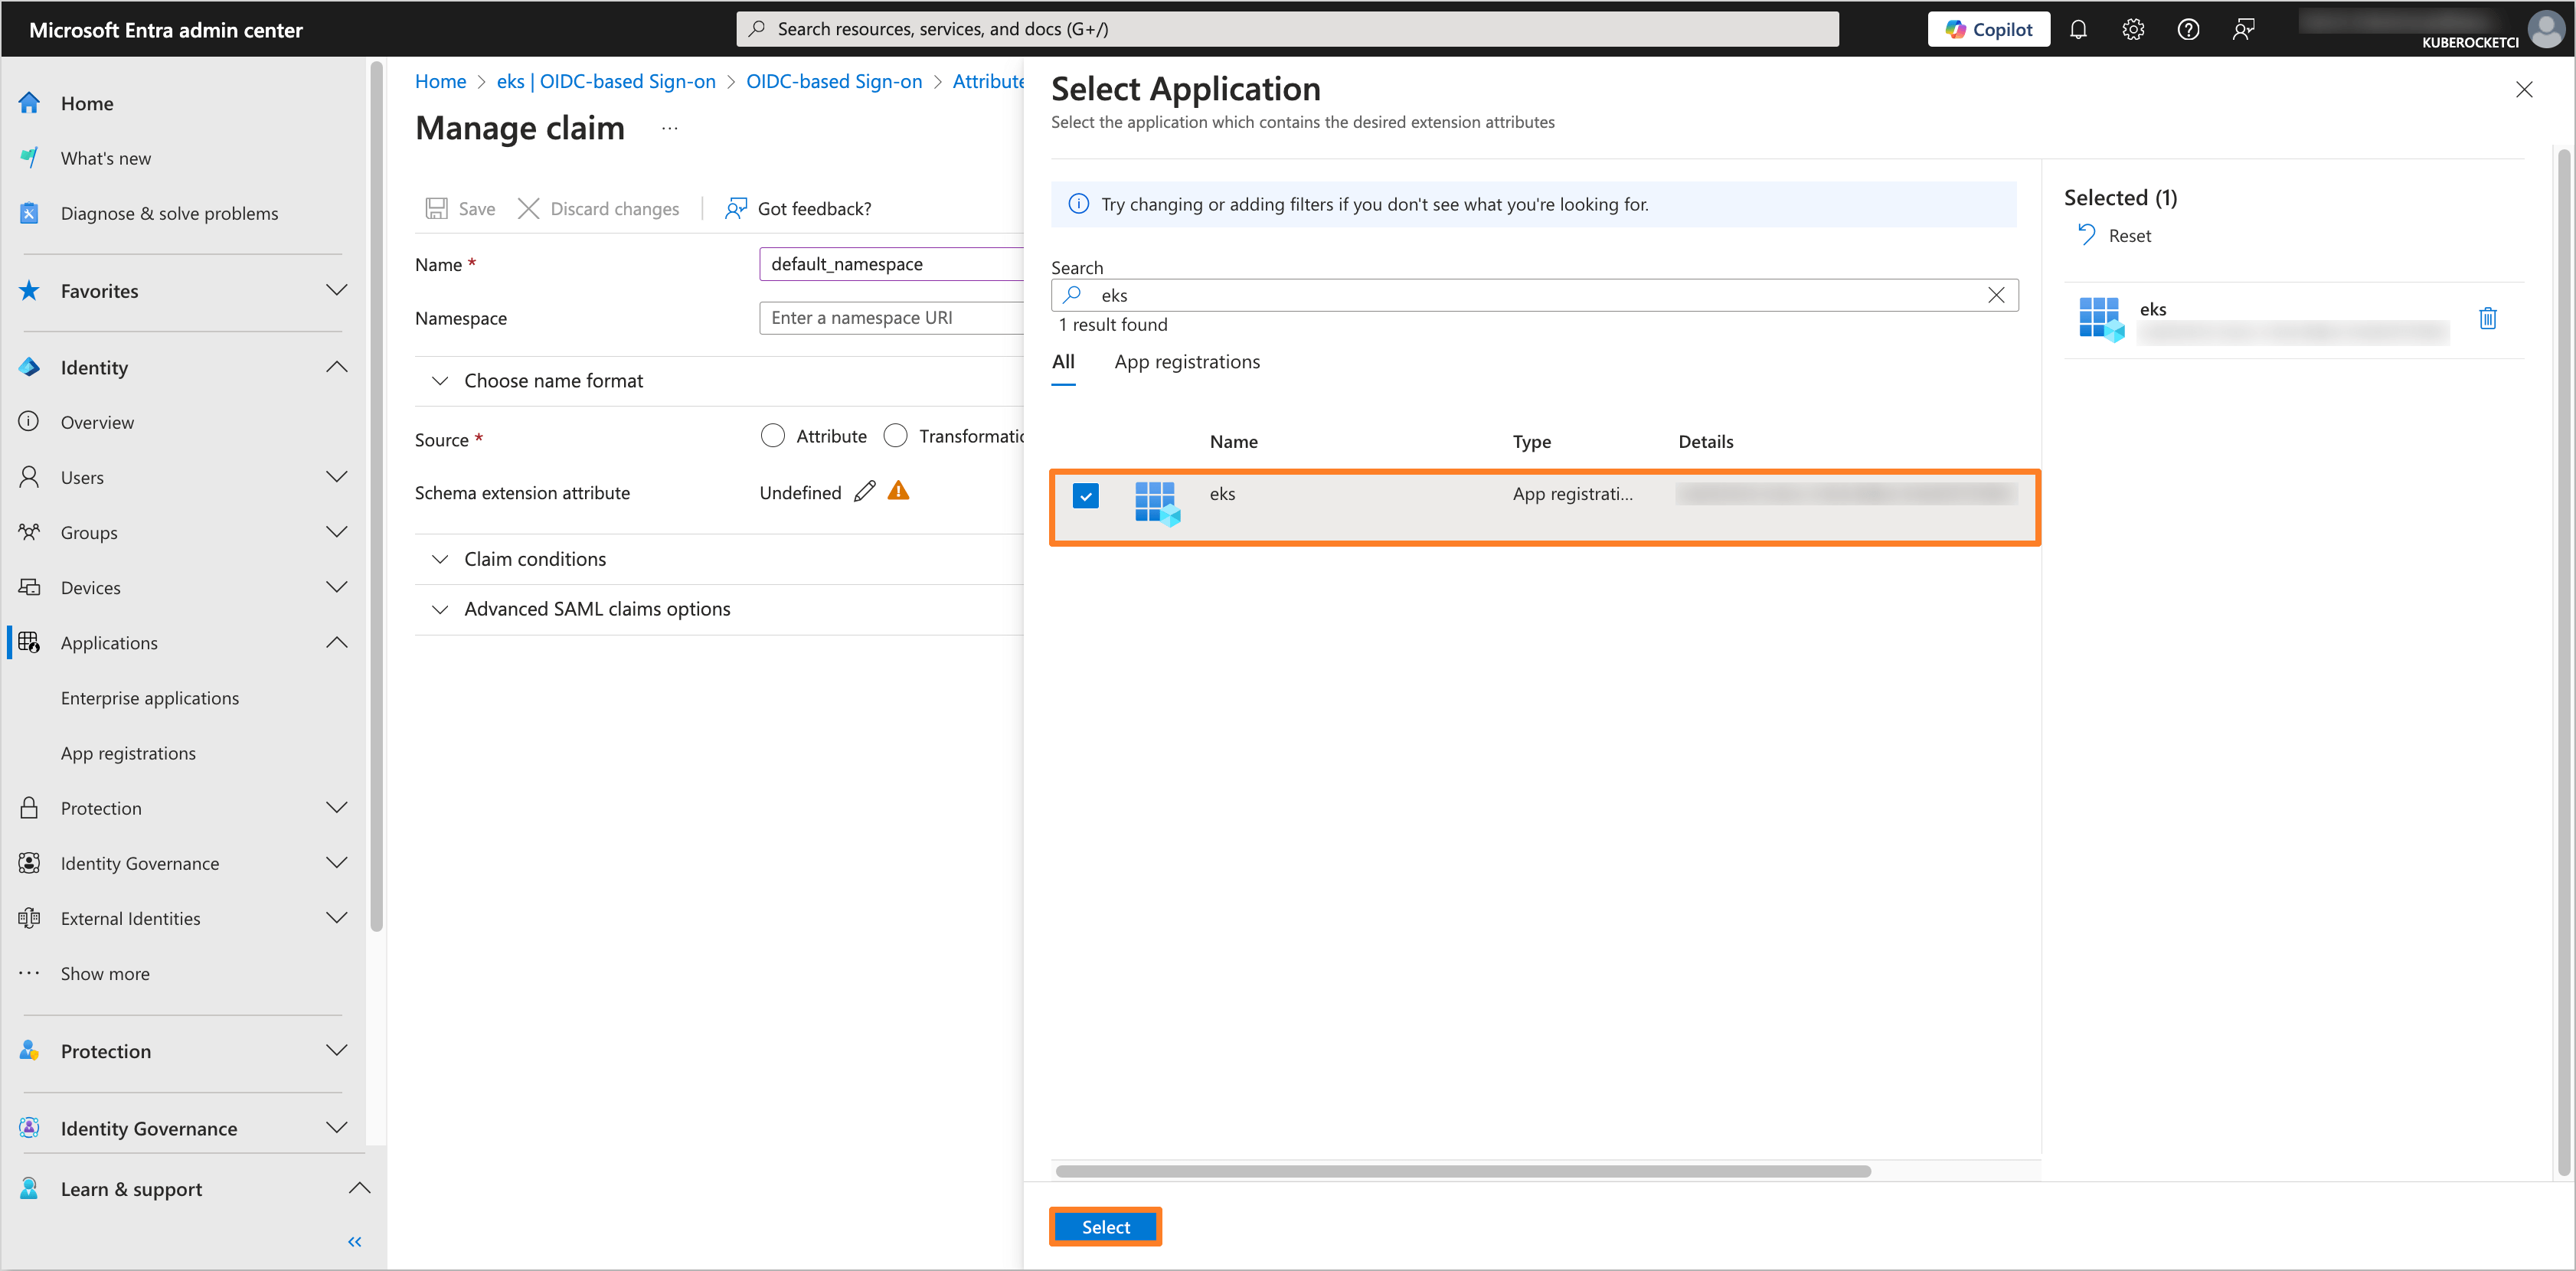
In the Add Extension Attributes tab, select the
user.default_namespaceattribute and click on the Add button.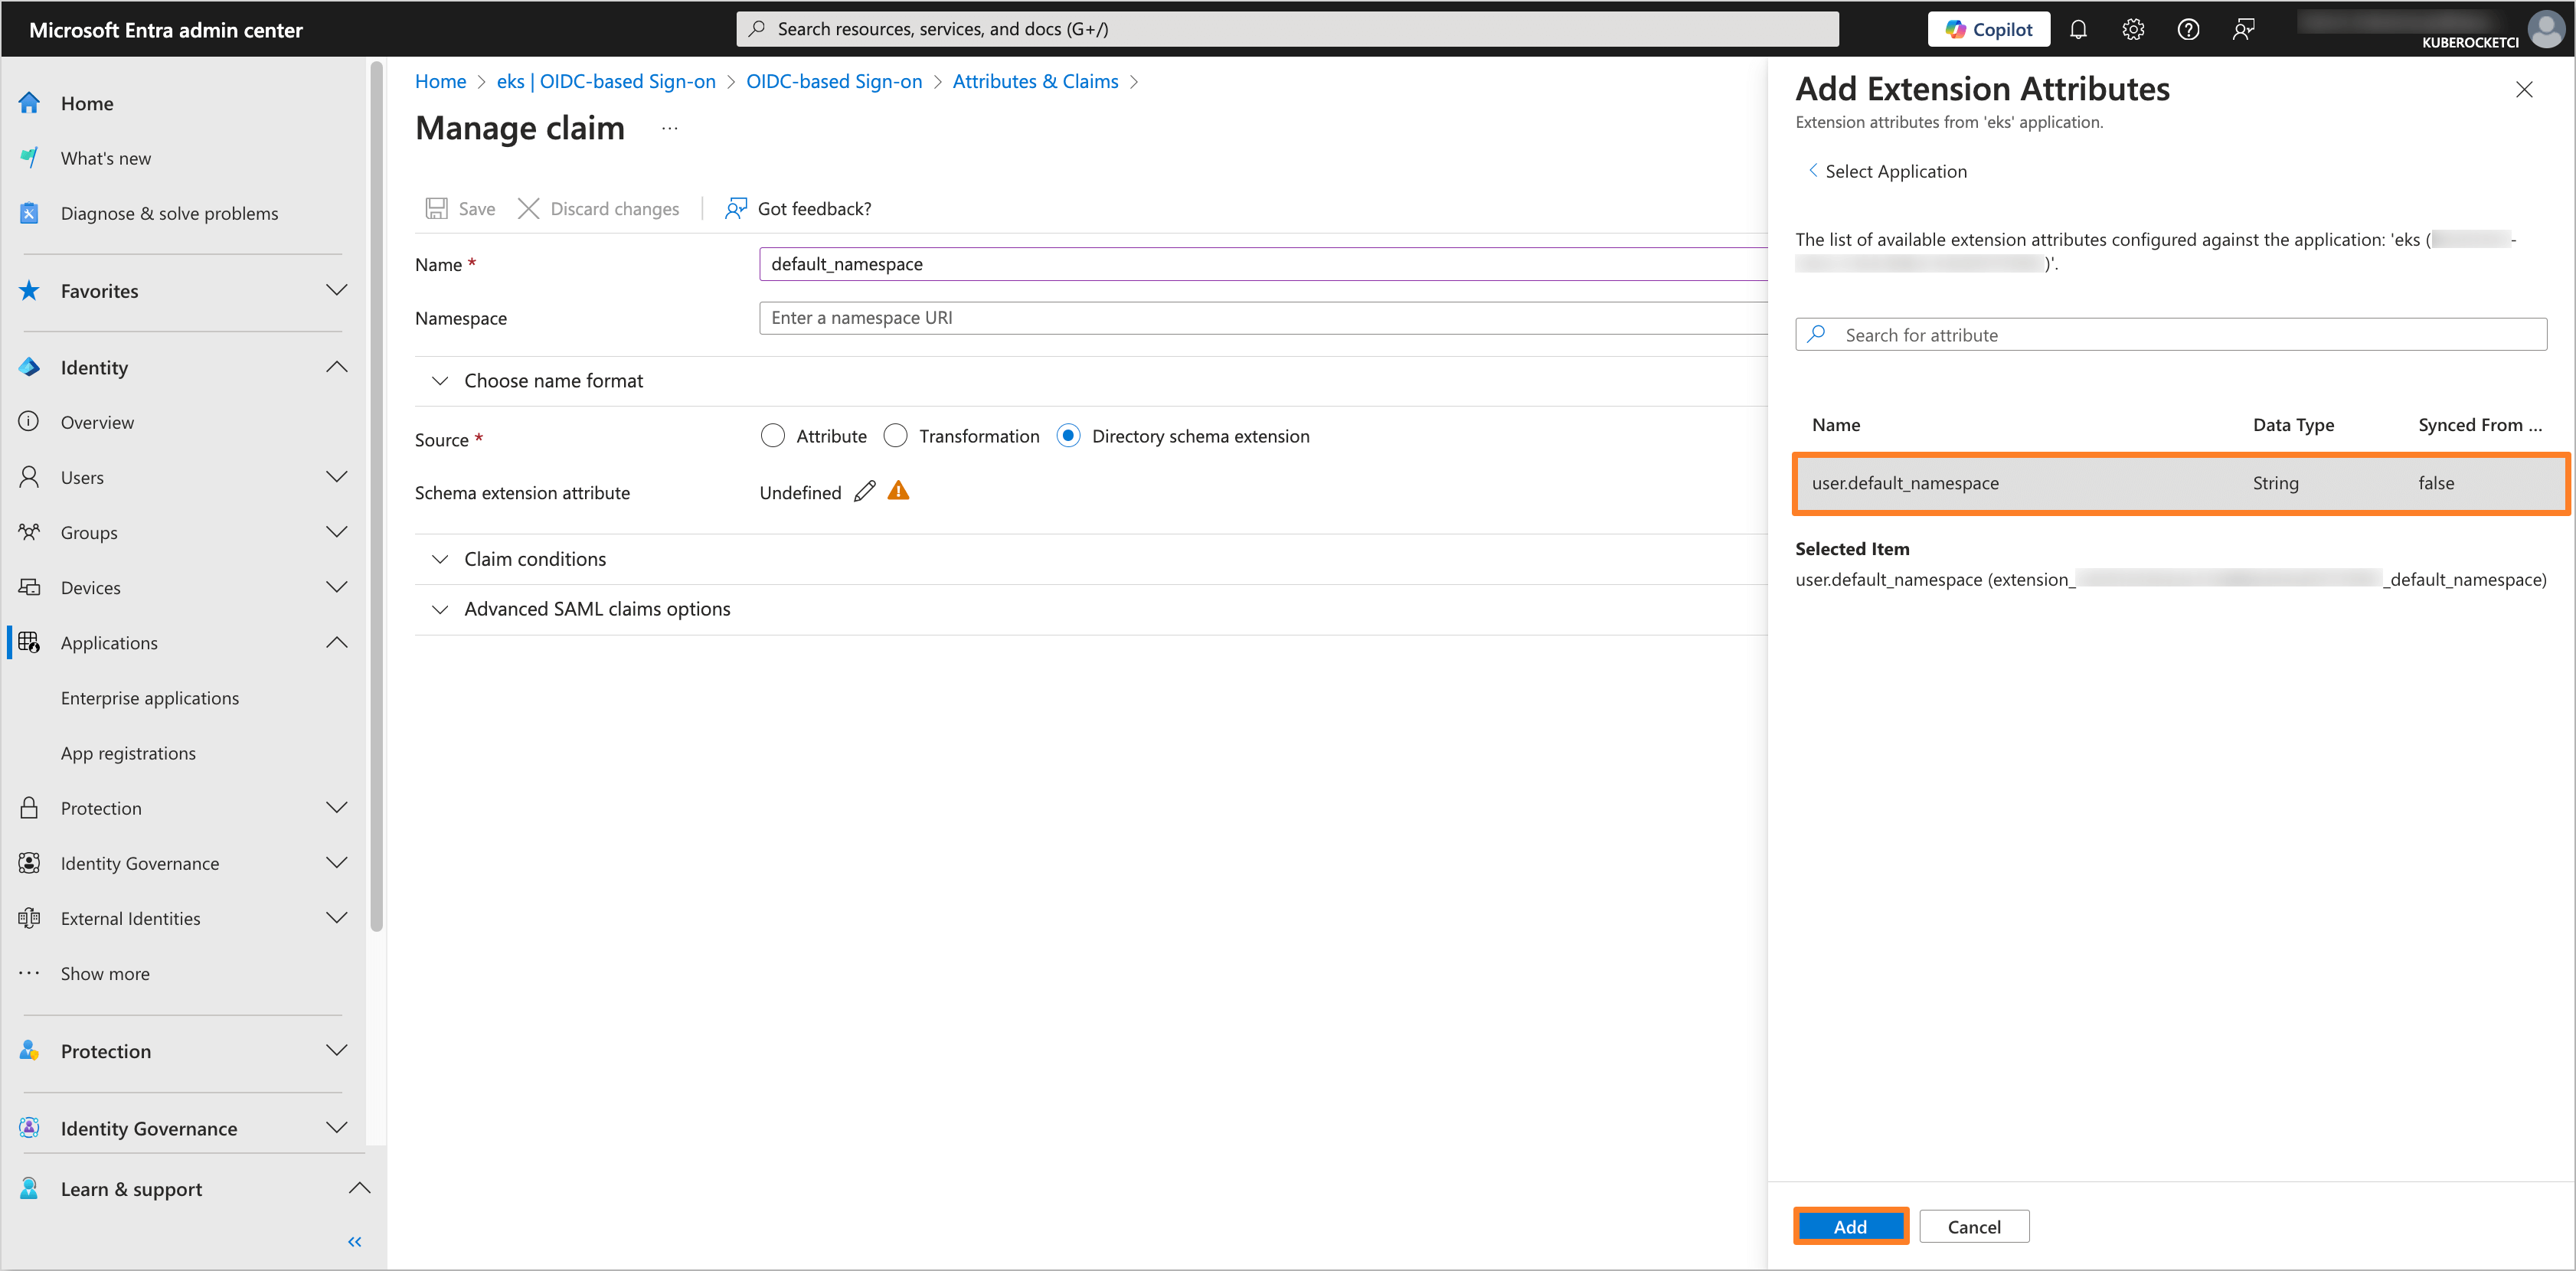
Click on the Save button to apply the changes.
-
In the left sidebar menu, select Applications and navigate to the application created for OIDC integration with AWS EKS and the KubeRocketCI Portal (e.g.,
eks). In the application tab, navigate to the Manifest section.Find the
acceptMappedClaimsparameter and set it totrue. Click on the Save button to apply the changes.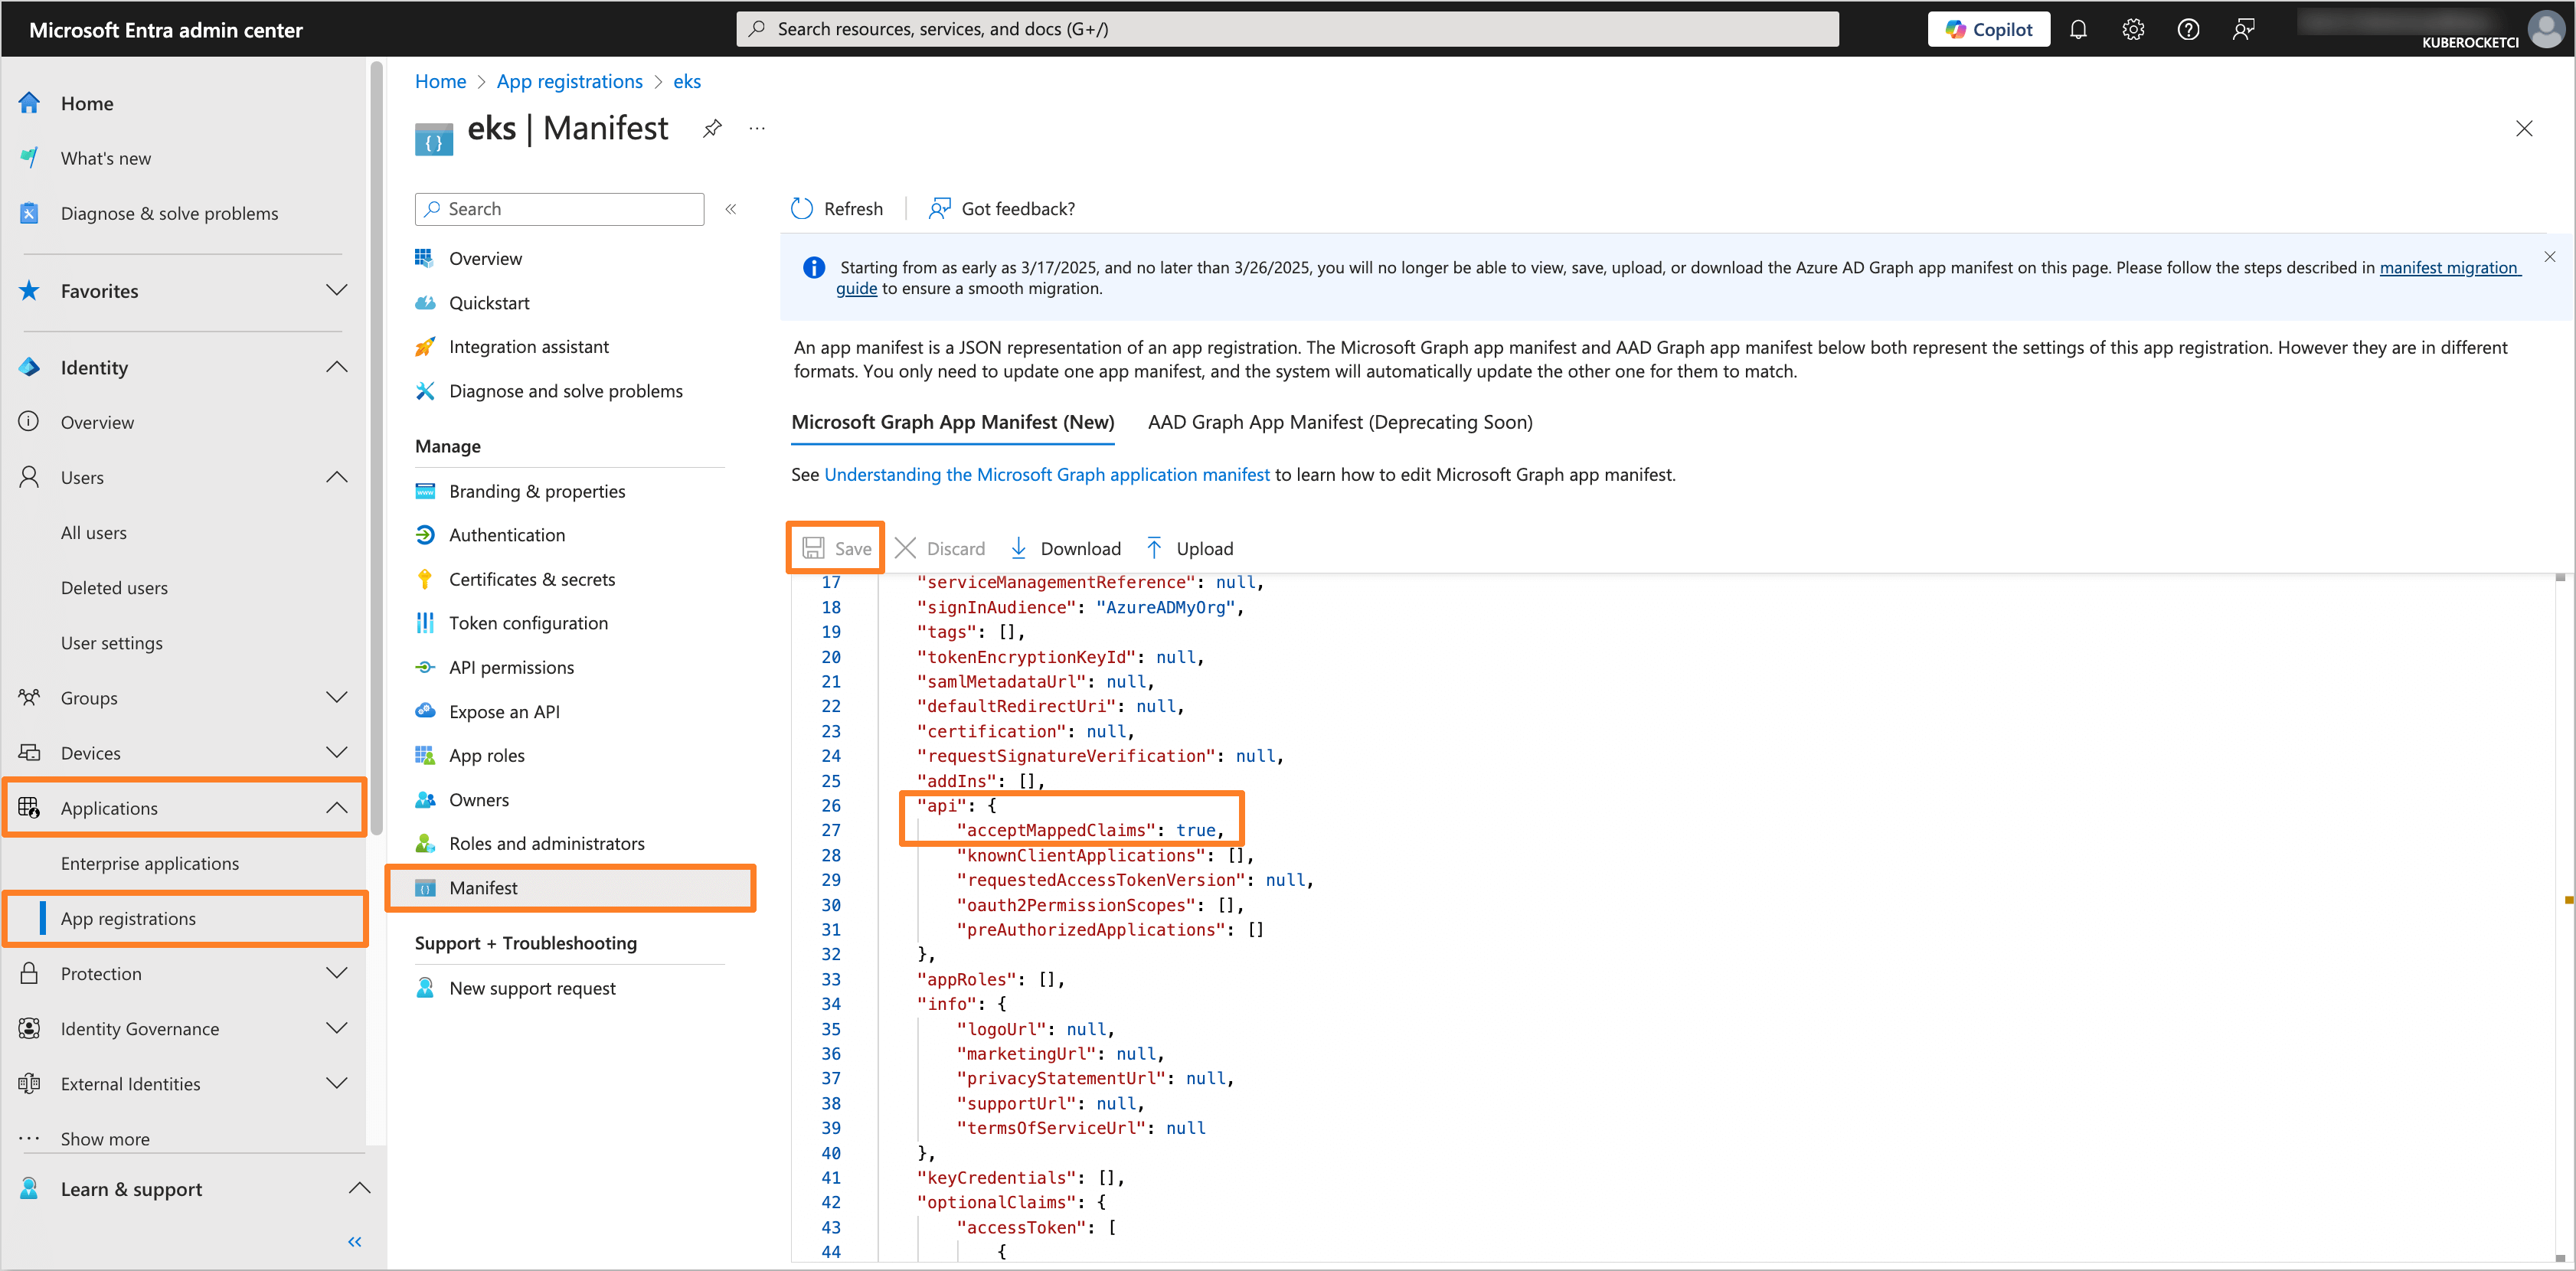
-
(Optional) Get the application access token and verify the
default_namespaceextension attribute by running the following command:noteBefore running the command, ensure that the
Redirect URIin the Microsoft Entra application is set tohttp://localhost:8000.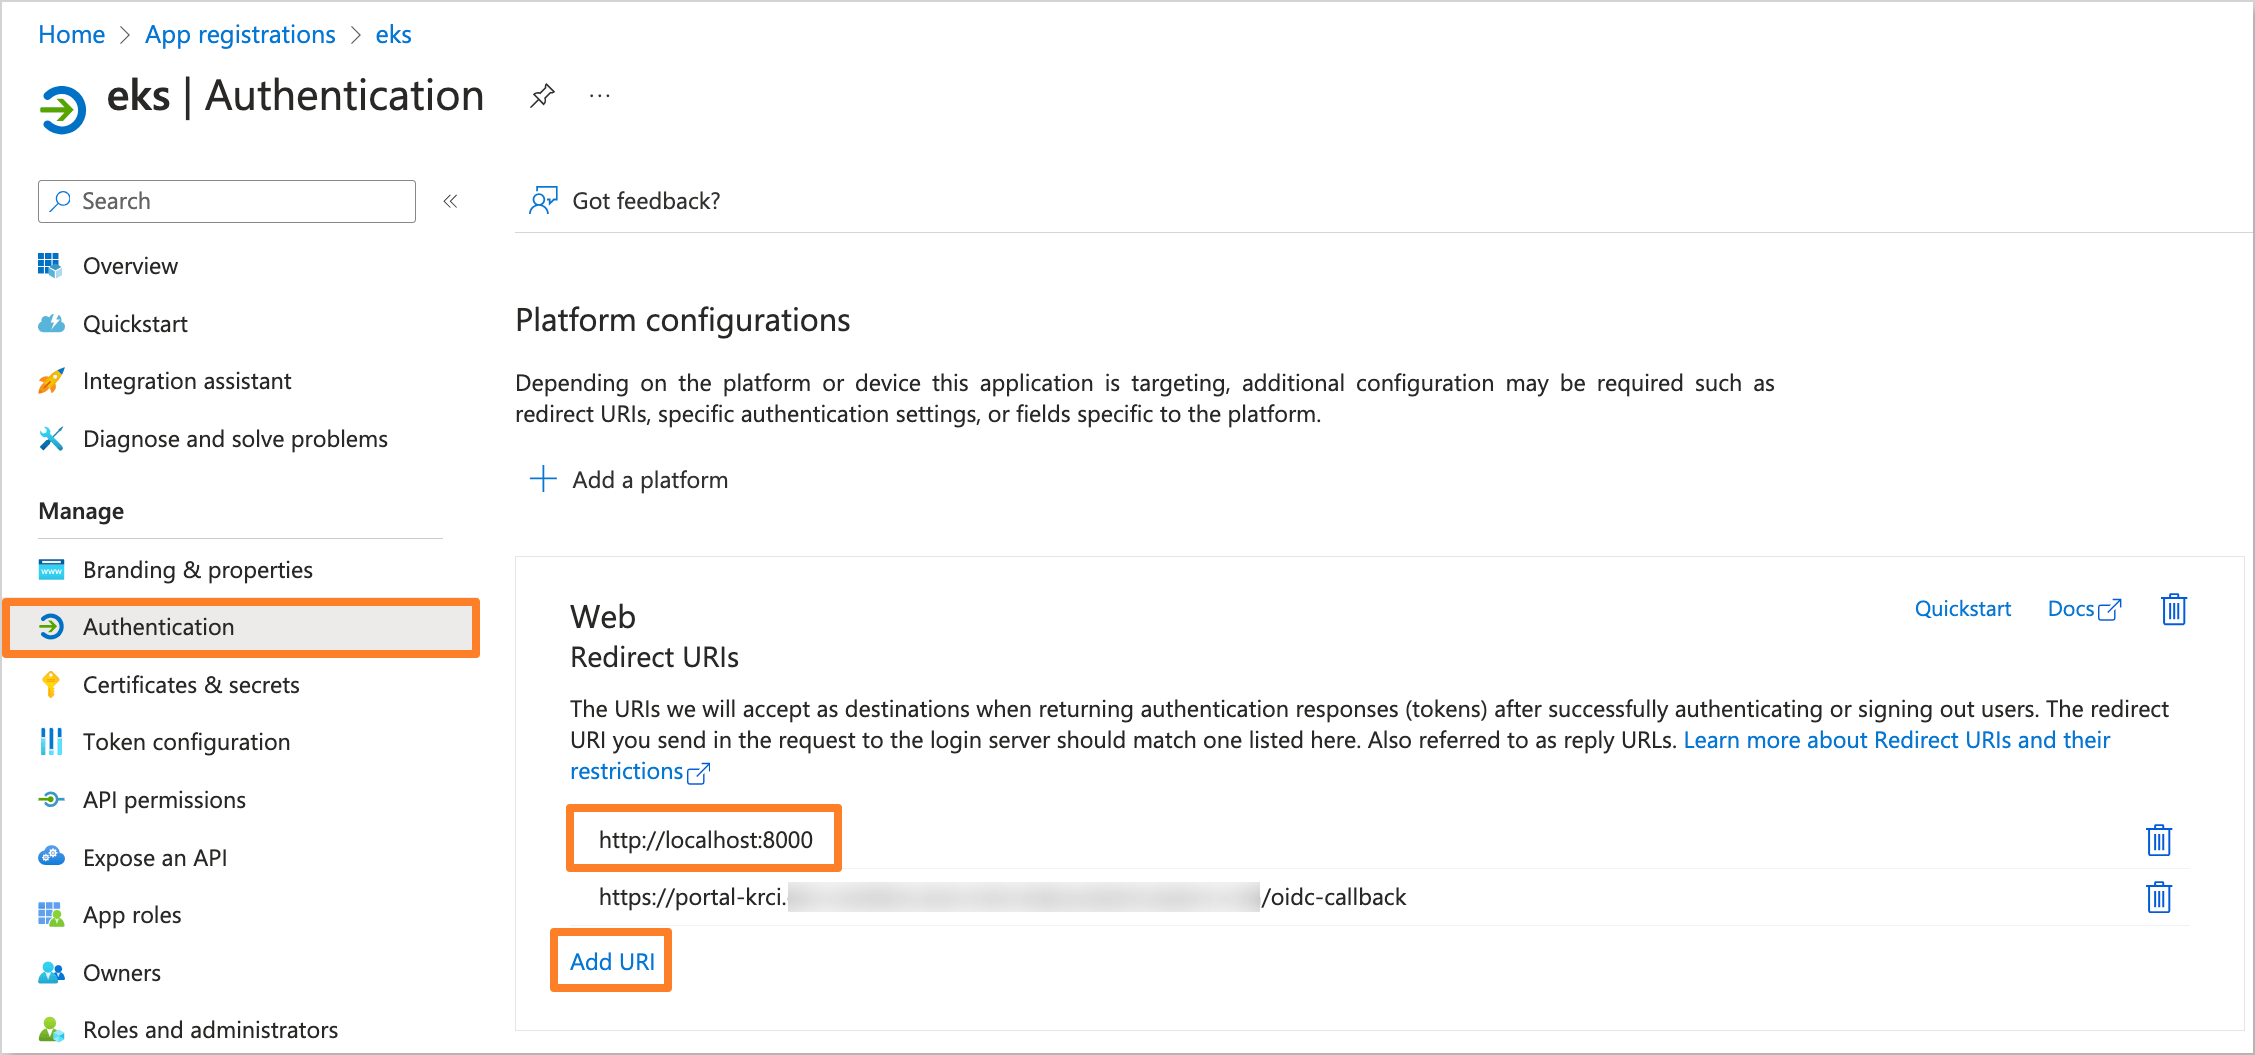
kubelogin get-token --oidc-issuer-url=https://sts.windows.net/<tenant_id>/ --oidc-client-id=<application_client_id> --oidc-client-secret=<application_client_secret> --force-refreshReplace
<tenant_id>,<application_client_id>, and<application_client_secret>with the corresponding values from the Microsoft Entra application.After that, encode the token using the jwt.io tool and verify the
default_namespaceattribute in the decoded token.
-
After configuring the
default_namespaceextension attribute, the account settings, such as the Default namespace and Allowed namespaces, will be automatically configured during login to the KubeRocketCI Portal.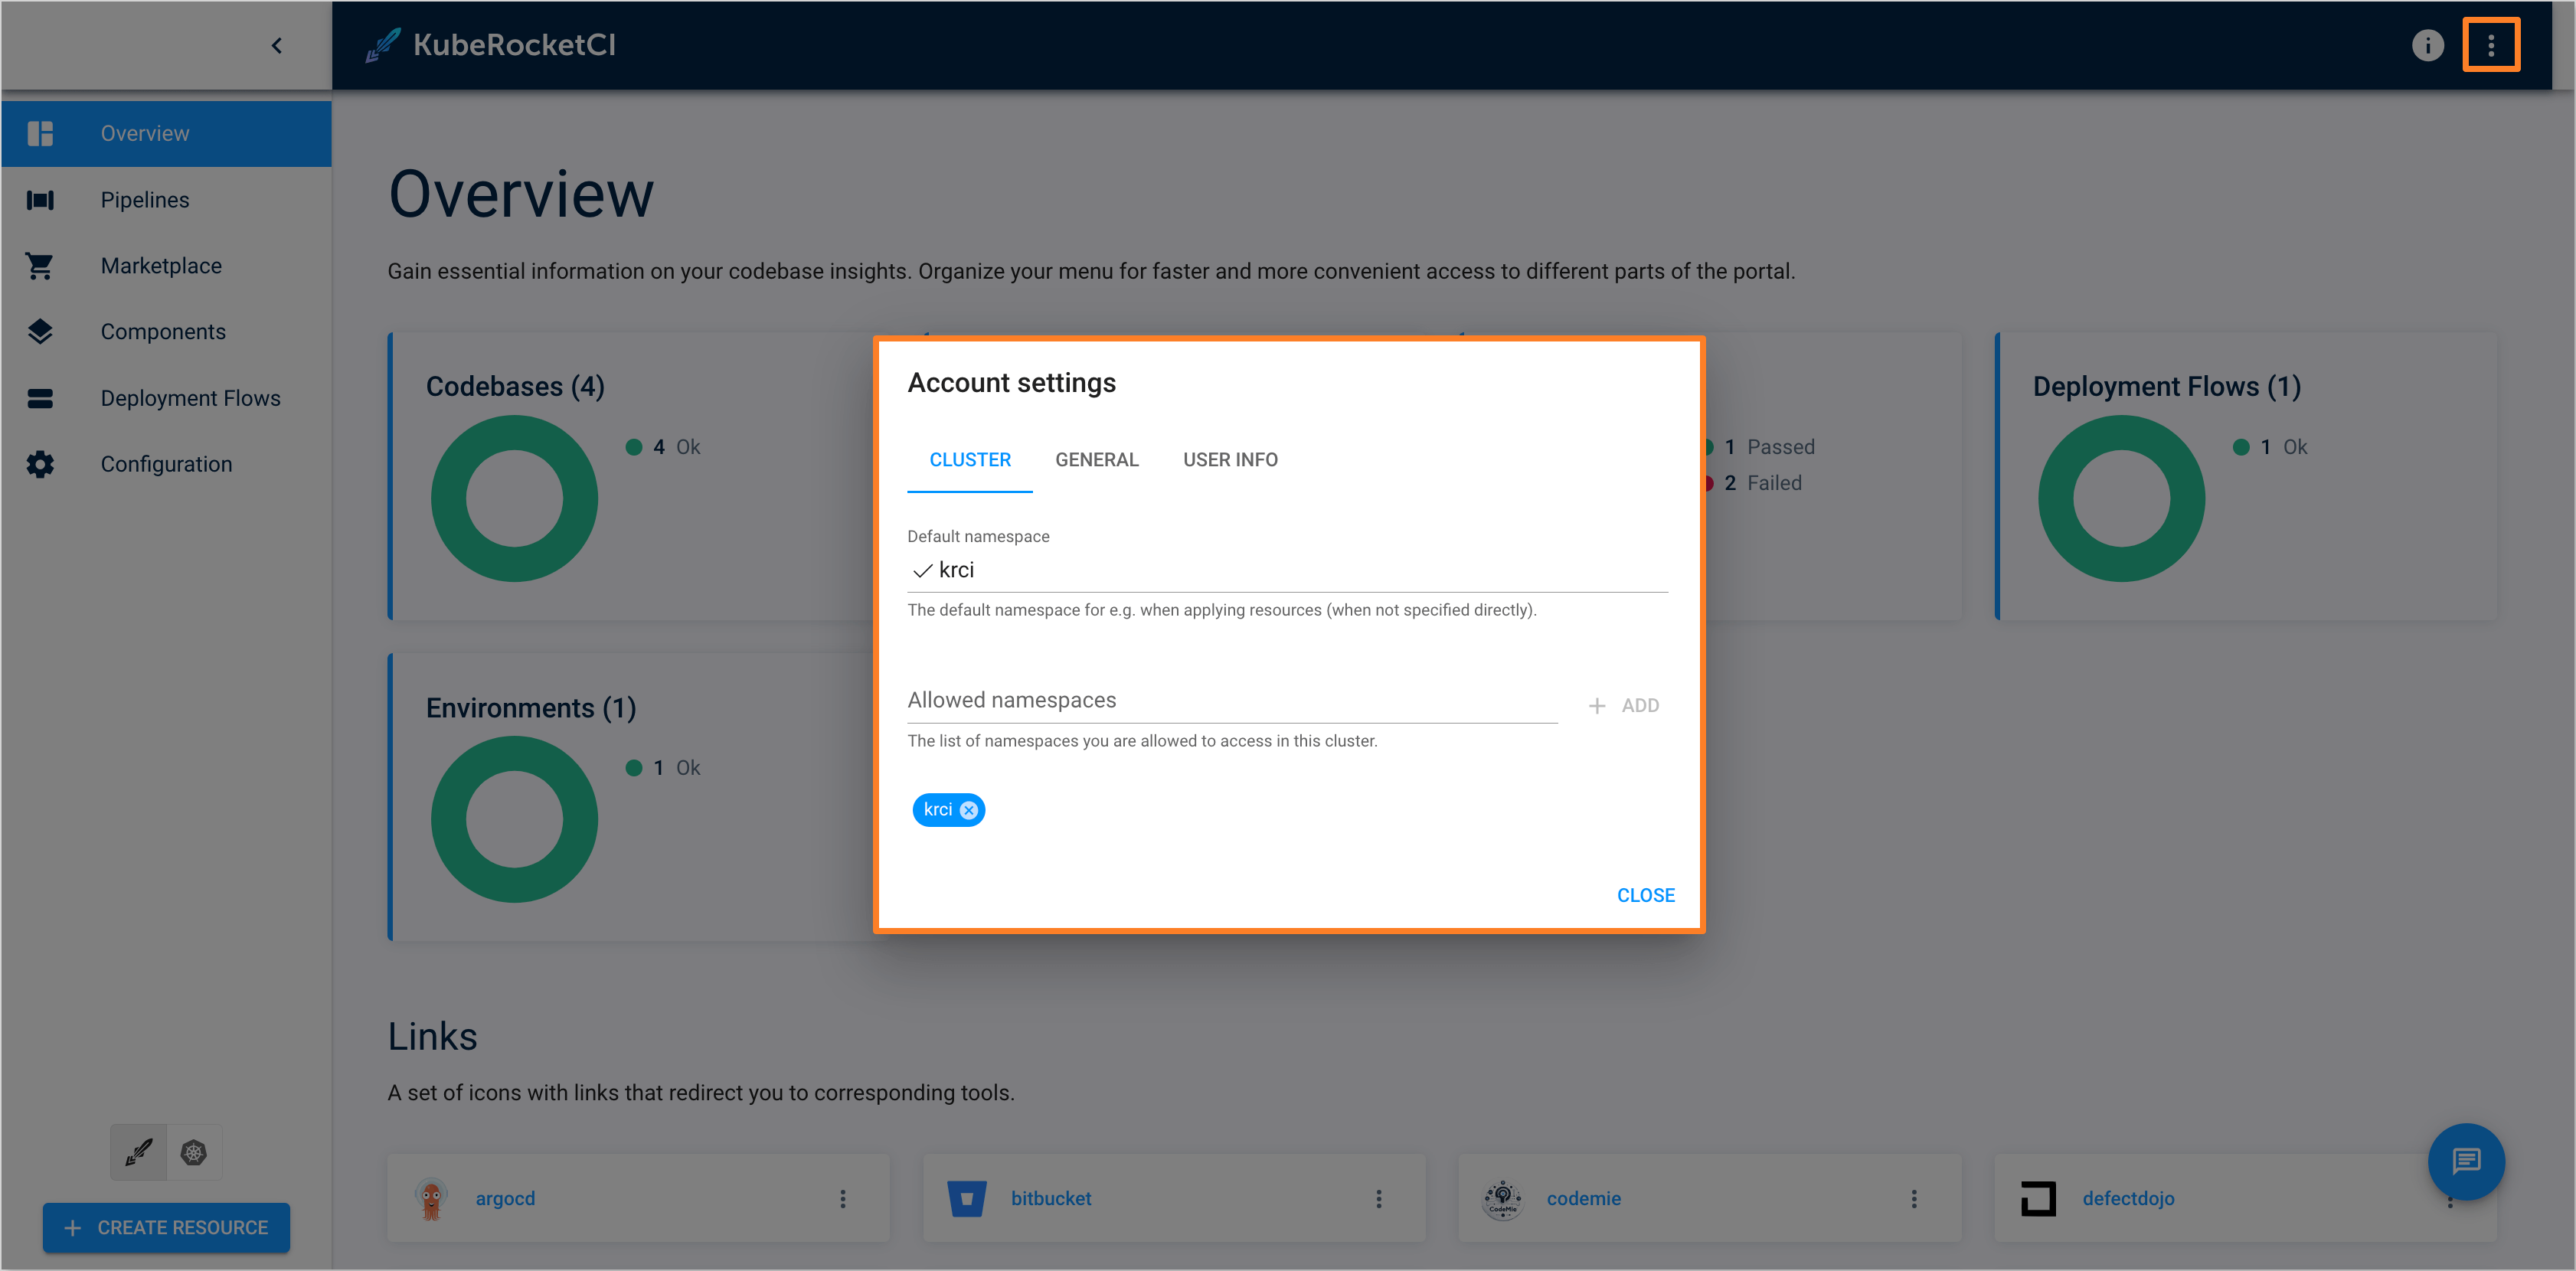
Configure User Profile Picture
To enhance account personalization, it is possible to configure the user profile picture in the KubeRocketCI Portal using the Microsoft Entra extension attributes.
Follow the steps below to configure the user profile picture extension attribute in Microsoft Entra and assign it to the user:
-
Log in to the Microsoft Entra Admin Center.

-
In the left sidebar menu, select Applications and navigate to the application created during the OIDC integration process with AWS EKS and the KubeRocketCI Portal (e.g.,
eks).
-
In the application tab, navigate to the API permissions section. Click on the Add a permission button. Select Microsoft Graph and then Application permissions. Add the following permissions:
- Application.ReadWrite.All
- User.ReadWrite.All

After adding the permissions, click on the Grant admin consent for 'Tenant name' button to grant the required permissions.
-
Navigate to the local terminal and run the following command to get the access token:
noteYou can use the jq tool to parse the JSON response. If you do not have it installed, you can drop the
| jq -r '.access_token'part from the command.curl -X POST "https://login.microsoftonline.com/<tenant_id>/oauth2/v2.0/token" \
-d "client_id=<application_client_id>" \
-d "client_secret=<application_client_secret>" \
-d "scope=https://graph.microsoft.com/.default" \
-d "grant_type=client_credentials" | jq -r '.access_token'Replace
<tenant_id>,<application_client_id>, and<application_client_secret>with the corresponding values from the Microsoft Entra application.Save the access token for further use.
-
Create the
pictureextension attribute for the Microsoft Entra application by running the following command:curl -X POST "https://graph.microsoft.com/v1.0/applications/<application_object_id>/extensionProperties" \
-H "Authorization: Bearer <access_token>" \
-H "Content-Type: application/json" \
-d '{
"name": "picture",
"dataType": "String",
"targetObjects": ["User"]
}'Replace
<application_object_id>with the Object ID of the Microsoft Entra application and<access_token>with the saved access token. -
Assign the
pictureextension attribute to the user by running the following command:curl -X PATCH "https://graph.microsoft.com/v1.0/users/<user_object_id>" \
-H "Authorization: Bearer <access_token>" \
-H "Content-Type: application/json" \
-d '{
"extension_<application_client_id>_picture": "<picture_url>"
}'Replace
<user_object_id>,<application_client_id>,<access_token>, and<picture_url>with the user Object ID, application Client ID, saved access token, and the URL of the user profile picture, respectively.noteThe profile picture URL should refer to an image accessible via a public URL.
-
Navigate to the Microsoft Entra Admin Center. In the left sidebar menu, select Applications and navigate to the Enterprise application created for OIDC integration with AWS EKS and the KubeRocketCI Portal (e.g.,
eks).
-
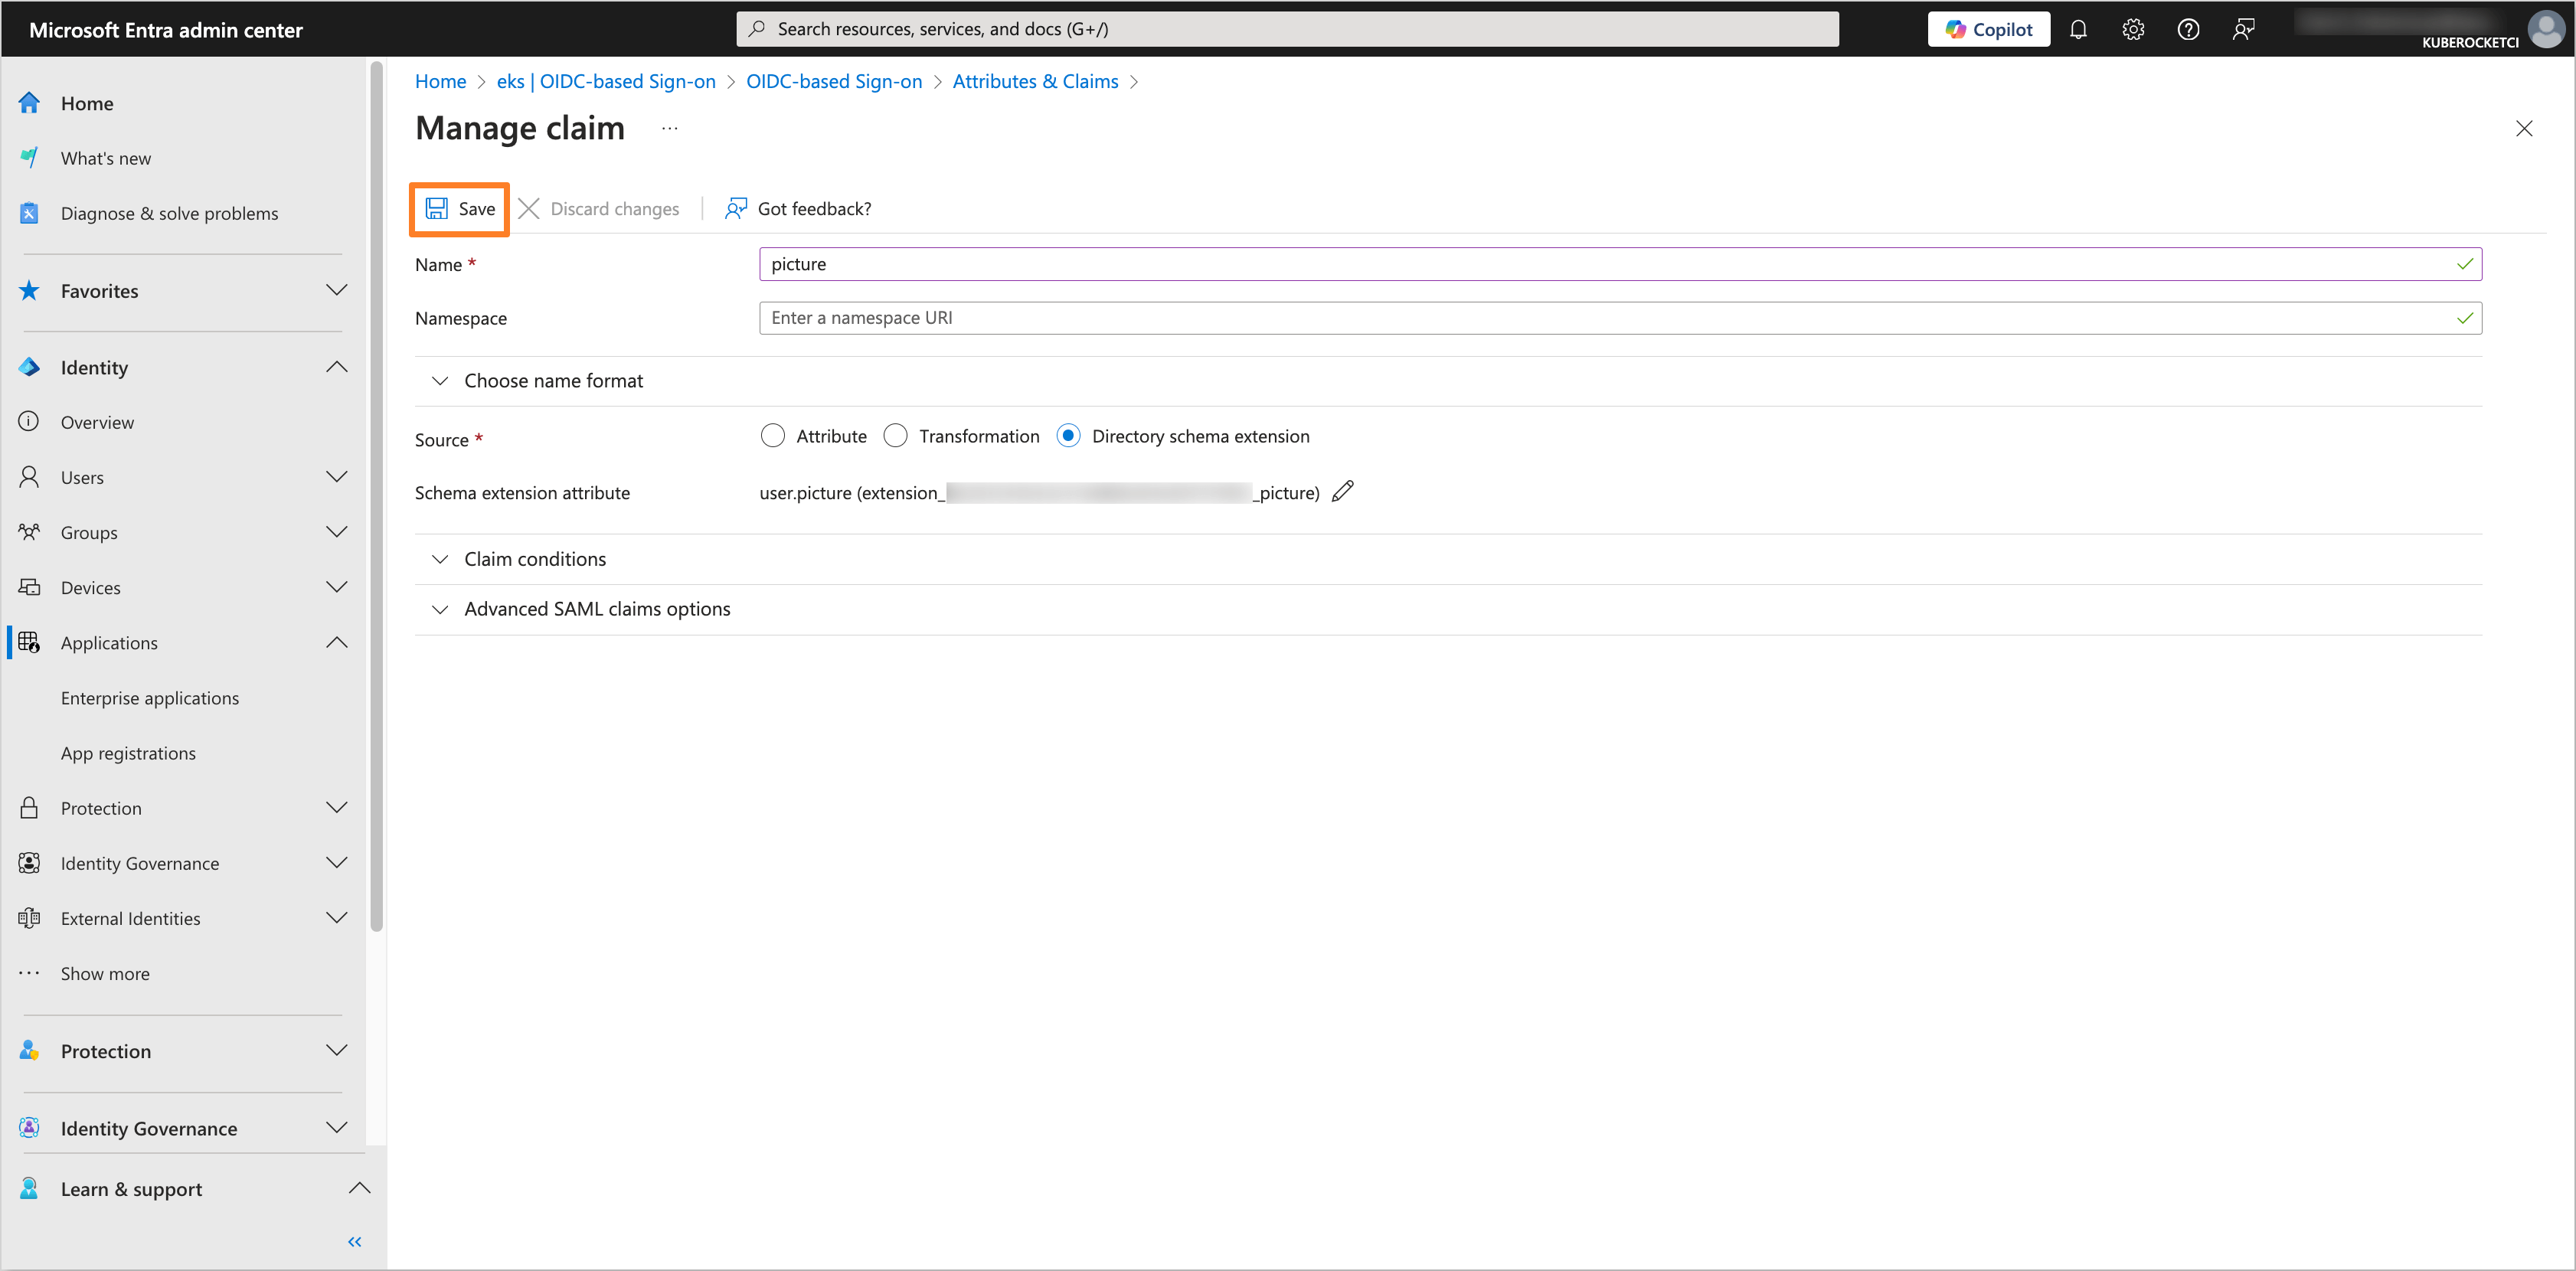
In the application tab, navigate to the Single sign-on section. In the Attributes & Claims tab, click on the Edit button.

After that, click on the Add new claim button.

Fill in the Name field with
pictureand select the Source asDirectory schema extension.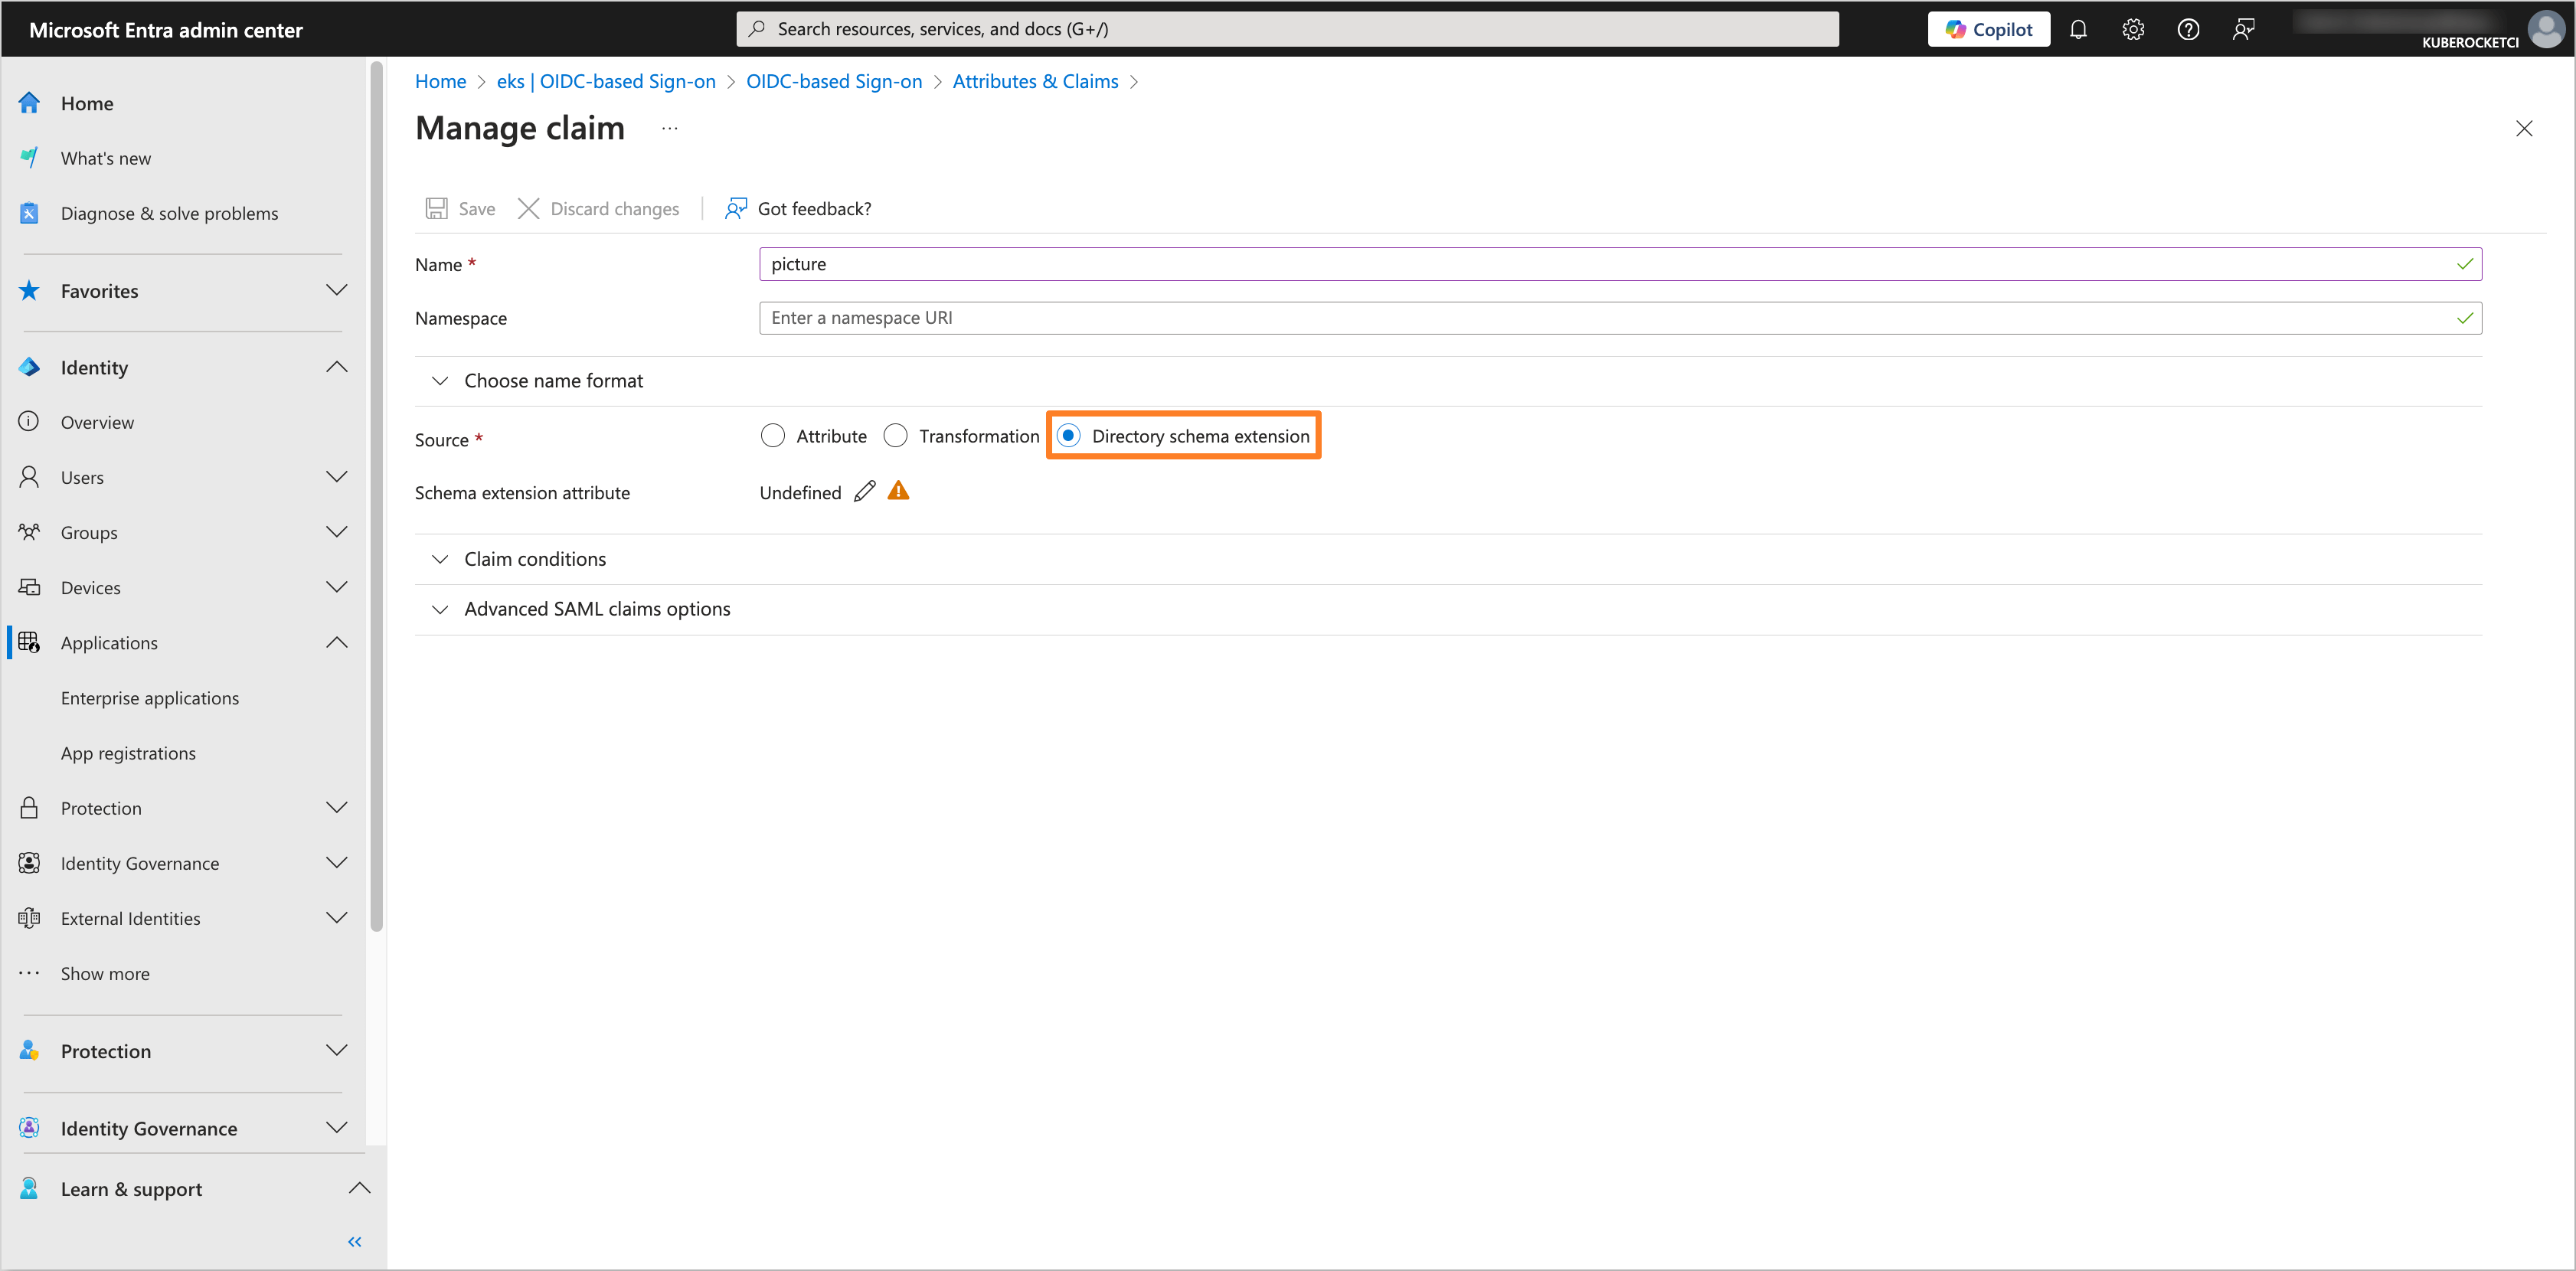
In the Select Application tab, choose the application created for OIDC integration with AWS EKS and the KubeRocketCI Portal (e.g.,
eks). Click on the Select button.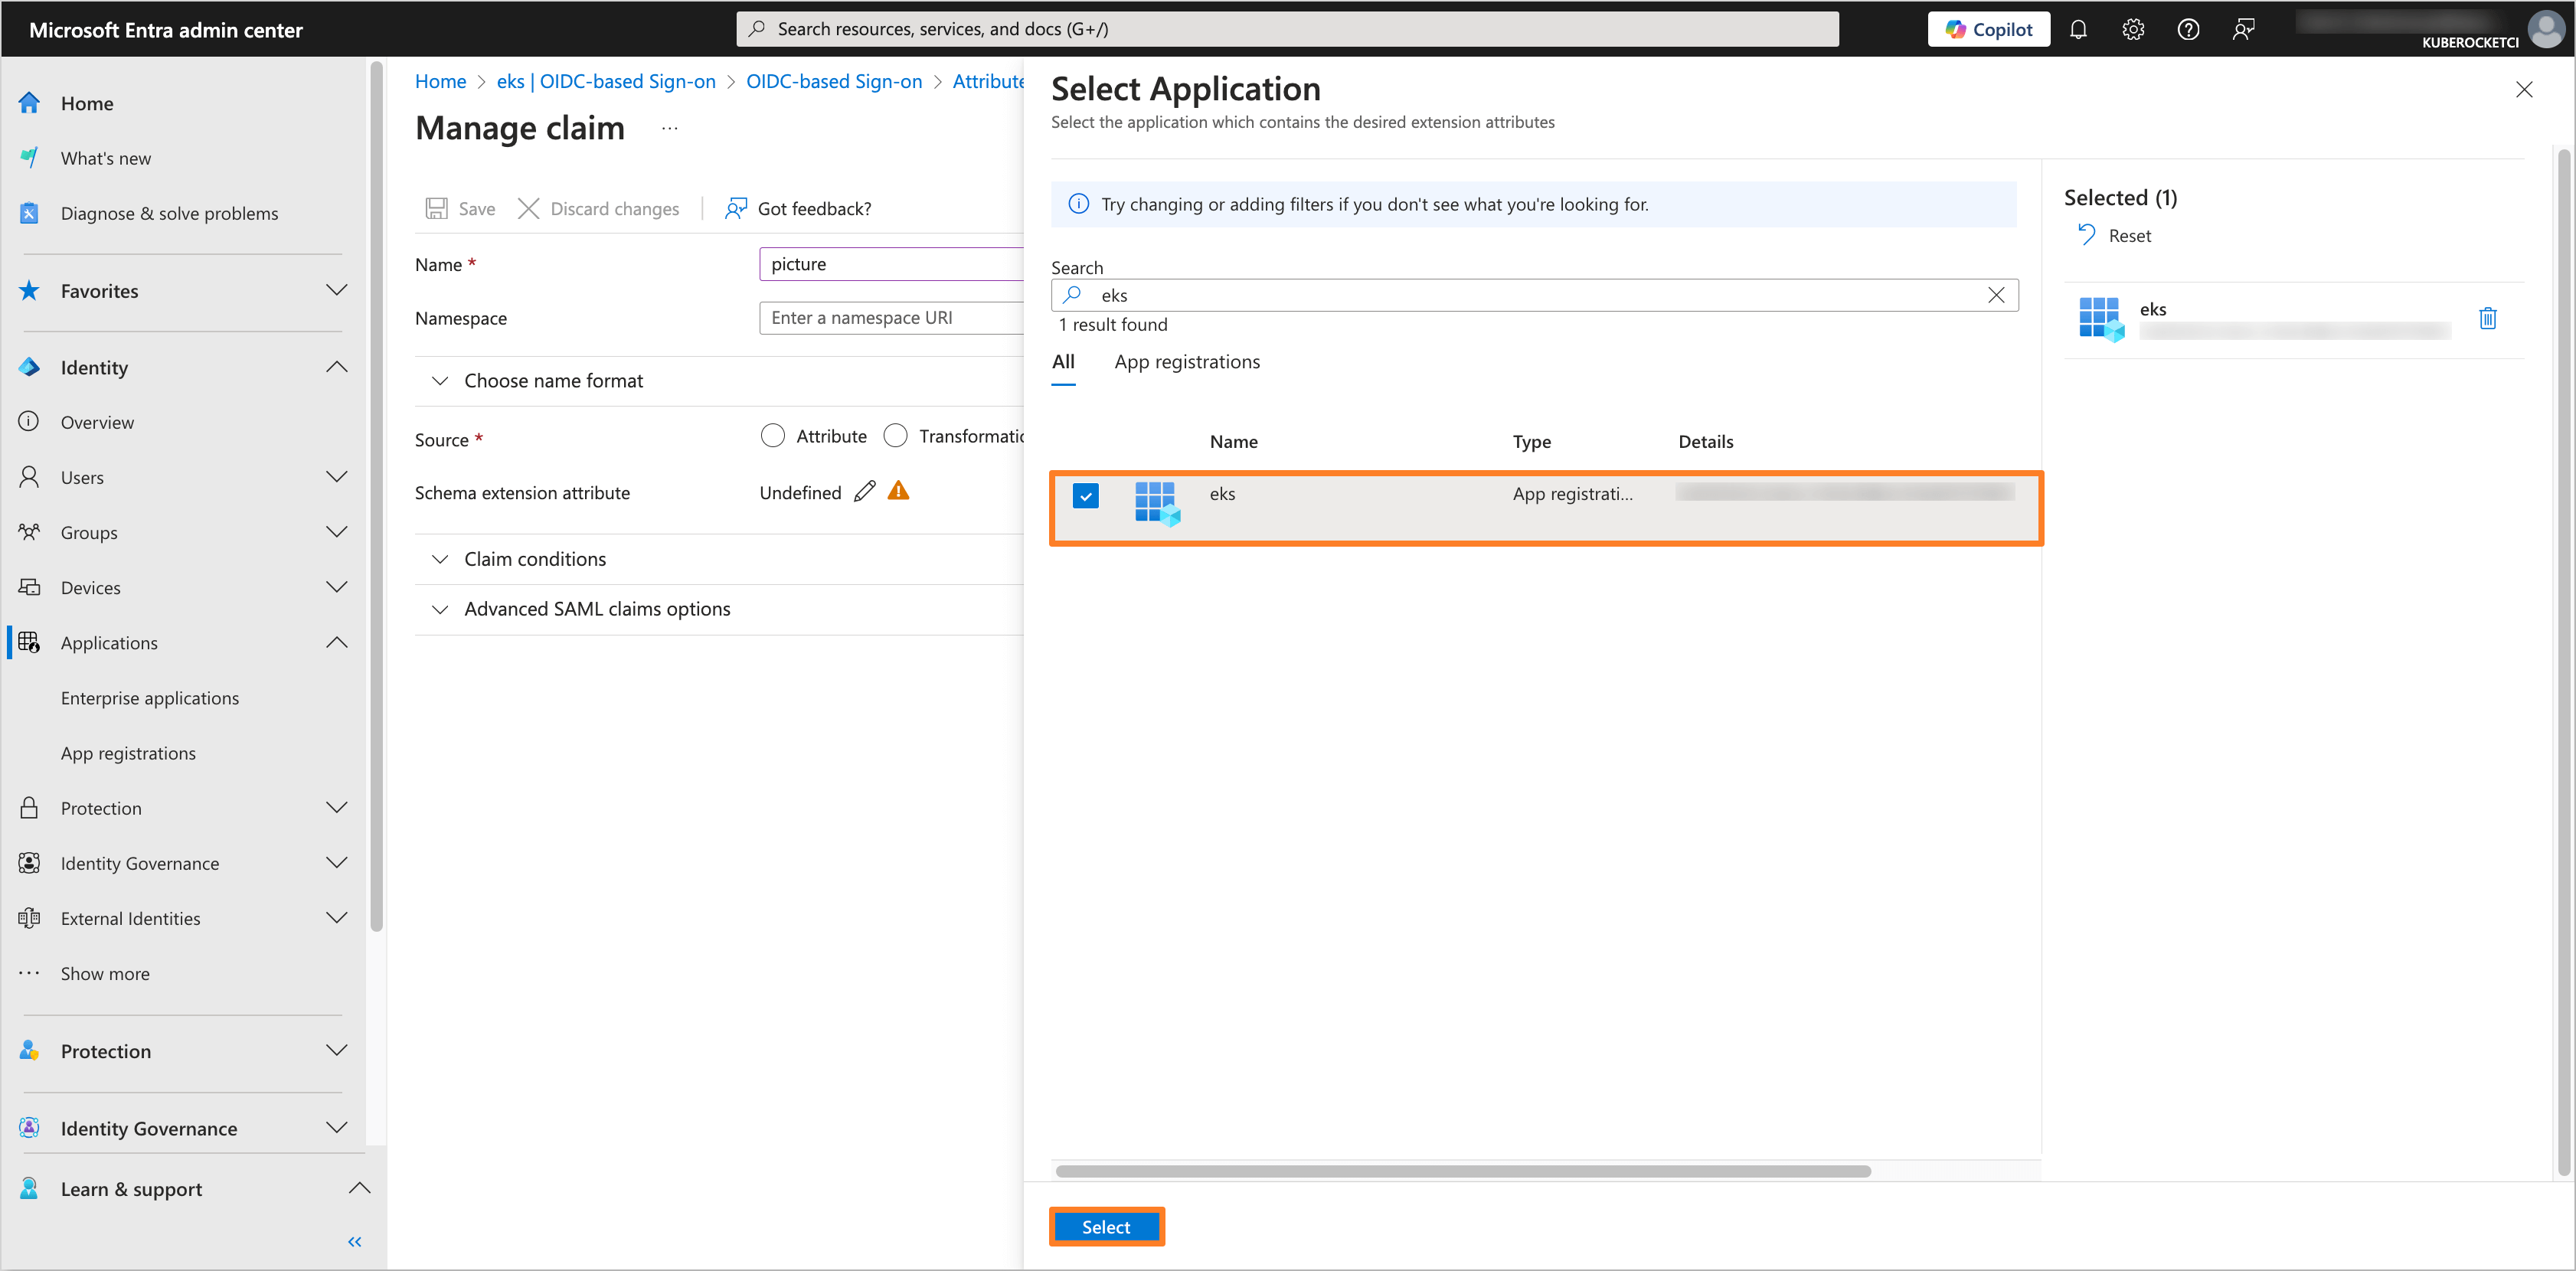
In the Add Extension Attributes tab, select the
user.pictureattribute and click on the Add button.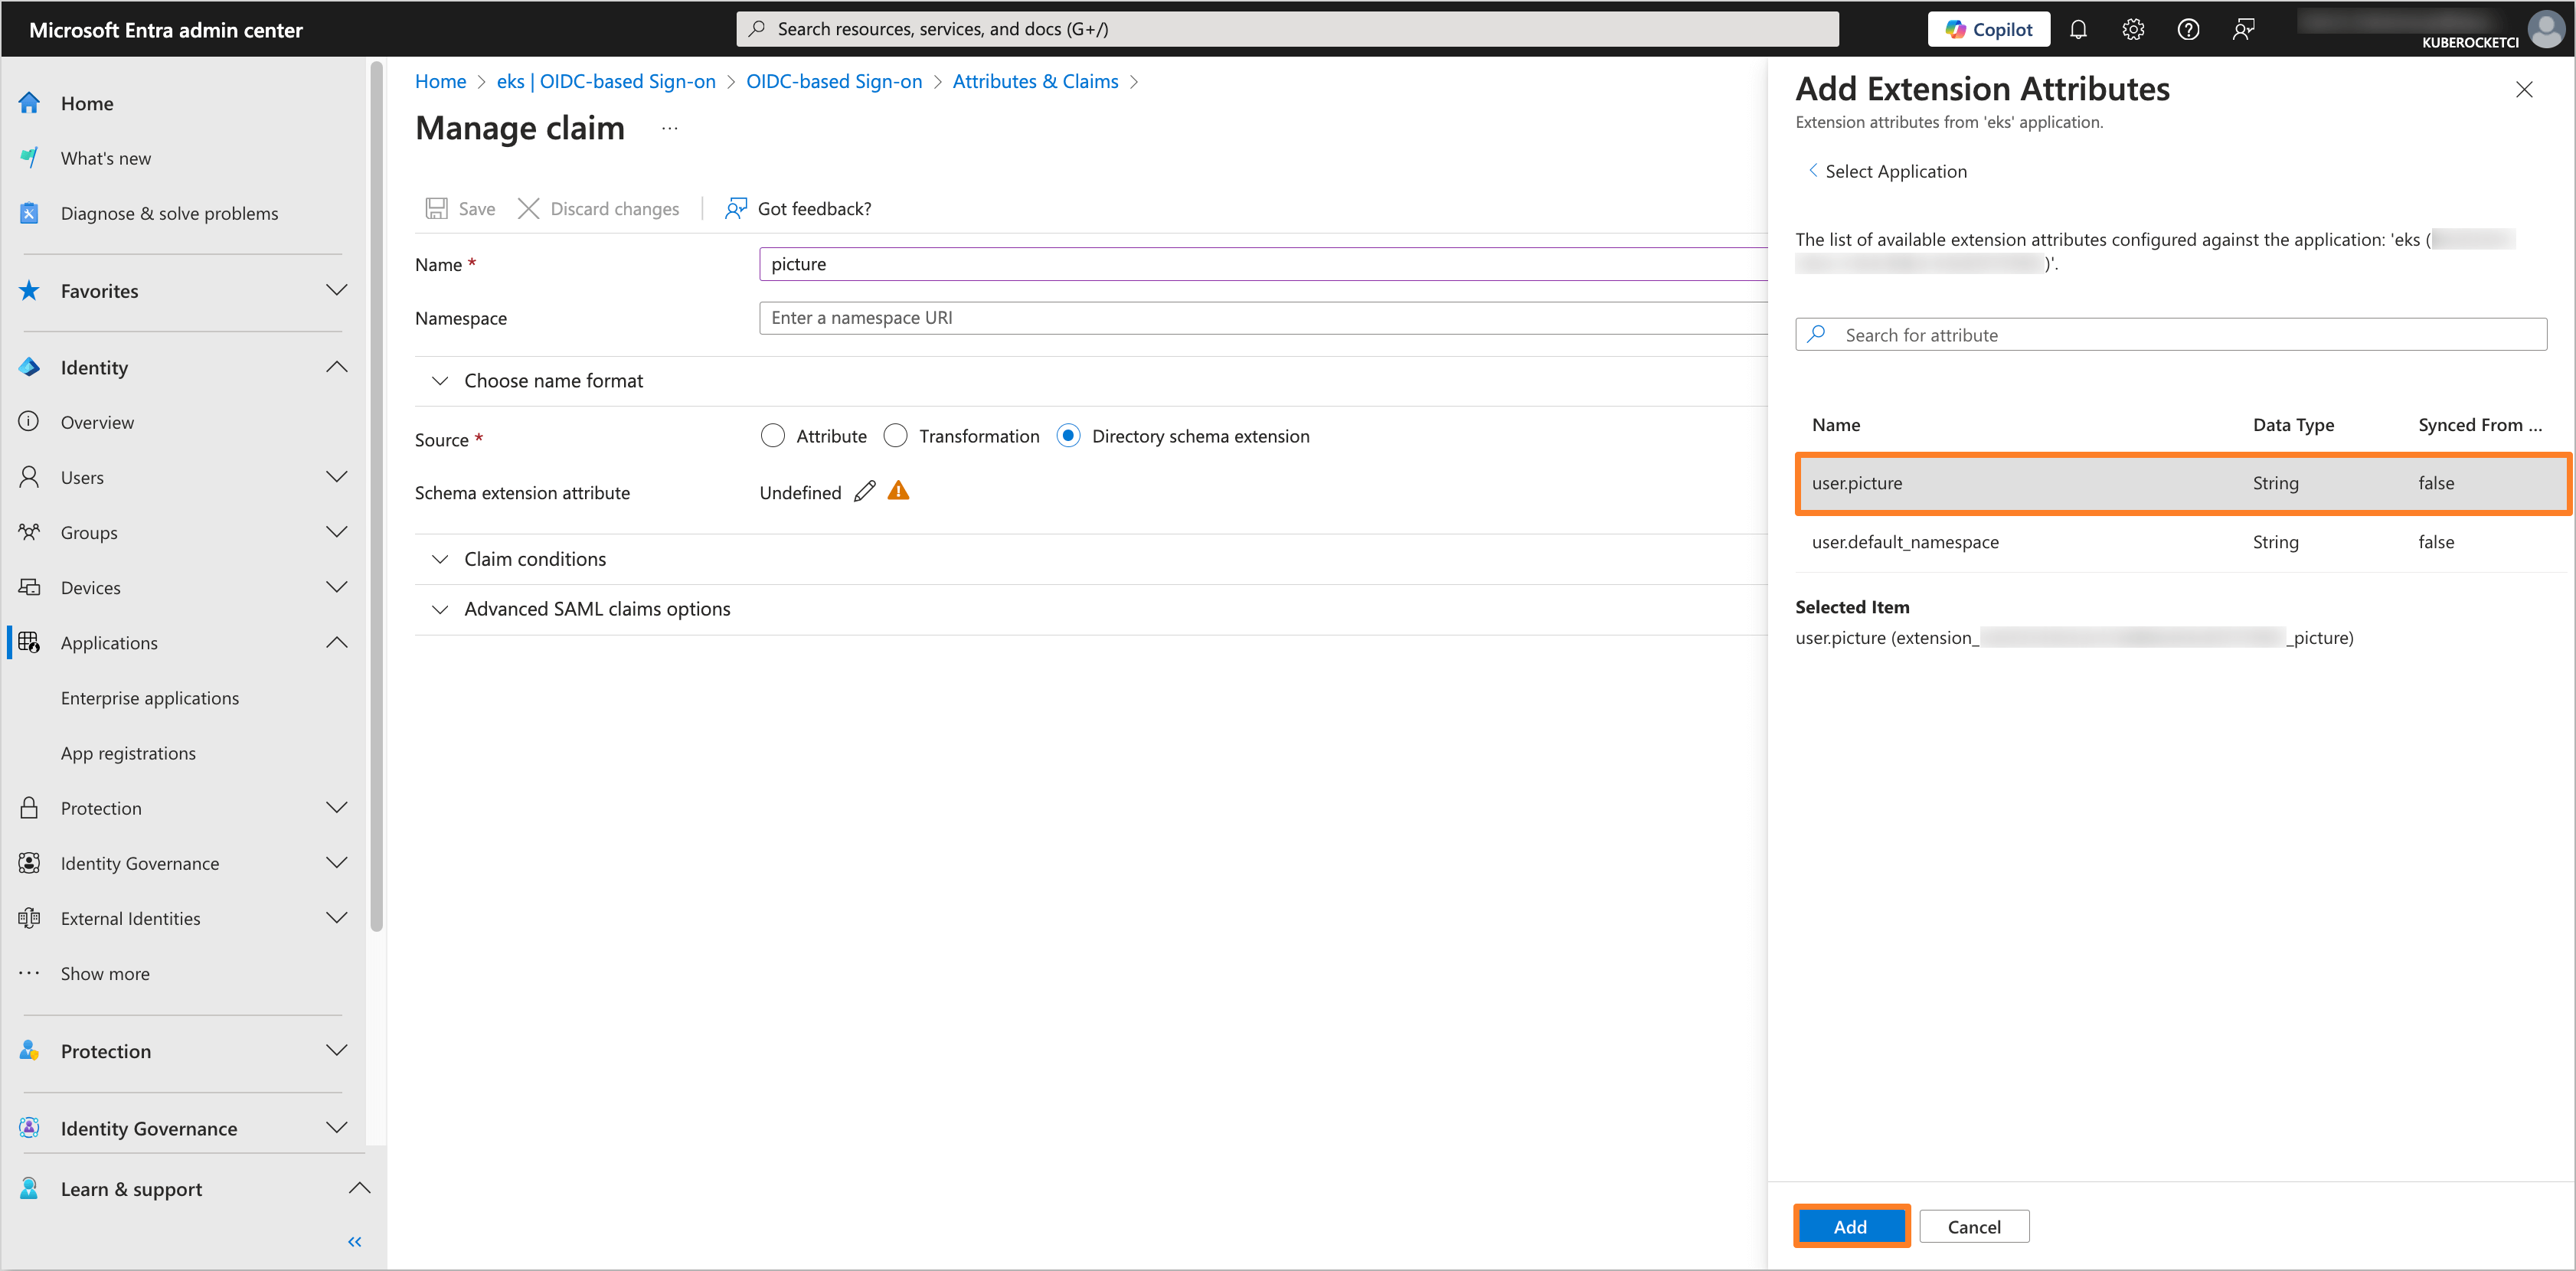
Click on the Save button to apply the changes.
-
In the left sidebar menu, select Applications and navigate to the application created for OIDC integration with AWS EKS and the KubeRocketCI Portal (e.g.,
eks). In the application tab, navigate to the Manifest section.Find the
acceptMappedClaimsparameter and set it totrue. Click on the Save button to apply the changes.
-
(Optional) Get the application access token and verify the
pictureextension attribute by running the following command:noteBefore running the command, ensure that the
Redirect URIin the Microsoft Entra application is set tohttp://localhost:8000.
kubelogin get-token --oidc-issuer-url=https://sts.windows.net/<tenant_id>/ --oidc-client-id=<application_client_id> --oidc-client-secret=<application_client_secret> --force-refreshReplace
<tenant_id>,<application_client_id>, and<application_client_secret>with the corresponding values from the Microsoft Entra application.After that, encode the token using the jwt.io tool and verify the
pictureattribute in the decoded token.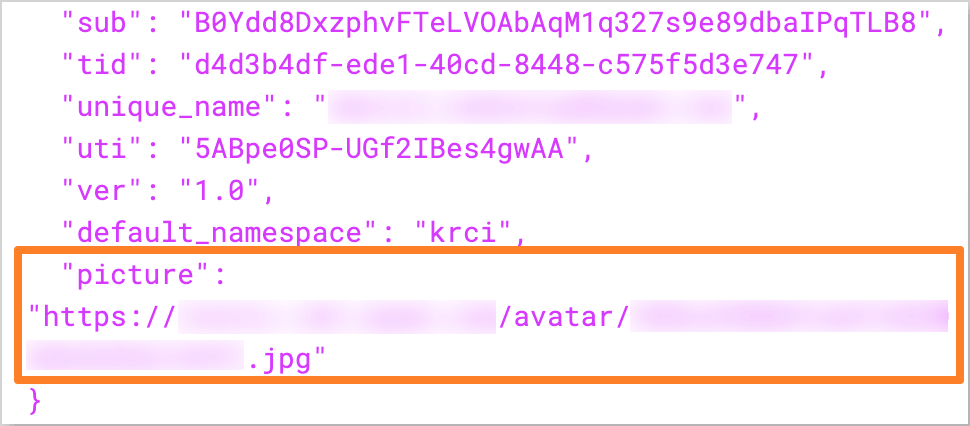
-
After configuring the
pictureextension attribute, the user profile picture will be displayed in the KubeRocketCI Portal.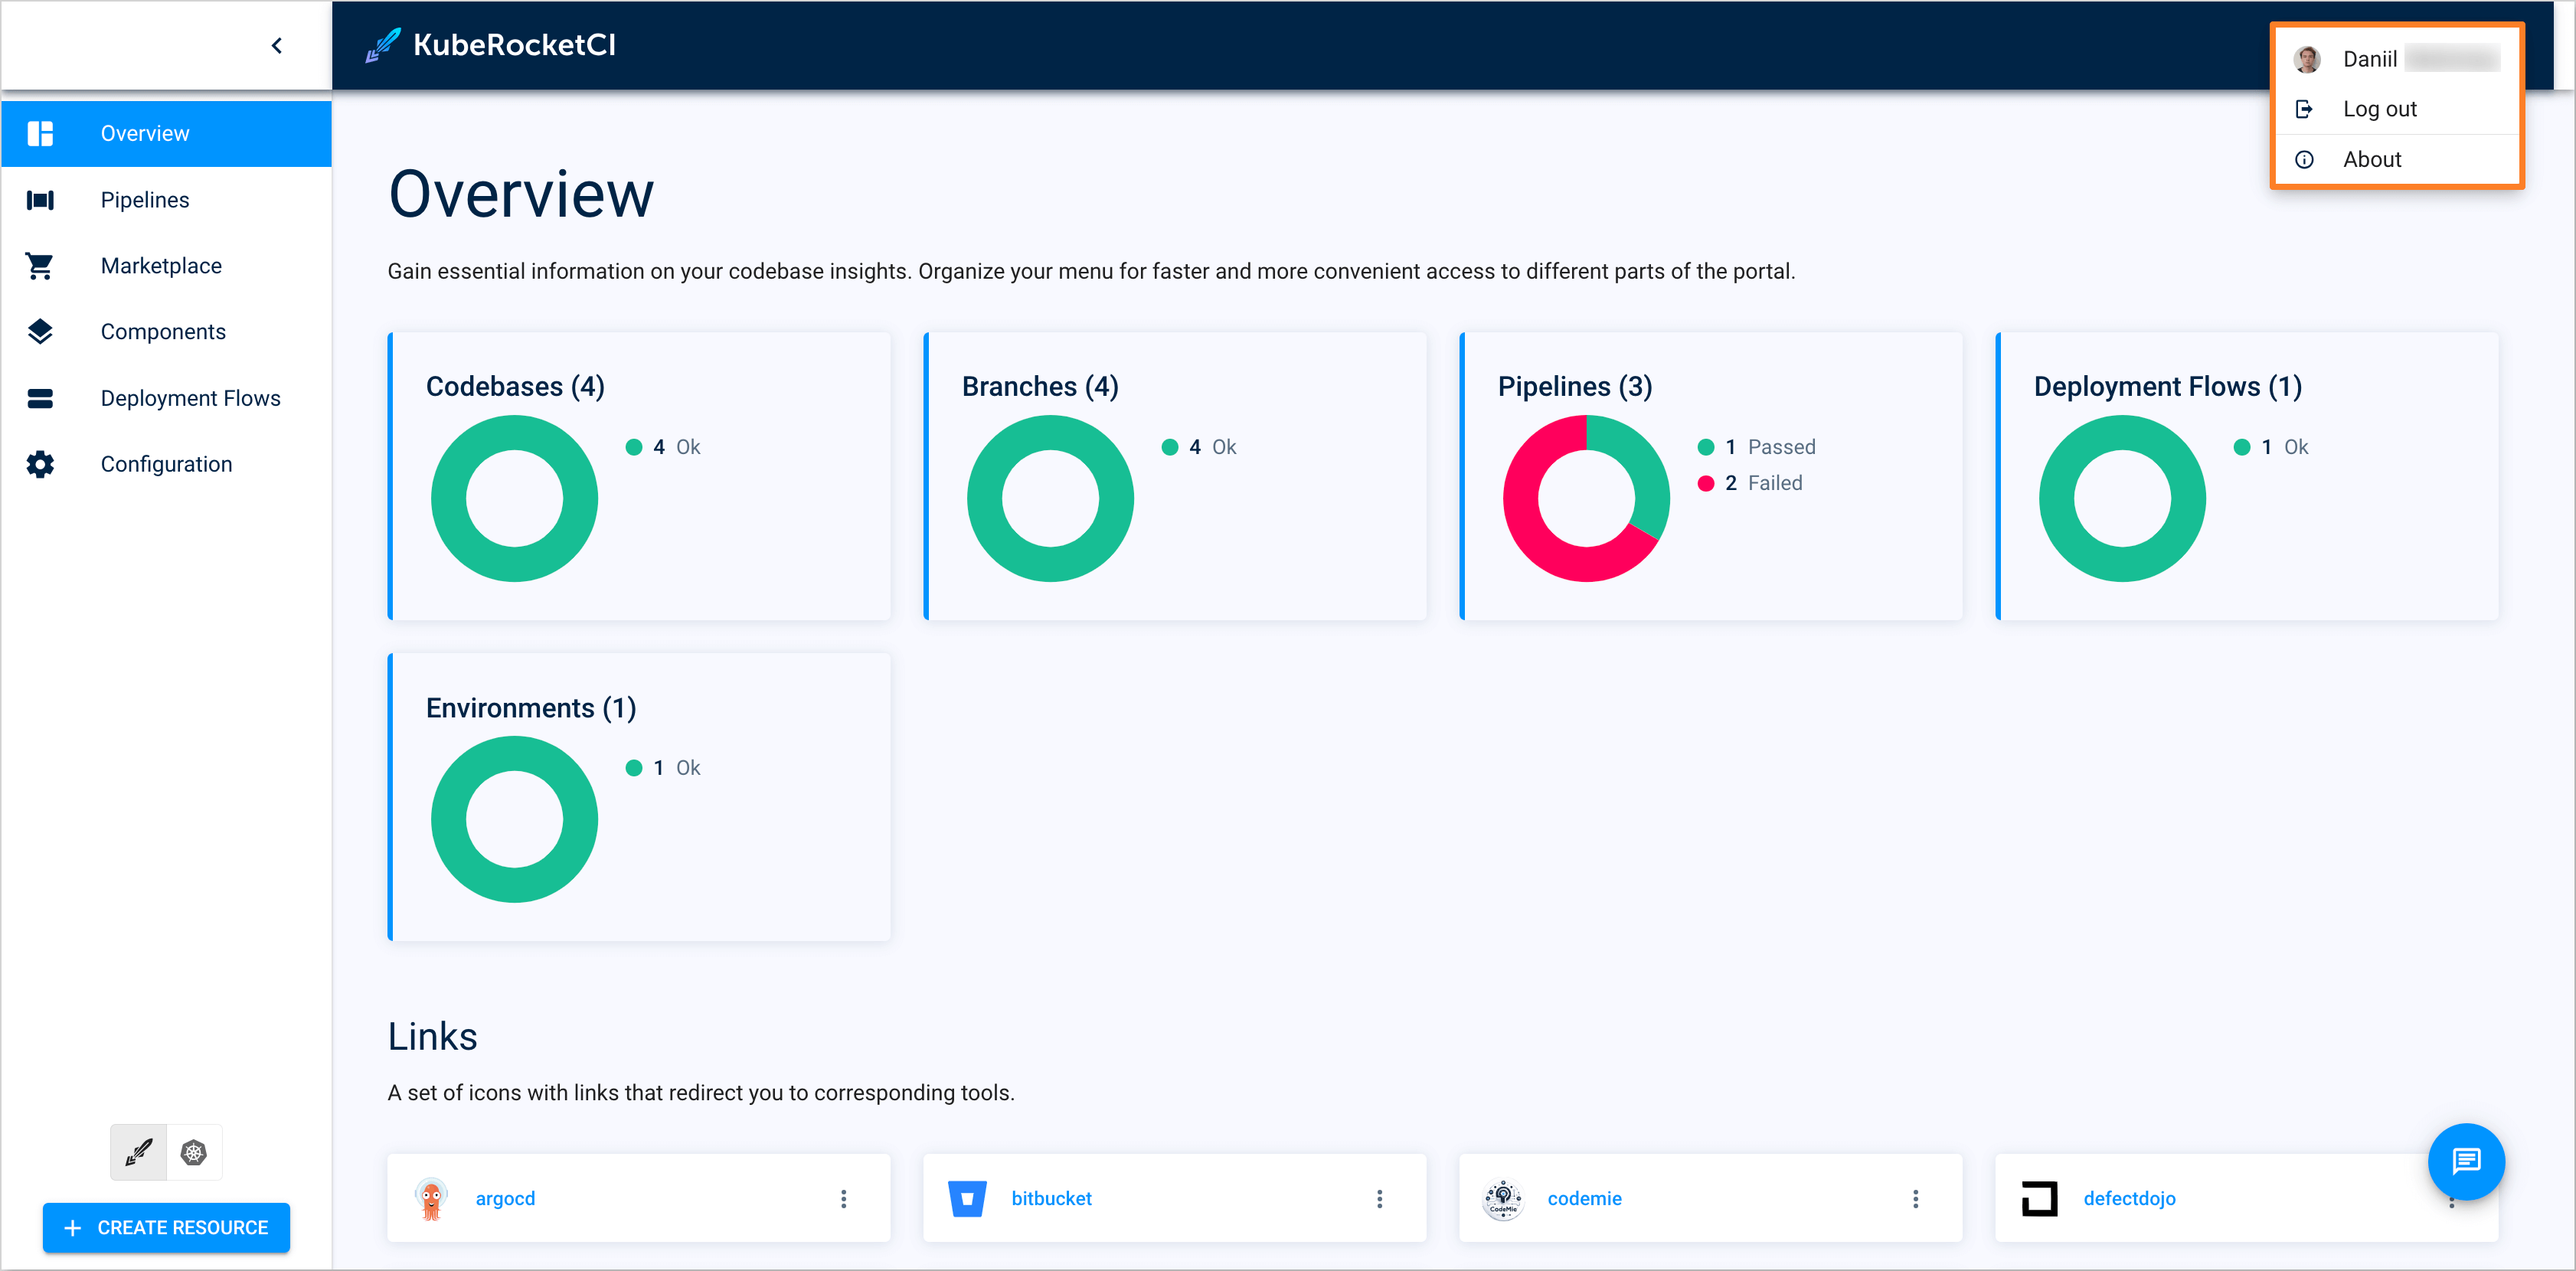
Configure Token Lifetime for Application
The default token lifetime in Microsoft Entra ID is set to 1 hour. This can cause issues for applications needing long-running processes or extended user sessions, leading to frequent re-authentication. To avoid this, a custom Token Lifetime Policy can be created and assigned to the application to extend the lifespan of ID Tokens or Access Tokens, improving the user experience and application efficiency.
Follow the steps below to configure and assign a custom Token Lifetime Policy to the application:
-
Log in to the Microsoft Entra Admin Center.

-
In the left sidebar menu, select Applications and navigate to the application for which the Token Lifetime Policy needs to be configured (e.g.,
eks).
-
In the application tab, navigate to the API permissions section. Click on the Add a permission button. Select Microsoft Graph and then Application permissions. Add the following permissions:
- Policy.ReadWrite.ApplicationConfiguration
- Application.ReadWrite.All
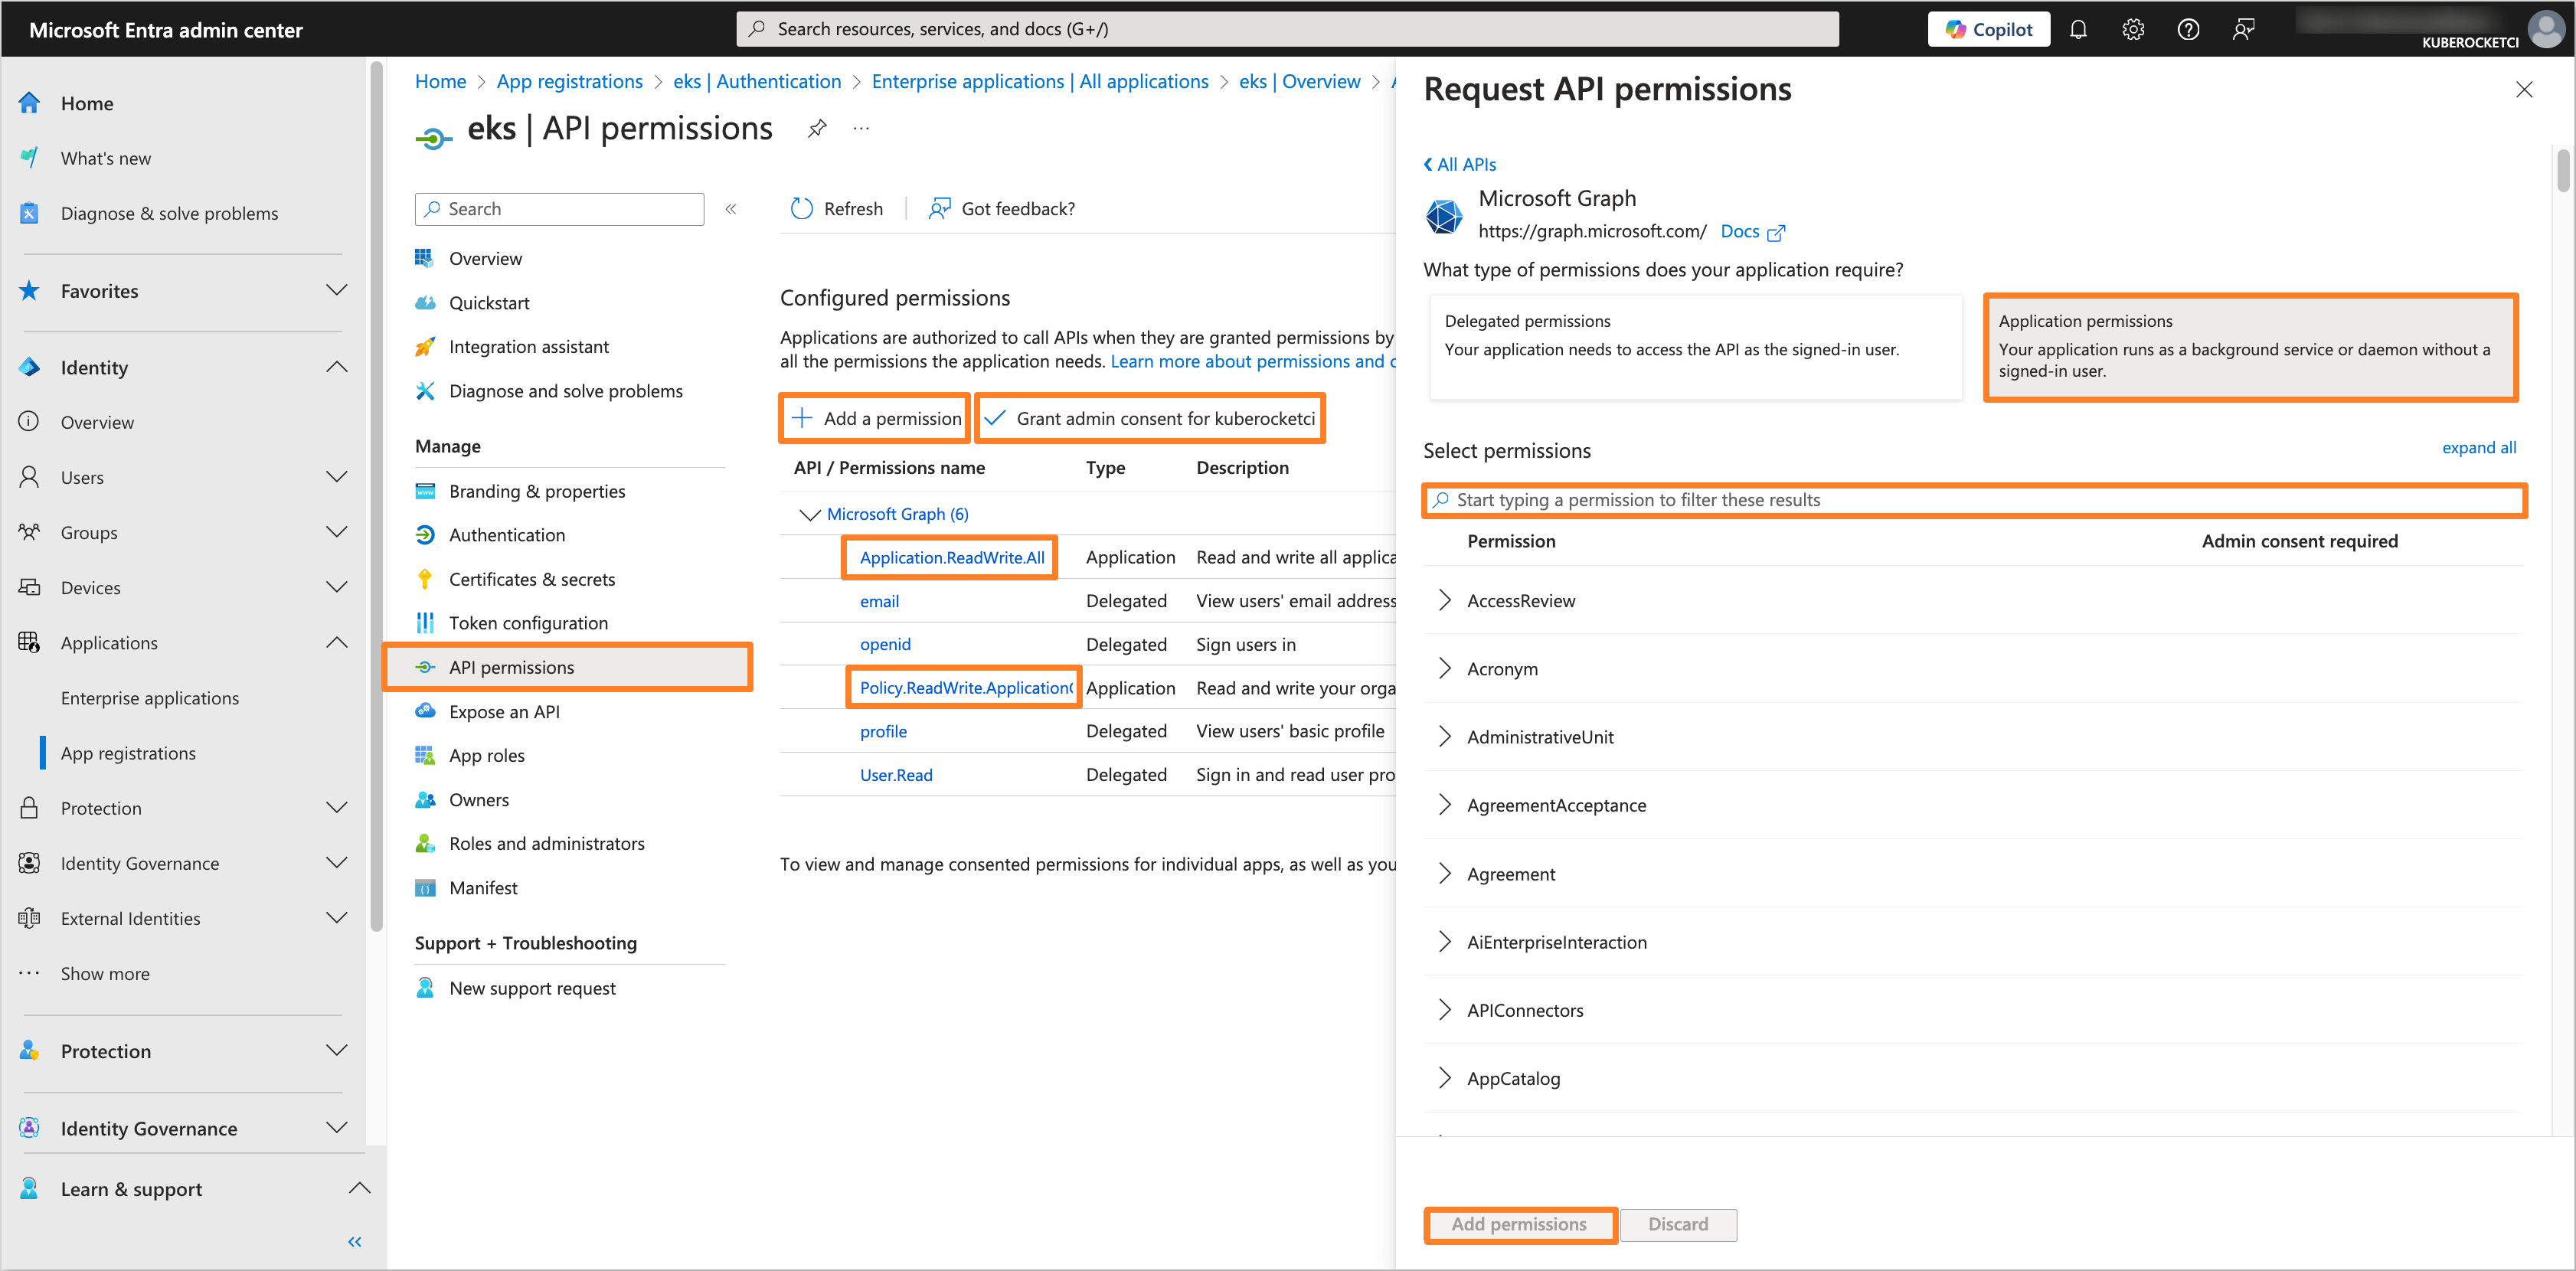
After adding the permissions, click on the Grant admin consent for 'Tenant name' button to grant the required permissions.
-
Navigate to the local terminal and run the following command to get the access token:
noteYou can use the jq tool to parse the JSON response. If you do not have it installed, you can drop the
| jq -r '.access_token'part from the command.curl -X POST "https://login.microsoftonline.com/<tenant_id>/oauth2/v2.0/token" \
-d "client_id=<application_client_id>" \
-d "client_secret=<application_client_secret>" \
-d "scope=https://graph.microsoft.com/.default" \
-d "grant_type=client_credentials" | jq -r '.access_token'Replace
<tenant_id>,<application_client_id>, and<application_client_secret>with the corresponding values from the Microsoft Entra application.Save the access token for further use.
-
Create the custom Token Lifetime Policy by running the following command:
noteThe
AccessTokenLifetimevalue should be set in the formatHH:MM:SS(e.g.,04:00:00for 4 hours).curl -X POST https://graph.microsoft.com/v1.0/policies/tokenLifetimePolicies \
-H "Authorization: Bearer <access_token>" \
-H "Content-Type: application/json" \
-d '{
"definition": [
"{ \"TokenLifetimePolicy\": { \"Version\": 1, \"AccessTokenLifetime\": \"04:00:00\" }}"
],
"displayName": "Custom Access Token Lifetime",
"isOrganizationDefault": false
}'Replace
<access_token>with the saved access token and set theAccessTokenLifetimevalue as needed.After running the command, save the
idvalue from the response for further use.
-
Assign the custom Token Lifetime Policy to the application by running the following command:
noteFor UNIX-based systems, it is necessary to escape the
$character in the\$refvalue.curl -X POST "https://graph.microsoft.com/v1.0/applications/<application_object_id>/tokenLifetimePolicies/\$ref" \
-H "Authorization: Bearer <access_token>" \
-H "Content-Type: application/json" \
-d '{
"@odata.id": "https://graph.microsoft.com/v1.0/policies/tokenLifetimePolicies/<policy_id>"
}'Replace
<application_object_id>,<access_token>, and<policy_id>with the Object ID of the Microsoft Entra application, the saved access token, and theidvalue of the custom Token Lifetime Policy, respectively. -
(Optional) Get the application access or ID token and verify the token lifetime by running the following command:
noteBefore running the command, ensure that the
Redirect URIin the Microsoft Entra application is set tohttp://localhost:8000.
kubelogin get-token --oidc-issuer-url=https://sts.windows.net/<tenant_id>/ --oidc-client-id=<application_client_id> --oidc-client-secret=<application_client_secret> --force-refreshReplace
<tenant_id>,<application_client_id>, and<application_client_secret>with the corresponding values from the Microsoft Entra application.After that, decode the token using the jwt.io tool and verify the
expclaim to check the token expiration time. The lifetime of the token should match theAccessTokenLifetimevalue set in the custom Token Lifetime Policy (e.g., the token should expire after 4 hours after issuance).
-
After configuring the custom Token Lifetime Policy, the application will issue tokens with the extended lifespan as defined in the policy.