Scaffold and Deploy FastAPI Application
Overview
This use case outlines the process of creating and deploying a FastAPI application using KubeRocketCI. The purpose is to provide developers with a streamlined approach to generate a functional code structure for a FastAPI web application, including basic read functionality. The process also allows for customization to meet specific requirements and deployment to a development environment. By utilizing a standardized process for code review, testing, and deployment, developers can save time and effort while ensuring high code quality and reliability. The goal is to empower the development team to release new features and applications more efficiently, while maintaining a high level of code quality and reliability. The KubeRocketCI is used to facilitate this process.
Roles
This documentation is tailored for the Developers and Team Leads.
Goals
- Create a new FastAPI application quickly.
- Deploy the initial code to the DEV environment.
- Check CI pipelines.
- Delivery update using the GitOps approach.
Preconditions
- KubeRocketCI instance is configured with GitOps repo.
- Developer has access to the KubeRocketCI instances using the Single-Sign-On approach.
- Developer has merge permissions in the GitOps repository on GitHub.
Scenario
To scaffold and deploy FastAPI Application, follow the steps below.
Scaffold the New FastAPI Application
-
Open the Portal URL. Use the Sign-In option.

-
Ensure
Namespacevalue in the User Account settings tab points to the namespace with the KubeRocketCI installation.
-
Create the new
Codebasewith theApplicationtype using theCreate from templatestrategy. Select the Components section and press the Create component button.
-
Choose the Application Codebase type as we intend to deliver our application as a container and deploy it within the Kubernetes cluster. Click the Next button.

-
Opt for the Create from template strategy to scaffold our application from the template provided by the KubeRocketCI and press the Create button:

-
On the Add component info tab, define the following values and press the Next button:
- Git server:
github - Repository name:
{github_account_name}/fastapi-demo - Component name:
fastapi-demo - Description:
fastapi-demo - Application code language:
Python - Language version/framework:
FastAPI - Build tool:
Python

- Git server:
-
On the Specify advanced settings tab, define the below values and push the Create button:
- Default branch:
main - Codebase versioning type:
edp - Start version from:
0.0.1andSNAPSHOT

- Default branch:
-
Check the application status. It should be green:

Deploy Application to the Development Environment
This section outlines the approach for deploying the application from the latest commit on the main branch. The following steps are involved:
-
Build the initial version of the application from the last commit on the
mainbranch. This version is generated from the provided template. -
Set up a
CD Pipelineto enable continuous delivery to the development environment. -
Deploy the initial version of the application to the development environment.
To succeed with the steps above, follow the instructions below:
-
Build Container from the latest branch commit. To build the initial version of the application's
mainbranch, go to the Components -> fastapi-demo -> Branches -> main and press the Trigger build pipeline run button.
-
Build pipeline for the
fastapi-demoapplication starts.
-
Track Pipeline's status by clicking the fastapi-demo-main-build-zwpj pipeline link.

-
Ensure that Build Pipeline was successfully completed.
-
To enable application deployment create a CD Pipeline with a single environment - Development (with the name
dev). -
In the UI Portal, navigate to Environments tab and push the Create environment button to create pipeline.

-
In the Create environment dialog, define the below values:
-
Pipeline tab:
- Pipeline name:
mypipe

- Pipeline name:
-
Applications tab. Add
fastapi-demoapplication, selectmainbranch, and leavePromote in pipelineunchecked:
-
Stages tab. Add the
devstage with the values below:- Cluster:
In cluster - Stage name:
dev - Description:
Development Environment - Trigger type:
Manual. We plan to deploy applications to this environment manually - Pipeline template:
deploy - Quality gate type:
Manual - Step name:
approve - Push the
Applybutton

- Cluster:
-
-
Deploy the initial version of the application to the development environment:
- Open CD Pipeline with the name
mypipe. - Select the
devstage from the Stages tab. - Push the Configure deploy button.
- In the Select image tag field select version
0.0.1-SNAPSHOT.1and push the Start deploy button.

- Open CD Pipeline with the name
Check the Application Status
To ensure the application is deployed successfully, follow the steps below:
-
Ensure application status is
HealthyandSynced, and theDeployed versionpoints to0.0.1-SNAPSHOT.1:
-
Check that the selected version of the container is deployed on the
devenvironment.${EDP_ENV}- is the EDP namespace name:# Check the deployment status of fastapi-demo application
$ kubectl get deployments -n ${EDP_ENV}-mypipe-dev
NAME READY UP-TO-DATE AVAILABLE AGE
fastapi-demo 1/1 1 1 14m
Deliver New Code
This section describes the code delivery process. We need to deploy our fastapi-demo application that deploys Ingress object to expose API outside the Kubernetes cluster.
Within the GitOps repository, follow the naming convention <pipeline-name>/<stage-name>/<application-name>-values.yaml to create the chart values file. For our case, use mypipe/dev/fastapi-demo-values.yaml as the file name.
Commit mypipe/dev/fastapi-demo-values.yaml file to the default branch of the GitOps repository:
ingress:
  enabled: true
-
Deploy
fastapi-demoapplication to the Environment. Before the new version deployment, check the ingress object indevenvironment:$ kubectl get ingress -n ${EDP_ENV}-mypipe-dev
No resources found in ${EDP_ENV}-mypipe-dev namespace.No ingress object exists as expected.
-
Deploy
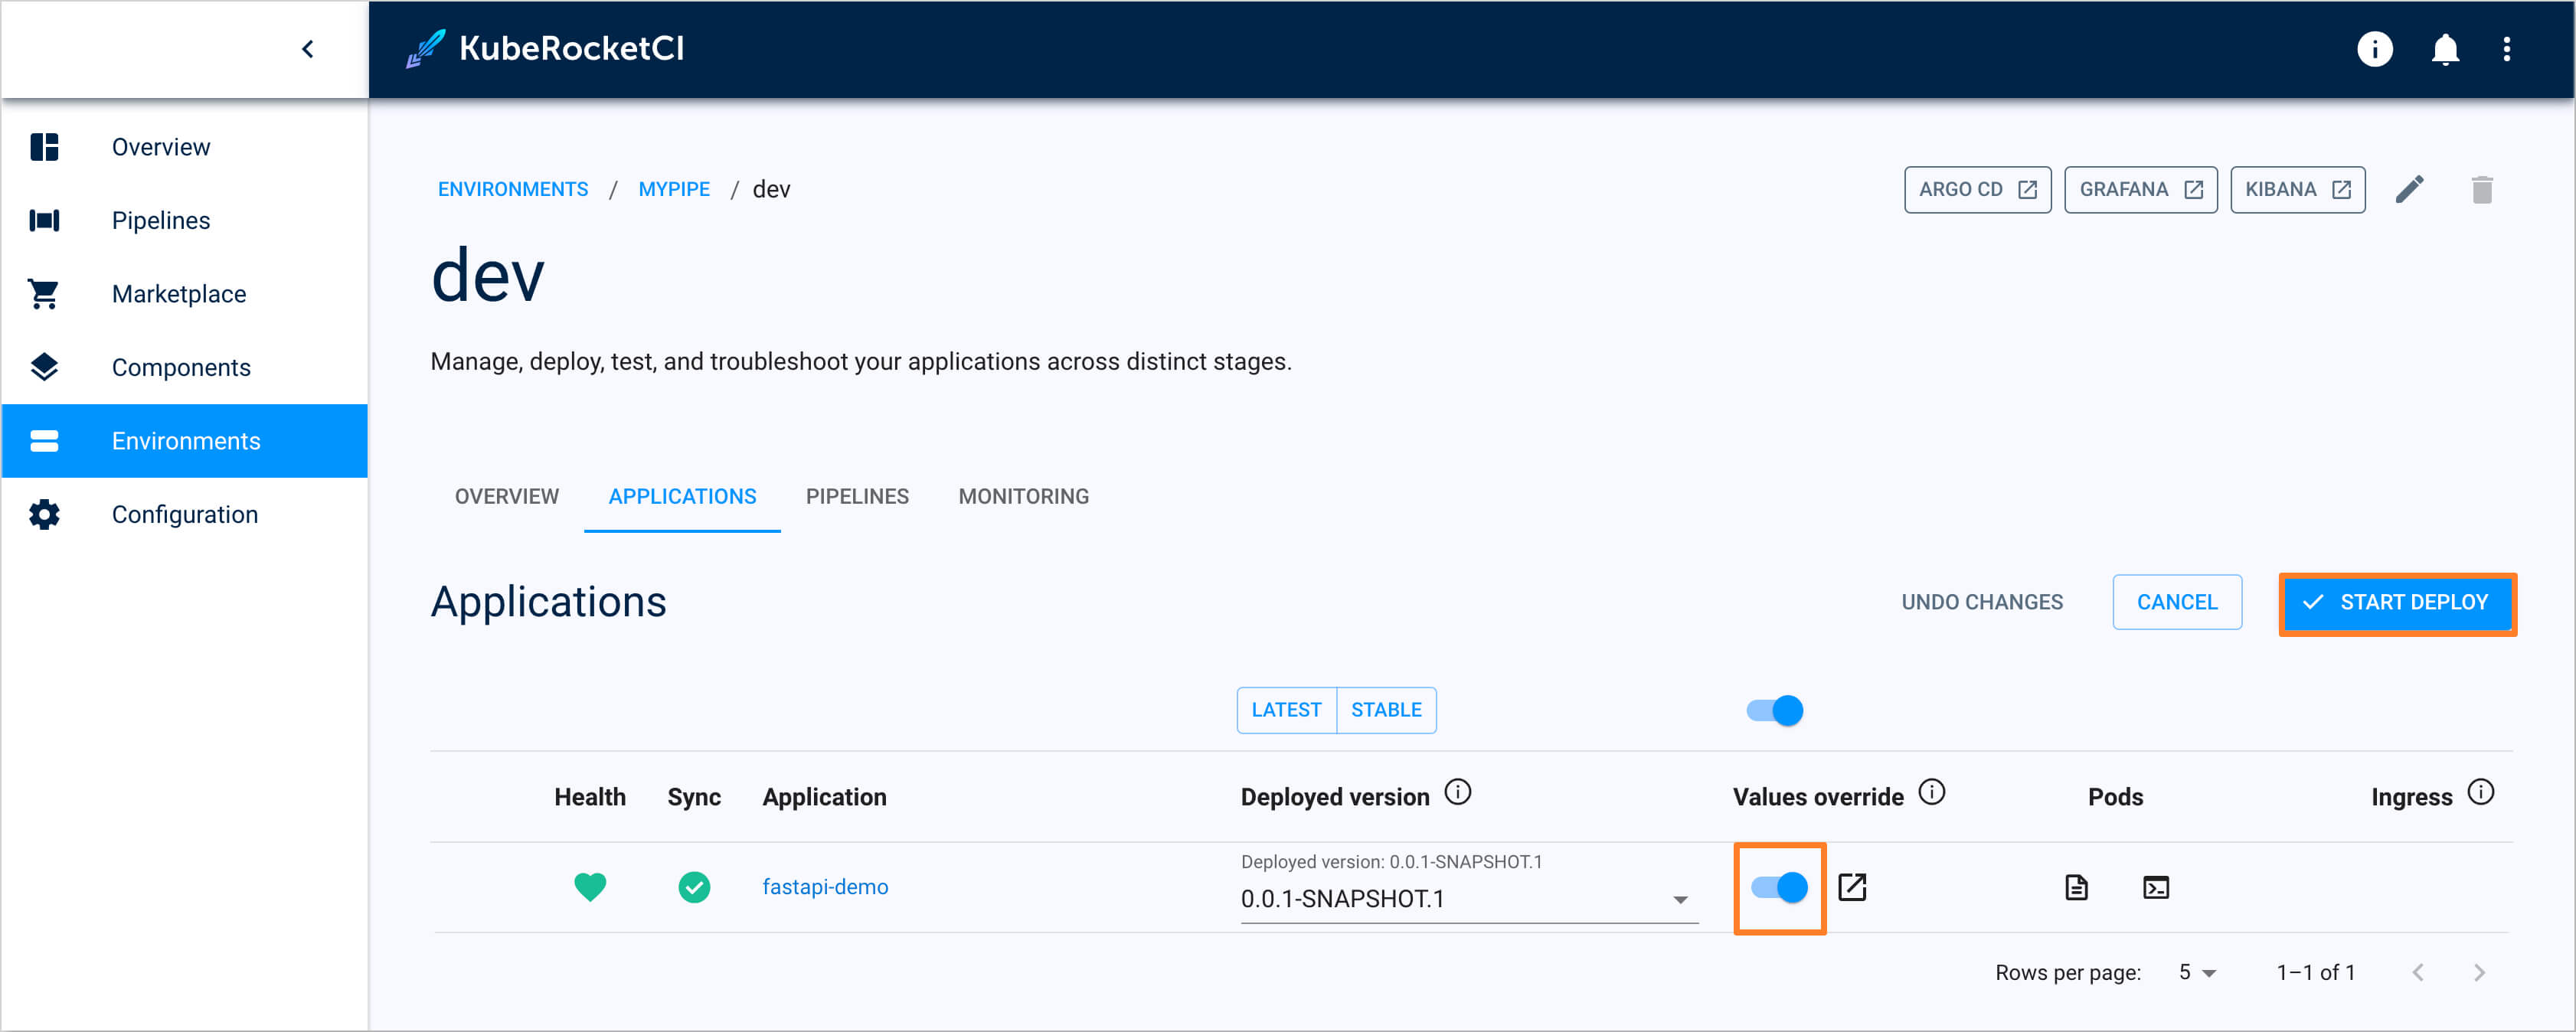
fastapi-demoapplication which has the ingress object in place. Since we useManualdeployment approach, we perform version upgrade by hand.To ensure our application recognizes the changes in the GitOps repository related to enabling the creation of the
Ingressresource, we need to set the Override values checkbox totruebefore deploying.- Go to the Environments section of the UI Portal, select
mypipeand choose dev stage. - In the Select image tag section select the version
0.0.1-SNAPSHOT.1 - Set the Override values checkbox to
trueand push the Start deploy button. - Check that the application is deployed: application status is
HealthyandSynced.
- Go to the Environments section of the UI Portal, select
-
Check that the new version with Ingress is deployed:
# Check Ingress object
kubectl get ingress -n ${EDP_ENV}-mypipe-dev
NAME           CLASS    HOSTS                                     ADDRESS          PORTS   AGE
fastapi-demo   <none>   fastapi-demo-ko1zs-example.com         10.100.182.134        80    14m

# Check application external URL
curl https://your-hostname-appeared-in-hosts-column-above.example.com/
{"Hello":"World"}